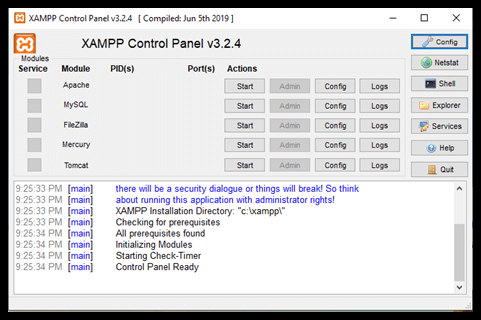
XAMPP CONTROL PANELThis article defines the term XAMPP Control Panel and its utility. XAMPP Control Panel is a management tool that offers to supervise the actions of individual components of XAMPP. It controls each component of the text server. The user can initiate or halt discrete modules by operating upon the buttons below the "Actions" column. Control panels efficiently manage all the components of the XAMPP package. One can use the Control Panel to determine whether Apache, MySQL, Mercury, etc. are currently in function or not. The development environment can only be used when Apache and MySQL are in running state. The XAMPP Control Panel icon exists in the system tray. It is an orange-colored icon that is visible when Panel is in running state. If in case it is not visible, then, to launch the Control Panel follow the following steps: 
Go to All Programs → Apache Friends → XAMPP → XAMPP Control Panel. In case it's already in running state, you will receive an Error! Message. The functionality of the Control PanelThe XAMPP Control Panel accommodates several buttons, such as config, help, net stat, quit, shell, explorer, and services. Each button and its functionality is defined below:- 
This button is used to configure the XAMPP as a whole, as well as its discrete components. 
This button offers you to show all the processes currently active on your system. 
This button permits opening the UNIX shell. 
This button is used to open the XAMPP folder in Windows Explorer. 
This button assists in showing all the services that are currently active in the back-end. 
This button assists the user by providing links to the user forums. 
As the name suggests, this button is used to leave the XAMPP Control Panel. Operating XAMPP Control PanelThis part of the article deals with the steps used to operate the Control Panel to manage the start-stop actions for MySQL and Apache. STEP 1- Open the XAMPP Control Panel by clicking on the shown icon In case the icon is not visible then, go to: All Programs → Apache Friends → XAMPP → XAMPP Control Panel. 
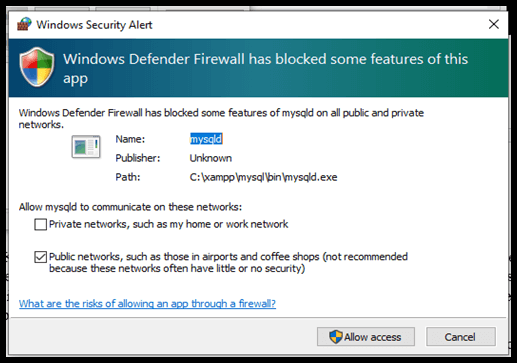
STEP 2- Click Start button corresponding to Apache and MySQL. It is strongly advised to NOT MARK the Service checkboxes on the leftmost end because running these modules as a service may cause a clash with other applications or servers that share standard ports. Establishing and terminating services physically is considered better when one does not include the Apache and MySQL components to run for a considerable time. STEP 3- Initially, while starting Apache or MySQL, Windows security will question you to Allow access to the servers on your local network in order to unblock the servers and grant access to the system. 
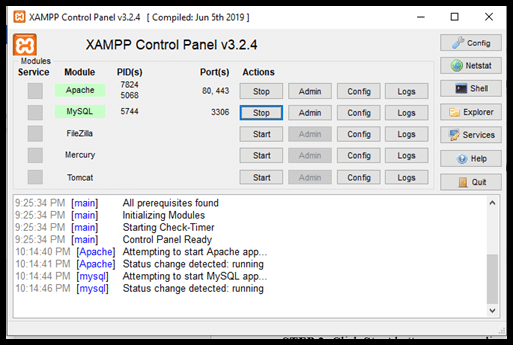
STEP 4- The "Actions" button is a toggle button that switches between Start/Stop. The Port information is also available corresponding to the modules once they are active. 
STEP 5- Click the Close × button in at the upper right end, which will enable XAMPP to run in the background. It will now be accessible through the Notification area. STEP 6- To manage the XAMPP Control Panel while running in the background, you can simply right-click the XAMPP icon in the notification area and start/stop components without opening it. STEP 7- Admin and Config buttons for Modules- Admin: In the case of Apache, it opens XAMPP for Windows Admin page in the default browser, and for MySQL, it redirects to PHPMyAdmin in the default browser. Config: In the case of Apache, it provides access to apache folders and configuration files, like httpd.conf, and for MySQL, it grants access to MySQL database folders. STEP 8- In order to suspend the running of any of the components like Apache or MySQL, click the "Stop" button corresponding to the module you wish to stop. STEP 9- To stop the Control Panel from running as a background application, click on the "Quit" button at the lower right end. This will remove the XAMPP Launcher from the Notification Bar. To operate again, XAMPP Control Panel needs to be Re-launched.
Next TopicTesting XAMPP Installation
|
 For Videos Join Our Youtube Channel: Join Now
Feedback
- Send your Feedback to [email protected]
Help Others, Please Share


