| |

Inventory Management in Magento 2Efficient stock management is essential in eCommerce. Setting up the stock for our products is the smart solution to make the shopping online more professional. Inventory allows us to set a product's stock quantity. We can manage the stock for any product at our store that we need. We should always be aware of the quantity of the goods in our store and take the inventory of our store under control. For example - If you have a product with 150 units in the stock, but you set the stock availability to "Out of Stock". In that case, it will force the item to be out of stock. In this section, we will see how to configure and manage the inventory setting in Magento 2 with practical implementation. There are two approaches to stock management in Magento 2.
Therefore, we can control all products' general inventory settings or can deal with each product individually. Both approaches are required to achieve ultimate efficiency. To setup Stock in Magento 2The Stock Options can be active for all products in the catalog, and the quantity in the stock is continuously updated. In addition, Stock Options help us to drive more new clients shopping at our store, not only those who purchase a huge quantity of the products. Instead of taking whole from our inventory, we are able to set the maximum for an order. To set up the stock in Magento 2, follow the below steps: Step 1: On the left sidebar of Magento 2 Admin Panel, Go to STORES >> Settings >> Configuration. 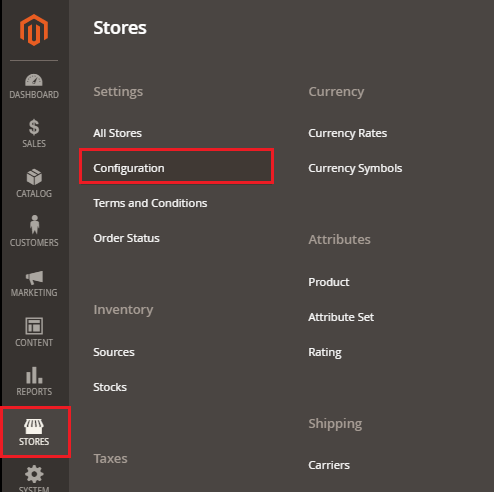
Step 2: Expand the Catalog tab and click on Inventory, i.e., Catalog >> Inventory. From here, we can manage the Stocks Options and Products Stock Options. 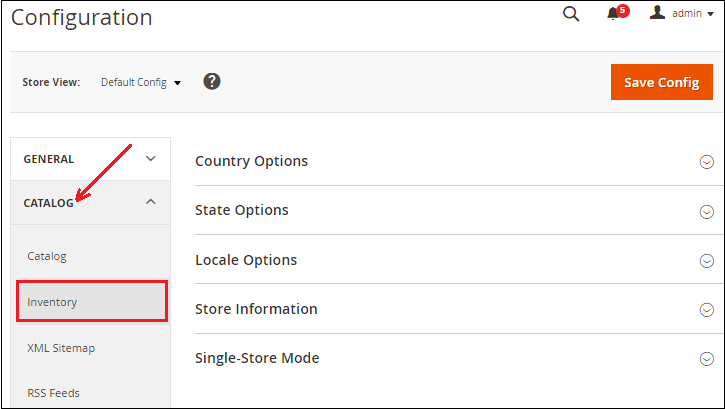
Step 3: Expand the Store Options and provide the required details as needed in the given fields to set up the inventory. 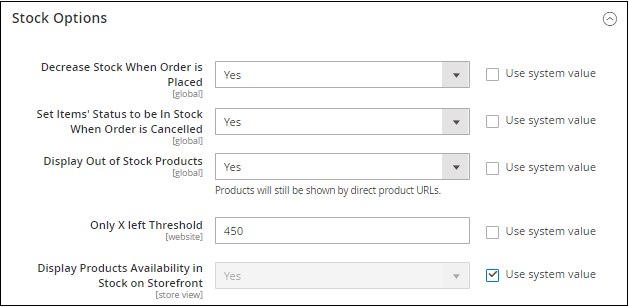
Decrease Stock When Order is placed - Set Yes to decrease the stock quantity of the product in the shopping cart when order is placed. Set Item's Status to be Stock When Order is Cancelled - Enable this option by setting Yes in this field to put items back in stock from canceled orders. Display Out of Stock Products - Set this field to Yes if you allow showing the product in the catalog even if it is not available in the stock. Select No if you don't want to show the products in Catalog, which are out of stock. Only X left Threshold - Enter the number of products left in the stock. In the Store View, "Only X left" will show for the buyers, e.g., only 3 left. Display Products Availability in Stock on Storefront - Make the quantity In Stock or Out of Stock visible on the product detail page by setting the Yes in this field. Step 4: Click on the Save Config to finish. Setup Product Stock in Magento 2Now, move to the Product Stock Options. The Product Stock Options mean the inventory setting at the product level. However, the Product Stock settings apply only for a single product rather than all items in a cart means that these settings are applied individually to the products in the cart. This tab contains the settings related to managing the stock for the individual product. To set up the Product in Magento 2, follow the below steps: Step 1: On the Admin Panel, Go to STORES >> Settings >> Configuration. Step 2: Expand the Catalog tab and click on Inventory, i.e., Catalog >> Inventory. Step 3: Expand the Product Store Options and provide the required details as needed in the given fields to set up the inventory. 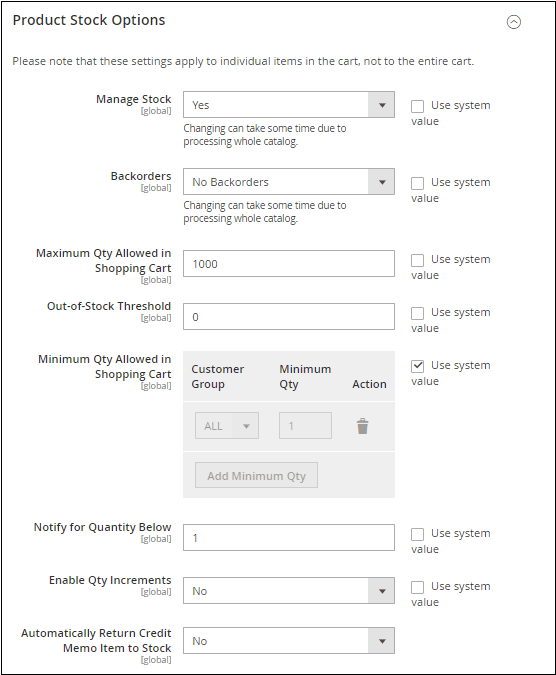
Manage Stock: By default, Yes is set to this field, and it is used to count or track the products in stock. It can be set to No if the stock quantity of a product does not matter. Backorders: It determines how the backorders are managed. The backorders do not change the processing status of the order. In the backorders field, we have three choices, i.e.:
Maximum Qty Allowed in Shopping Cart - Enter the maximum quantity for a product that can be allowed in one shopping cart. It determines the maximum number of products, which can be purchased in a single order at a time. Out of Stock Threshold - It determines the stock level at which a product is treated as out of stock. So, it helps to determine a product is required to order. Minimum Qty Allowed in Shopping Cart - Enter the minimum quantity for a product that can be required to place an order. It determines the minimum number of products, which can be purchased in a single order. It also has an advanced option to set different limits for different groups. 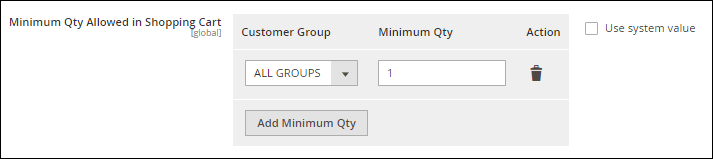
To set the different limits for the different groups of the customer, we can define the minimum quantity for them. We can even delete the action if we don't need and add several options. Notify for Quantity below - This field notifies when the number of products goes down to the set limits. It triggers a warning of low stock. This amount is deducted from the salable quantity instead of inventory quantity. Enable Quantity Increment - This field determines if the product can be sold in quantity increment. Enabling this field allows the customers to buy the product only in quantity set by the admin. Automatically Return Credit Memo Item to stock - By enabling this option, automatically will get an out-of-stock status for the products when they are returned back to cart after canceling the order. Step 4: Fill the required information in the given fields and click on the Save Config button to finish. |
 For Videos Join Our Youtube Channel: Join Now
Feedback
- Send your Feedback to [email protected]
Help Others, Please Share


