| |

DHCP (Dynamic High Configuration Protocol)The DHCP stands for Dynamic Host Configuration Protocol. It is a network management protocol used on IP networks. A DHCP server is used to assign an IP address and other configurations to the connected devices on the network to communicate with others. DHCP server allows a system to request IP addresses and other networking parameters automatically from the internet service provides. It reduces the network administrator's work. When the DHCP server is absent, the IP address for a computer or other device needs to be manually assigned. But, later, these devices can not be connected outside the local subnet. A DHCP can be implemented on home networks to wide area networks and region ISP networks. Most of the home networks receive a globally unique id within the ISP ( Internet Service Provider) networks. For the local networks, DHCP assigns a local IP address to every connected device within the network. We can also use the routers as a DHCP server. There are millions of devices in the world, and each individual device needs a unique IP address. The TCP/IP protocol supports a built-in DHCP protocol. So, it automatically assigns a unique IP address to each connected device and keeps tabs of them. Almost all IP addresses are dynamic. The DHCP protocol is a part of the application layer of the TCP/IP protocol. Components of DHCPLet's understand it's components to get more about the DHCP server. The DHCP server's components are as following: DHCP server: It is a networked device that allows us to run the DHCP service, which keeps IP address and other configurations. Usually, it is a router or server, but it could be anything that acts as a host, for example, an SD-WAN appliance. DHCP client: The DHCP client is an endpoint that receives data from the server. It can be a mobile device, computer, or anything else that is connected to the network. Most of the devices are configured to obtain the DHCP data by default. IP address pool: It is a range of IP addresses available to clients. Generally, it is handled in ascending order. Subnet: The subnet is the partition of the IP networks into a small segment. It allows easy management of the IP addresses. Lease: The Lease is the length of the time taken by the DHCP client to hold the information. Once a lease is expired, the client will have to renew it. DHCP relay: The relay is a router or host that receives the client's messages being broadcasted over the network and forwards it to a configured server. The server responds to the relay. It is useful for centralizing a DHCP server. Advantages of DHCP serverThe DHCP server simplified device management. In addition to device management, it provides the following benefits: Accurate IP configuration: It provides an easy way to troubleshoot and use the DHCP server. Thus, it minimizes the risk of invalid IP configuration parameters. Reduced IP address conflicts: The connected devices have a unique IP address. The DHCP server ensures the one IP address is used only once. Thus, it reduces the IP address conflict. Automation of IP address administration: The DHCP server automatically assigns an IP address to each device. In the absence of a DHCP server, we have to manually assign the IP address. It keeps track of every IP address. So it is easy to manage all the devices from one point. Efficient change management: The DHCP provides an easy way to change the addresses, endpoints, and scopes. For example, if we want to change the IP address scheme for the entire organization; it will allow us to configure the system with the new scheme easily. Similarly, in the case of a new device, no configuration will be needed. How to Install and Configure DHCP Server on UbuntuThe DHCP server package can be installed from the official package repository of Ubuntu. We can install it using the APT package manager. Execute the below commands to install the ISC DHCP server: before installing the DHCP server, update the package repository by executing the below command: The above command will ask for the system password, type the password and hit the Enter key. It will start updating the APT repository. Consider the below snap of the output: 
Now, install the ISC DHCP server by executing the below command: The above command will ask for the verification of installing the server; hit the Y key to confirm. It will start installing the DHCP server package. Consider the below snap of output: 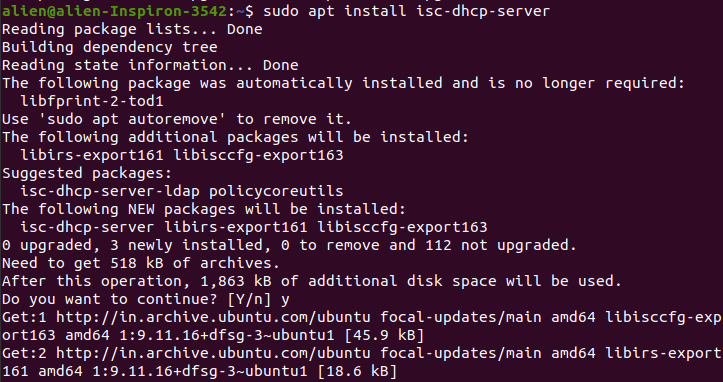
Now, the ISC DHCP server must be installed on your Linux system. Configuring the DHCP Files & ServerTo configure the DHCP server, we must edit the DHCP configuration file, which is "/etc/dhcp/dhcpd.conf". After editing this file, we have to restart the isc-dhcp-server service to apply the changes. To restart the isc-dhcp-server service & apply changes, execute the below command: 
Now, we can configure the DHCP server. Before making any changes to the configuration file, make sure to take the backup of the /etc/dhcp/dhcpd.conf configuration file. To make the backup of the configuration file, execute the below command: 
Now, create a new blank configuration file by executing the below command: 
Now enter the below configuration lines and save the file: To save this file, hit the CTRL+X keys followed by the Y key. It will save the file. 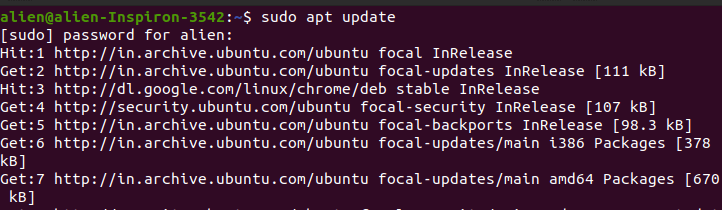
Hence, we have created a new configuration file. Now, restart the server by executing the below command: Now, verify whether the DHCP server is properly running or not by executing the below command: It will display the server status active. To test the Ip addresses, execute the below command: The above command will display the IP address of all the connected systems on the network. 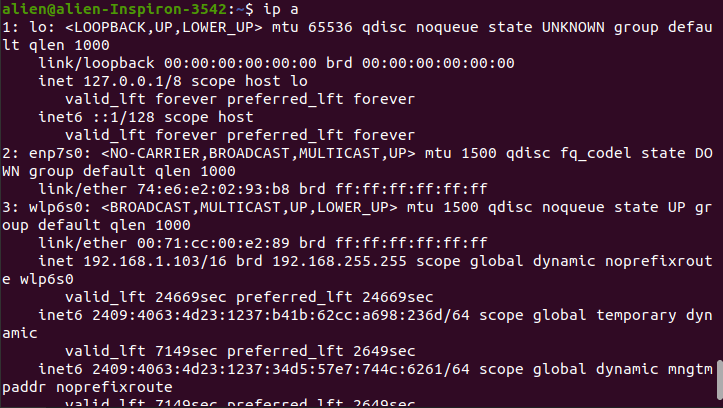
Next TopicICT Tools
|
 For Videos Join Our Youtube Channel: Join Now
Feedback
- Send your Feedback to [email protected]
Help Others, Please Share


