| |

Splay TreeSplay trees are the self-balancing or self-adjusted binary search trees. In other words, we can say that the splay trees are the variants of the binary search trees. The prerequisite for the splay trees that we should know about the binary search trees. As we already know, the time complexity of a binary search tree in every case. The time complexity of a binary search tree in the average case is O(logn) and the time complexity in the worst case is O(n). In a binary search tree, the value of the left subtree is smaller than the root node, and the value of the right subtree is greater than the root node; in such case, the time complexity would be O(logn). If the binary tree is left-skewed or right-skewed, then the time complexity would be O(n). To limit the skewness, the AVL and Red-Black tree came into the picture, having O(logn) time complexity for all the operations in all the cases. We can also improve this time complexity by doing more practical implementations, so the new Tree data structure was designed, known as a Splay tree. What is a Splay Tree?A splay tree is a self-balancing tree, but AVL and Red-Black trees are also self-balancing trees then. What makes the splay tree unique two trees. It has one extra property that makes it unique is splaying. A splay tree contains the same operations as a Binary search tree, i.e., Insertion, deletion and searching, but it also contains one more operation, i.e., splaying. So. all the operations in the splay tree are followed by splaying. Splay trees are not strictly balanced trees, but they are roughly balanced trees. Let's understand the search operation in the splay-tree. Suppose we want to search 7 element in the tree, which is shown below: 
To search any element in the splay tree, first, we will perform the standard binary search tree operation. As 7 is less than 10 so we will come to the left of the root node. After performing the search operation, we need to perform splaying. Here splaying means that the operation that we are performing on any element should become the root node after performing some rearrangements. The rearrangement of the tree will be done through the rotations. Note: The splay tree can be defined as the self-adjusted tree in which any operation performed on the element would rearrange the tree so that the element on which operation has been performed becomes the root node of the tree.RotationsThere are six types of rotations used for splaying:
Factors required for selecting a type of rotation The following are the factors used for selecting a type of rotation:
Cases for the RotationsCase 1: If the node does not have a grand-parent, and if it is the right child of the parent, then we carry out the left rotation; otherwise, the right rotation is performed. Case 2: If the node has a grandparent, then based on the following scenarios; the rotation would be performed: Scenario 1: If the node is the right of the parent and the parent is also right of its parent, then zig zig right right rotation is performed. Scenario 2: If the node is left of a parent, but the parent is right of its parent, then zig zag right left rotation is performed. Scenario 3: If the node is right of the parent and the parent is right of its parent, then zig zig left left rotation is performed. Scenario 4: If the node is right of a parent, but the parent is left of its parent, then zig zag right-left rotation is performed. Now, let's understand the above rotations with examples. To rearrange the tree, we need to perform some rotations. The following are the types of rotations in the splay tree:
The zig rotations are used when the item to be searched is either a root node or the child of a root node (i.e., left or the right child). The following are the cases that can exist in the splay tree while searching: Case 1: If the search item is a root node of the tree. Case 2: If the search item is a child of the root node, then the two scenarios will be there:
Let's look at the above two scenarios through an example. Consider the below example: In the above example, we have to search 7 element in the tree. We will follow the below steps: Step 1: First, we compare 7 with a root node. As 7 is less than 10, so it is a left child of the root node. Step 2: Once the element is found, we will perform splaying. The right rotation is performed so that 7 becomes the root node of the tree, as shown below: 
Let's consider another example. In the above example, we have to search 20 element in the tree. We will follow the below steps: Step 1: First, we compare 20 with a root node. As 20 is greater than the root node, so it is a right child of the root node. 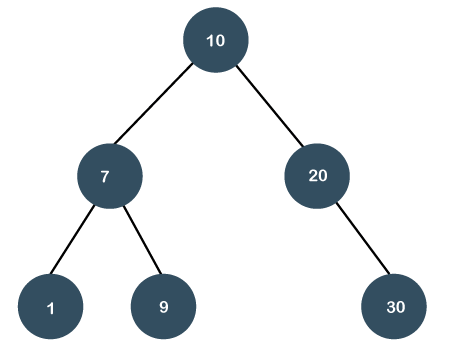
Step 2: Once the element is found, we will perform splaying. The left rotation is performed so that 20 element becomes the root node of the tree. 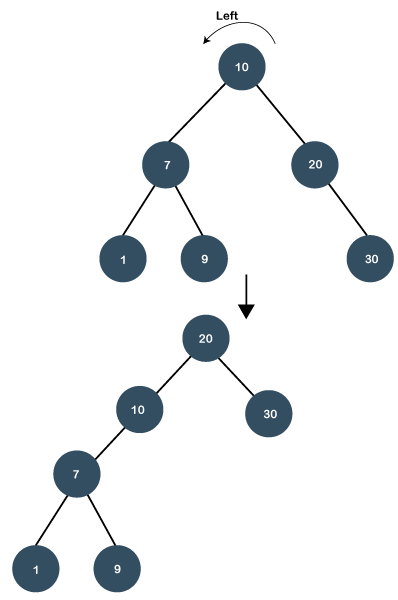
Sometimes the situation arises when the item to be searched is having a parent as well as a grandparent. In this case, we have to perform four rotations for splaying. Let's understand this case through an example. Suppose we have to search 1 element in the tree, which is shown below: Step 1: First, we have to perform a standard BST searching operation in order to search the 1 element. As 1 is less than 10 and 7, so it will be at the left of the node 7. Therefore, element 1 is having a parent, i.e., 7 as well as a grandparent, i.e., 10. Step 2: In this step, we have to perform splaying. We need to make node 1 as a root node with the help of some rotations. In this case, we cannot simply perform a zig or zag rotation; we have to implement zig zig rotation. In order to make node 1 as a root node, we need to perform two right rotations known as zig zig rotations. When we perform the right rotation then 10 will move downwards, and node 7 will come upwards as shown in the below figure: 
Again, we will perform zig right rotation, node 7 will move downwards, and node 1 will come upwards as shown below: 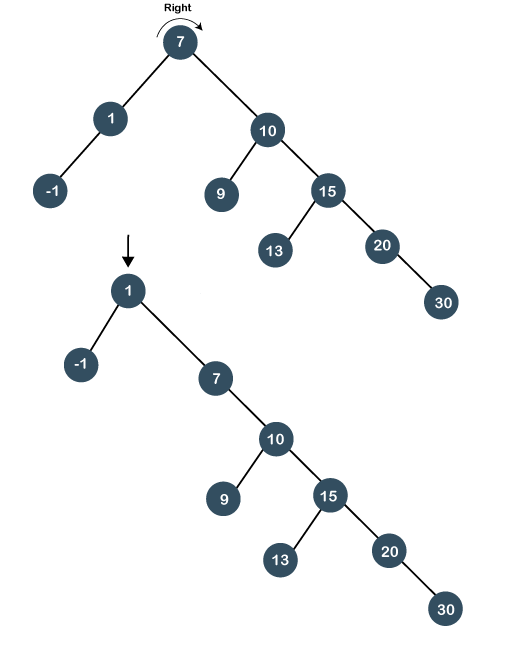
As we observe in the above figure that node 1 has become the root node of the tree; therefore, the searching is completed. Suppose we want to search 20 in the below tree. In order to search 20, we need to perform two left rotations. Following are the steps required to search 20 node: 
Step 1: First, we perform the standard BST searching operation. As 20 is greater than 10 and 15, so it will be at the right of node 15. Step 2: The second step is to perform splaying. In this case, two left rotations would be performed. In the first rotation, node 10 will move downwards, and node 15 would move upwards as shown below: 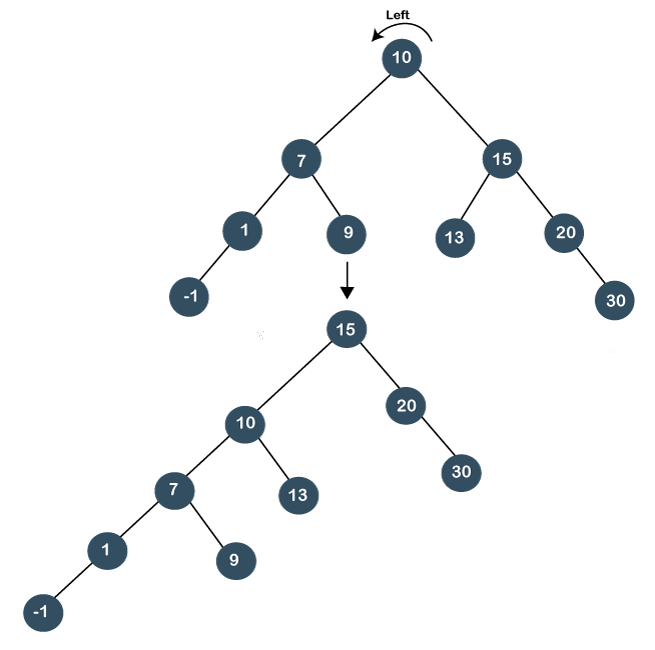
In the second left rotation, node 15 will move downwards, and node 20 becomes the root node of the tree, as shown below: 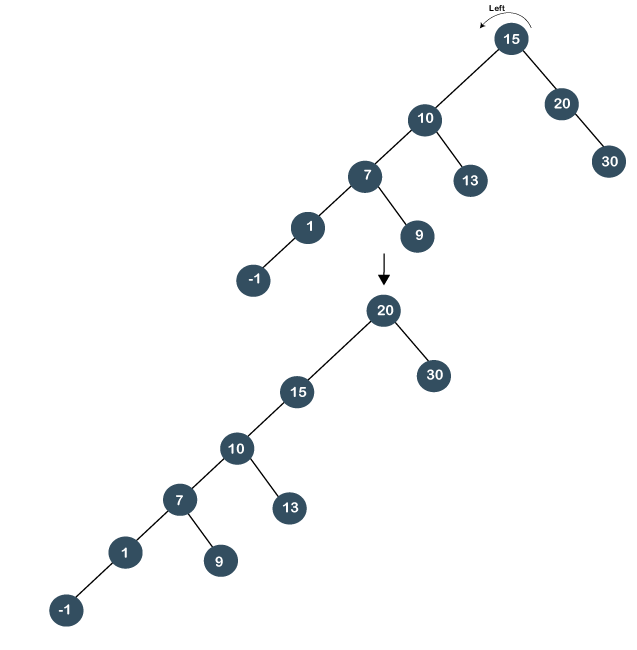
As we have observed that two left rotations are performed; so it is known as a zig zig left rotation.
Till now, we have read that both parent and grandparent are either in RR or LL relationship. Now, we will see the RL or LR relationship between the parent and the grandparent. Let's understand this case through an example. Suppose we want to search 13 element in the tree which is shown below: 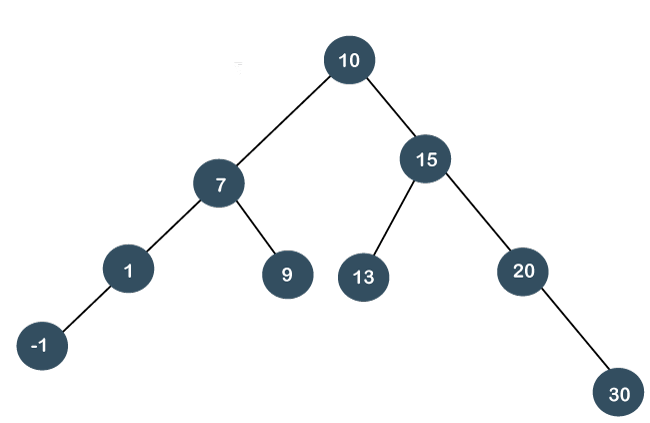
Step 1: First, we perform standard BST searching operation. As 13 is greater than 10 but less than 15, so node 13 will be the left child of node 15. Step 2: Since node 13 is at the left of 15 and node 15 is at the right of node 10, so RL relationship exists. First, we perform the right rotation on node 15, and 15 will move downwards, and node 13 will come upwards, as shown below: 
Still, node 13 is not the root node, and 13 is at the right of the root node, so we will perform left rotation known as a zag rotation. The node 10 will move downwards, and 13 becomes the root node as shown below: 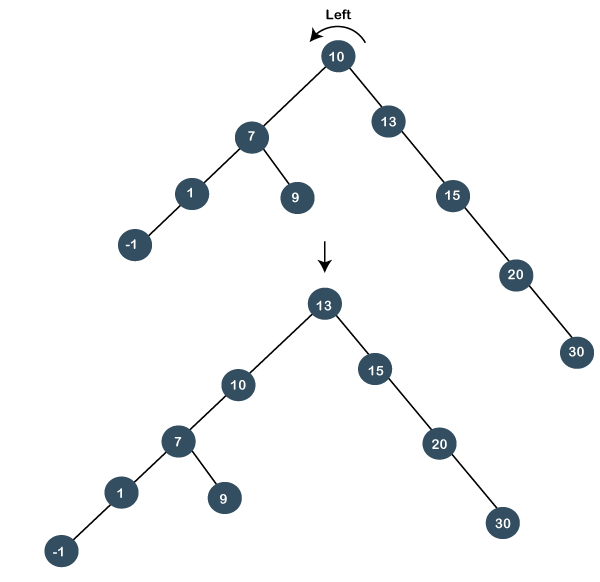
As we can observe in the above tree that node 13 has become the root node; therefore, the searching is completed. In this case, we have first performed the zig rotation and then zag rotation; so, it is known as a zig zag rotation.
Let's understand this case through an example. Suppose we want to search 9 element in the tree, which is shown below: 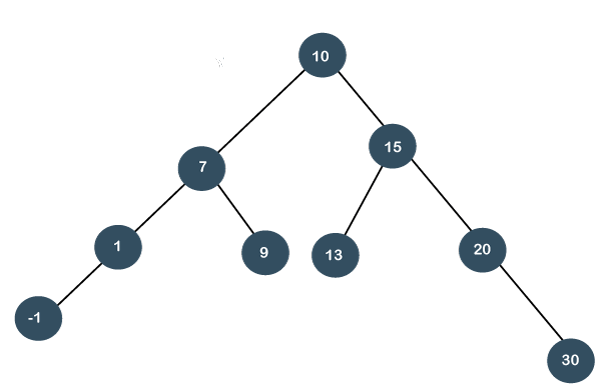
Step 1: First, we perform the standard BST searching operation. As 9 is less than 10 but greater than 7, so it will be the right child of node 7. Step 2: Since node 9 is at the right of node 7, and node 7 is at the left of node 10, so LR relationship exists. First, we perform the left rotation on node 7. The node 7 will move downwards, and node 9 moves upwards as shown below: 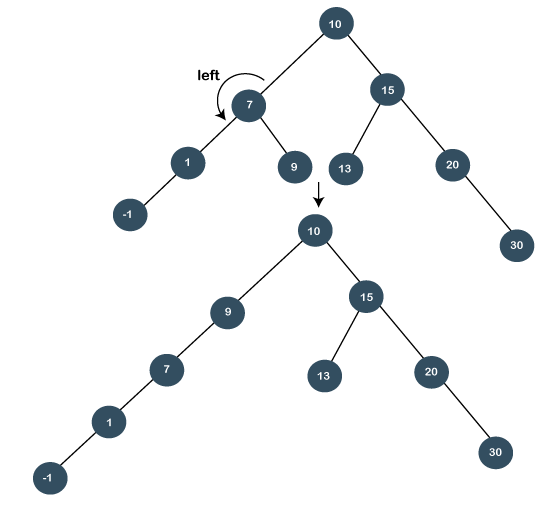
Still the node 9 is not a root node, and 9 is at the left of the root node, so we will perform the right rotation known as zig rotation. After performing the right rotation, node 9 becomes the root node, as shown below: 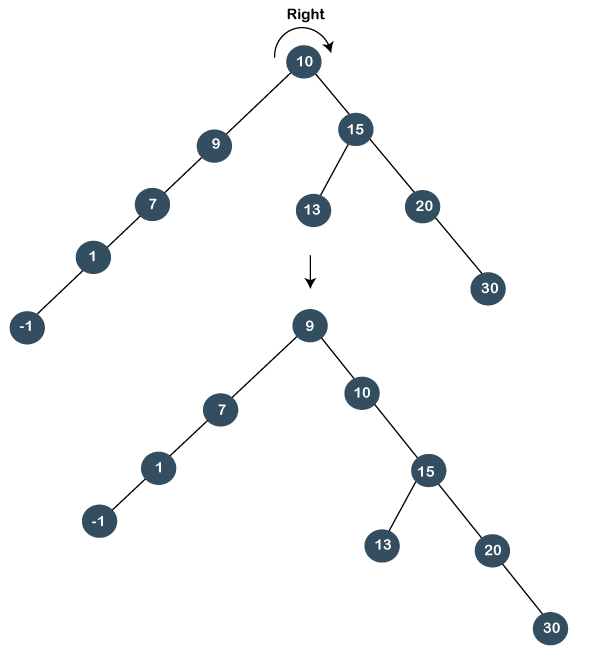
As we can observe in the above tree that node 13 is a root node; therefore, the searching is completed. In this case, we have first performed the zag rotation (left rotation), and then zig rotation (right rotation) is performed, so it is known as a zag zig rotation. Advantages of Splay tree
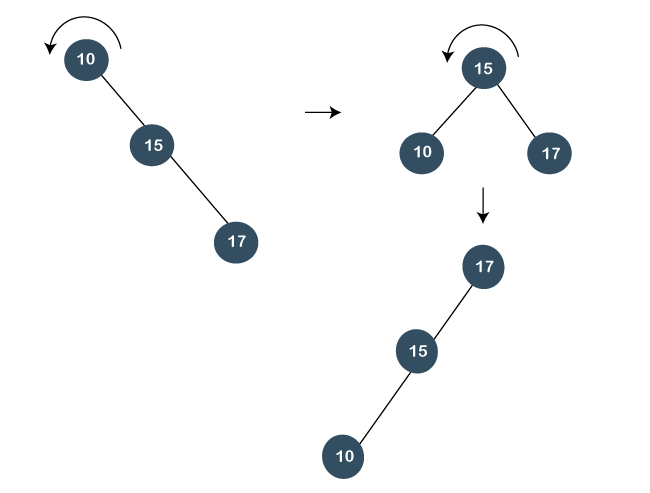
Drawback of Splay treeThe major drawback of the splay tree would be that trees are not strictly balanced, i.e., they are roughly balanced. Sometimes the splay trees are linear, so it will take O(n) time complexity. Insertion operation in Splay tree In the insertion operation, we first insert the element in the tree and then perform the splaying operation on the inserted element. 15, 10, 17, 7 Step 1: First, we insert node 15 in the tree. After insertion, we need to perform splaying. As 15 is a root node, so we do not need to perform splaying. 
Step 2: The next element is 10. As 10 is less than 15, so node 10 will be the left child of node 15, as shown below: Now, we perform splaying. To make 10 as a root node, we will perform the right rotation, as shown below: 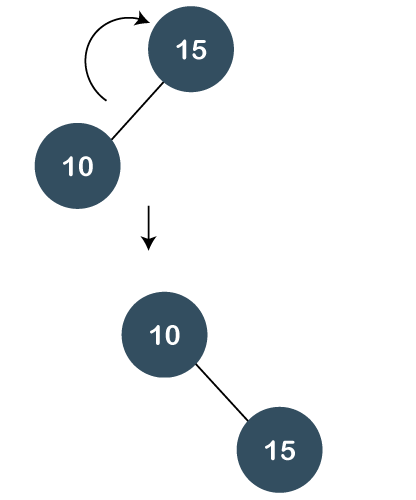
Step 3: The next element is 17. As 17 is greater than 10 and 15 so it will become the right child of node 15. Now, we will perform splaying. As 17 is having a parent as well as a grandparent so we will perform zig zig rotations. 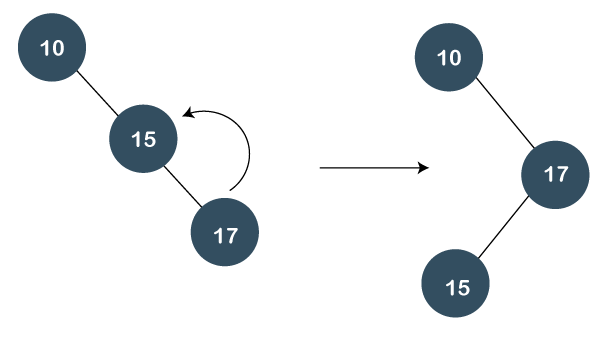
In the above figure, we can observe that 17 becomes the root node of the tree; therefore, the insertion is completed. Step 4: The next element is 7. As 7 is less than 17, 15, and 10, so node 7 will be left child of 10. Now, we have to splay the tree. As 7 is having a parent as well as a grandparent so we will perform two right rotations as shown below: 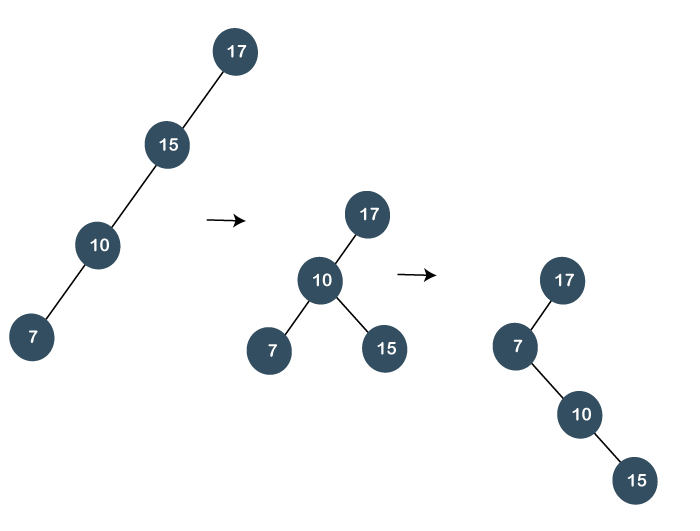
Still the node 7 is not a root node, it is a left child of the root node, i.e., 17. So, we need to perform one more right rotation to make node 7 as a root node as shown below: 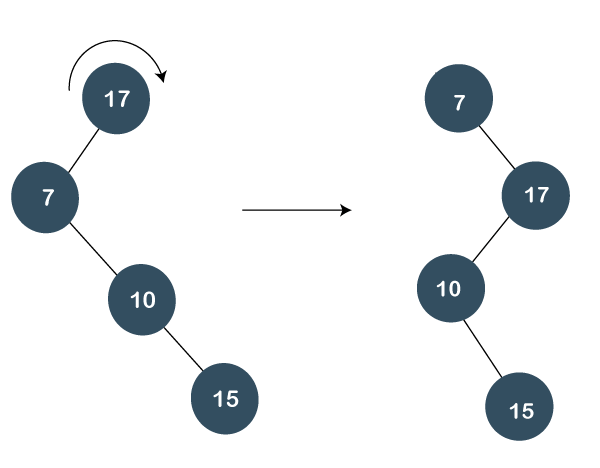
Algorithm for Insertion operation In the above algorithm, T is the tree and n is the node which we want to insert. We have created a temp variable that contains the address of the root node. We will run the while loop until the value of temp becomes NULL. Once the insertion is completed, splaying would be performed Algorithm for Splaying operation In the above implementation, x is the node on which the rotation is performed, whereas y is the left child of the node x. Implementation of left.rotation(T, x) In the above implementation, x is the node on which the rotation is performed and y is the right child of the node x. Deletion in Splay treeAs we know that splay trees are the variants of the Binary search tree, so deletion operation in the splay tree would be similar to the BST, but the only difference is that the delete operation is followed in splay trees by the splaying operation. Types of Deletions: There are two types of deletions in the splay trees:
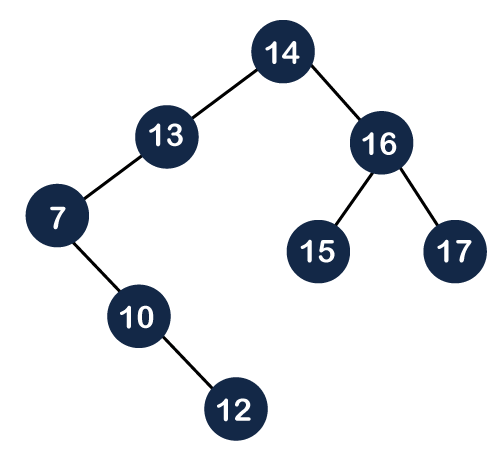
Bottom-up splaying In bottom-up splaying, first we delete the element from the tree and then we perform the splaying on the deleted node. Let's understand the deletion in the Splay tree. Suppose we want to delete 12, 14 from the tree shown below:
The deletion is still not completed. We need to splay the parent of the deleted node, i.e., 10. We have to perform Splay(10) on the tree. As we can observe in the above tree that 10 is at the right of node 7, and node 7 is at the left of node 13. So, first, we perform the left rotation on node 7 and then we perform the right rotation on node 13, as shown below: 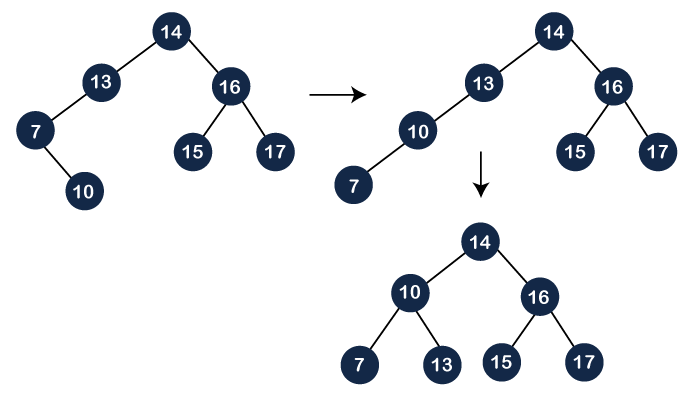
Still, node 10 is not a root node; node 10 is the left child of the root node. So, we need to perform the right rotation on the root node, i.e., 14 to make node 10 a root node as shown below: 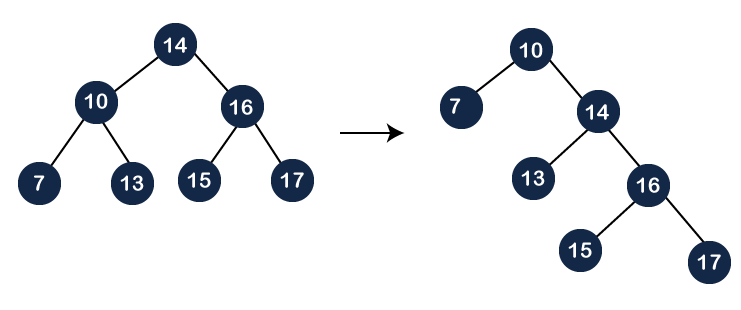
As we know that we cannot simply delete the internal node. We will replace the value of the node either using inorder predecessor or inorder successor. Suppose we use inorder successor in which we replace the value with the lowest value that exist in the right subtree. The lowest value in the right subtree of node 14 is 15, so we replace the value 14 with 15. Since node 14 becomes the leaf node, so we can simply delete it as shown below: 
Still, the deletion is not completed. We need to perform one more operation, i.e., splaying in which we need to make the parent of the deleted node as the root node. Before deletion, the parent of node 14 was the root node, i.e., 10, so we do need to perform any splaying in this case. 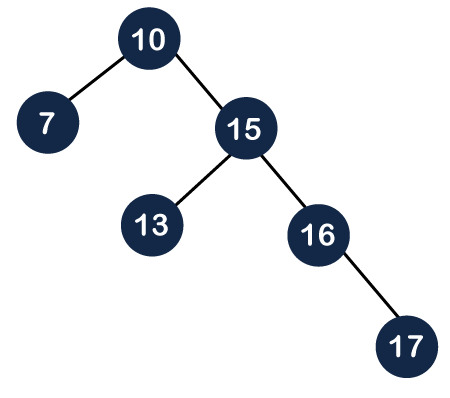
Top-down splaying In top-down splaying, we first perform the splaying on which the deletion is to be performed and then delete the node from the tree. Once the element is deleted, we will perform the join operation. Let's understand the top-down splaying through an example. Suppose we want to delete 16 from the tree which is shown below: 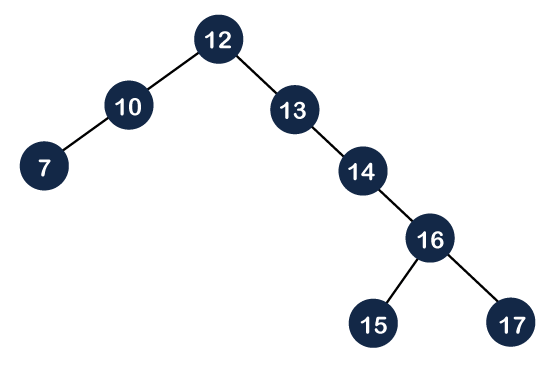
Step 1: In top-down splaying, first we perform splaying on the node 16. The node 16 has both parent as well as grandparent. The node 16 is at the right of its parent and the parent node is also at the right of its parent, so this is a zag zag situation. In this case, first, we will perform the left rotation on node 13 and then 14 as shown below: 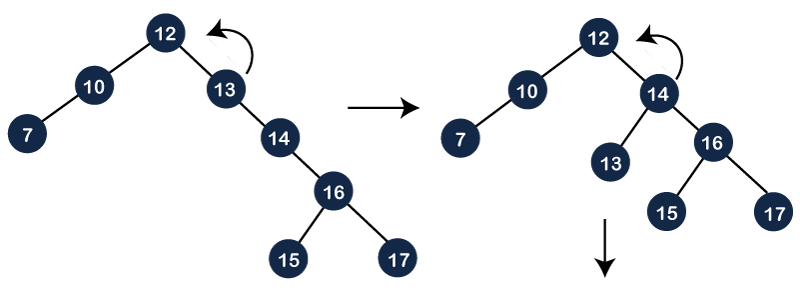
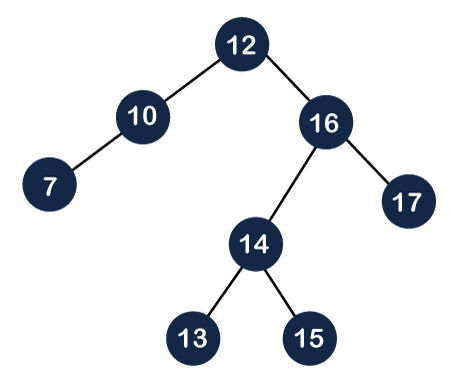
The node 16 is still not a root node, and it is a right child of the root node, so we need to perform left rotation on the node 12 to make node 16 as a root node. 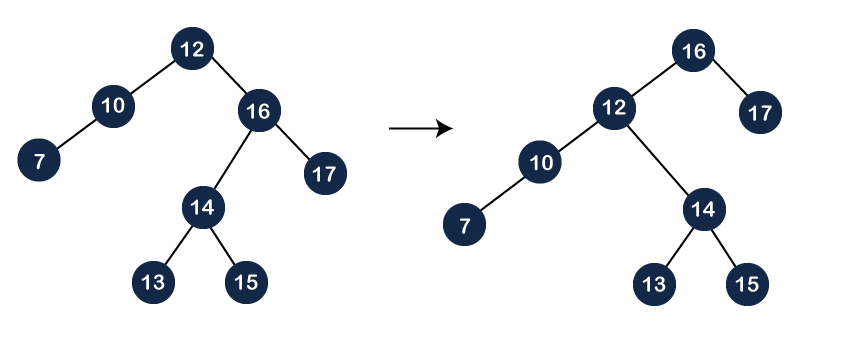
Once the node 16 becomes a root node, we will delete the node 16 and we will get two different trees, i.e., left subtree and right subtree as shown below: 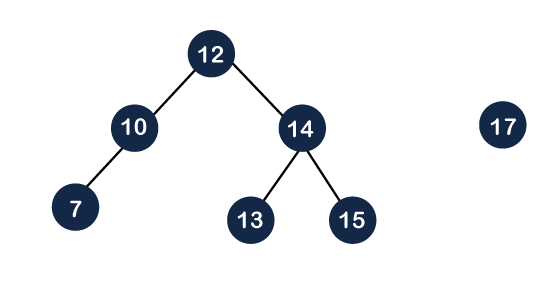
As we know that the values of the left subtree are always lesser than the values of the right subtree. The root of the left subtree is 12 and the root of the right subtree is 17. The first step is to find the maximum element in the left subtree. In the left subtree, the maximum element is 15, and then we need to perform splaying operation on 15. As we can observe in the above tree that the element 15 is having a parent as well as a grandparent. A node is right of its parent, and the parent node is also right of its parent, so we need to perform two left rotations to make node 15 a root node as shown below: 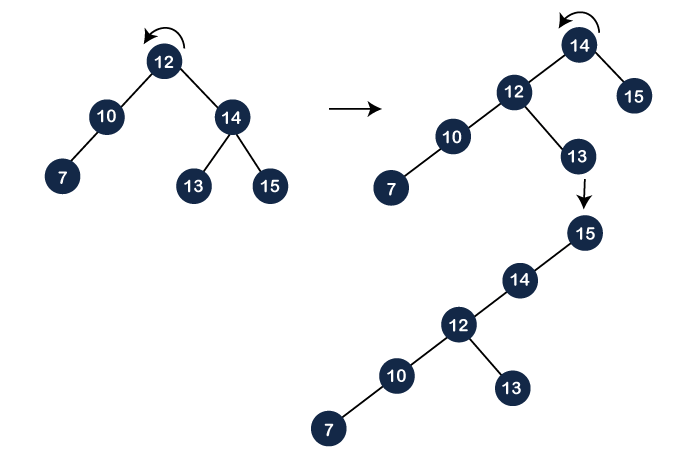
After performing two rotations on the tree, node 15 becomes the root node. As we can see, the right child of the 15 is NULL, so we attach node 17 at the right part of the 15 as shown below, and this operation is known as a join operation. 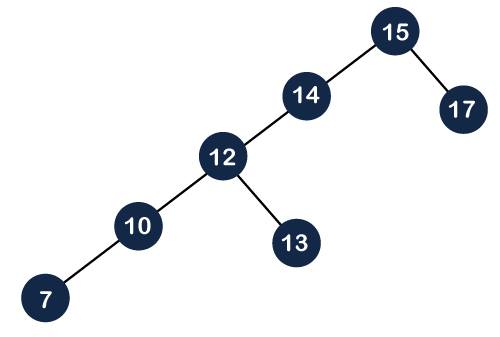
Note: If the element is not present in the splay tree, which is to be deleted, then splaying would be performed. The splaying would be performed on the last accessed element before reaching the NULL.Algorithm of Delete operation In the above algorithm, we first check whether the root is Null or not; if the root is NULL means that the tree is empty. If the tree is not empty, we will perform the splaying operation on the element which is to be deleted. Once the splaying operation is completed, we will compare the root data with the element which is to be deleted; if both are not equal means that the element is not present in the tree. If they are equal, then the following cases can occur: Case 1: The left of the root is NULL, the right of the root becomes the root node. Case 2: If both left and right exist, then we splay the maximum element in the left subtree. When the splaying is completed, the maximum element becomes the root of the left subtree. The right subtree would become the right child of the root of the left subtree.
Next TopicFundamental of the Data Structure
|
 For Videos Join Our Youtube Channel: Join Now
Feedback
- Send your Feedback to [email protected]
Help Others, Please Share


