Word Landscape
Landscape orientation is the horizontal arrangement of the content, which enables the user to accommodate the content with more width than length easily.
When the user switches the orientation from portrait to landscape, there are no changes in the position of the header and Footer.
They are located at the topmost and bottom-most sections of the page. But when the user prints the sheet, the location of the header and footer changes to the left and right margins. That is, the title of the page at the top of the page will be printed on the left margin of the page, and the page number in the Footer will be located on the rightmost side of the page.
In this article, we will learn to create and disconnect the Landscape Sections.
Making Landscape Section in MS Word
Click on the ending line of the previous page for which you want to change the orientation to landscape. In MS Word, the default orientation is portrait.
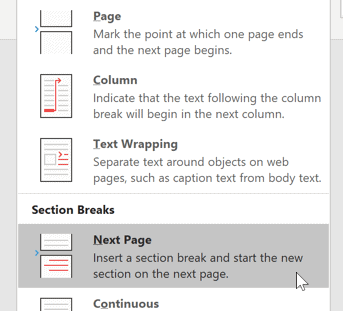
- In the Page Layout tab, select the arrow next to the Breaks icon and click Next Page.
- The above step will add a section break in your content at the selected point. You can use the Delete key to bring the content back to the current page.
Note: Only use the Delete key to bring the content back up, not the Backspace key.
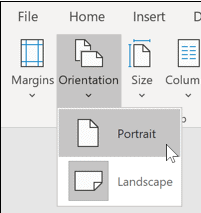
Once, the section is created, you can click anywhere and change the orientation to landscape mode. To do so, click on orientation in the Page Setup Group and select Landscape Orientation. The orientation will only be changed for the selected section.
Disconnection of Section in MS Word
If you want to disconnect the Landscape section from the rest of the Document in MS Word, then follow the given steps:
- To disconnect the Landscape section, go to the first page with the Landscape section and click on it. Now from the Insert tab, in the Header and Footer section, click on the header and then Edit header.
- This will open a list of tools enabling you to edit the header. From the list, select Unlink this Section's Header. Click on the tool by highlighting the Link to the previous section.
- If you have performed the given steps with the header, go to the Footer of the first Page and perform all these steps for the Footer.
- Once you have to Unlink both the Header and Footer of the First Landscape page in your Document, go to the First Portrait page after the Landscape Section and perform the same steps to unlink its Header and Footer.
- After completing the above steps, you have now disconnected the Header and Footer of the section before and after the Landscape Section. Thus, any change in the header and Footer of the Landscape Section will not be reflected in the Portrait section of the Document.
Adding Page Numbers in the Landscape Section
If you want to print the Document, you will have to modify the placement of the Page numbers in the Landscape section. When working in the Landscape section, the page number is located below the page, but as we print the pages, they are shifted to the Right margin of the page.
- First, delete all the Page numbers in the Landscape Section.
- After deletion, open the Insert tab and from the Header and Footer section, click on the arrow next to the Page Number icon, from the icon, select the Plain Number section and then select Large Left.
- This will show a large page number on the Left margin of the page. The number that will be entered using this method would be properly centered in the margin.
- Select the added number and go to the Home tab. Then Apply the same Footer styles to all the pages with similar Footer styles.
Note: It is important to perform the last step to ensure consistency of your Document's style.
- If you want to change the style of the page Number from the Styles Group, click on More. Then click on Apply Styles.
- In the Dialog box, type Footer and then Click on Apply.
- The style will be implemented in your Document.
- Now go to the Drawing Tools Format tab. Click on the text direction. This will allow you to rotate the page number in your Document. Rotate the number until its orientation is perfect.
Changing the Landscape of a Single page in MS Word
If you want to quickly make a one-page landscape in Word, then you will have to follow the given steps:
- First open the word document. Then, put the cursor in the beginning of the page of the document. The document you want to change the orientation to landscape.
- Select the layout menu from the page layout ribbon.
- Click on Breaks then click on Next page from the section break. By performing the above steps you will be able to add a section in the next page.
- Then go back to the Layout menu, select the orientation there you will have the option to change the layout to Landscape. Once, you select Landscape the orientation of the page. The orientation of the current page will be changed to landscape mode.
- You will have to change the orientation of the remaining pages back to portrait. You can change it by placing the cursor to the beginning of the next page.
- Click on Layout then select Breaks and click on the next page to add a section break there.
- After adding the section break select orientation and then click on portrait to change the orientation of the next pages to portrait.
- After completing the given steps, you will see that the page will be landscape while all the other pages will still be in portrait orientation.
How to Make Specific Text Landscape in Word
There may be sometimes when you don't want to change the orientation of the entire page in the document. Then you can just choose specific content on the page and change it to landscape.
If you don't want the entire page to change orientation then highlight the text for which you want to change the location in specific.
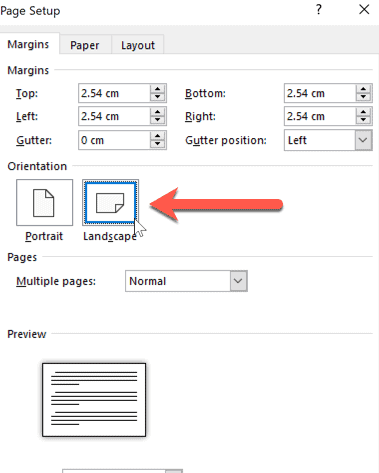
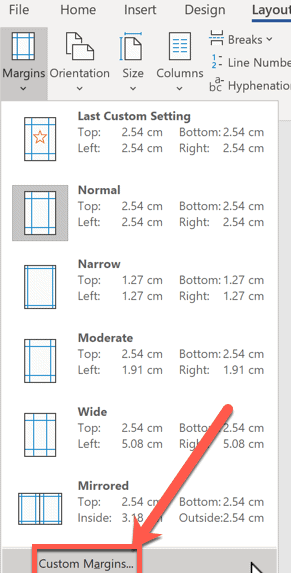
- From the Page layout tab click on layout then the Margin and select Custom Margin, the option is available in the last to the drop-down menu.
- This will open a new window, that will allow you to modify the page setup. Select the Landscape option that will be available under the category for Orientation Section.
- From the Apply box, Right click on the selected text.
- Then press OK to apply the changes for the text that you selected.
- Now you will observe that there will be a landscape page that contains the text you selected. Now create a section break, the layout for the page should be different from the rest of the document.
- You can either change the layout of a particular part of the page, or you can modify the layout of the entire page. For changing the layout of the entire page by using this method you will have to select the entire page from the beginning till the end.
|

 For Videos Join Our Youtube Channel: Join Now


