Git SquashIn Git, the term squash is used to squash the previous commits into one. It is not a command; instead, it is a keyword. The squash is an excellent technique for group-specific changes before forwarding them to others. You can merge several commits into a single commit with the compelling interactive rebase command. If you are a Git user, then you must have realized the importance of squashing a commit. Especially if you are an open-source contributor, then many times, you have to create a PR (pull request) with squashed commit. You can also squash commits if you have already created a PR. Let's understand how to squash commits? Git Squash CommitsBeing a responsible contributor to Git, it is necessary to make the collaboration process efficient and meaningful. Git allows some powerful collaboration tools in different ways. Git squash is one of the powerful tools that facilitate efficient and less painful collaboration. The squash is not any command; instead, it's one of many options available to you under git interactive rebases. The squash allows us to rewrite history. Suppose we have made many commits during the project work, squashing all the commits into a large commit is the right choice than pushing. Let's understand how to squash two commits. Step1: Check the commit history To check the commit history, run the below command: The given command will display the history in one line. We can track the history and choose the commits we want to squash. Consider the below output: 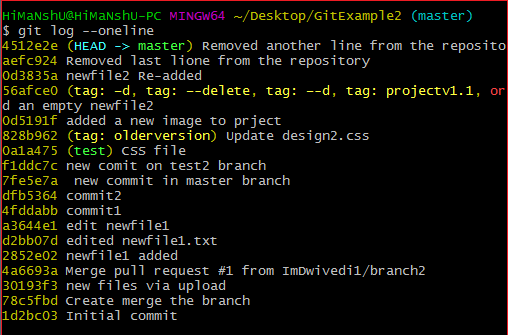
Step 2: Choose the commits to squash. Suppose we want to squash the last commits. To squash commits, run the below command: The above command will open your default text editor and will squash the last three commits. The editor will open as follows: 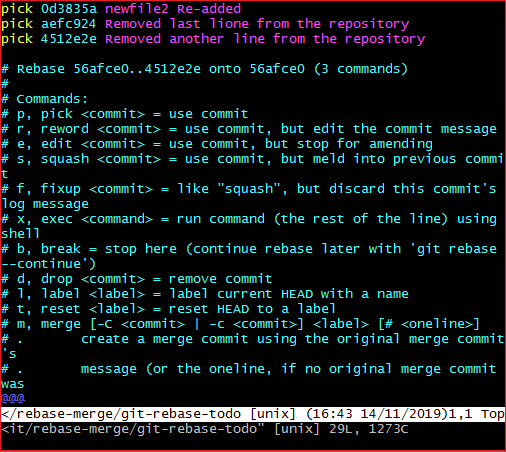
From the above image, we can see previous commits shown at the top of the editor. If we want to merge them into a single commit, then we have to replace the word pick with the squash on the top of the editor. To write on the editor, press 'i' button to enter in insert mode. After editing the document, press the :wq to save and exit from the editor. Step 3: update the commits On pressing enter key, a new window of the text editor will be opened to confirm the commit. We can edit the commit message on this screen. I am editing my first commit message because it will be a combination of all three commits. Consider the below image: 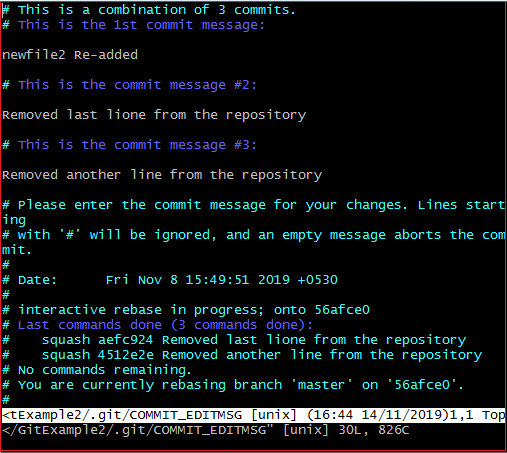
The above image is the editor screen to confirm the merging of commits. Here we can update the commit messages. To edit on this editor, press the 'i' button for insert mode and edit the desired text. Press the :wq keys, to save and exit from the editor. When we exit the editor, it will show the description of updates. Consider the below output: 
The above output is listing the description of changes that have been made on the repository. Now, the commits have been squashed. Check the commit history for confirmation with the help of the git log. Consider the below output: 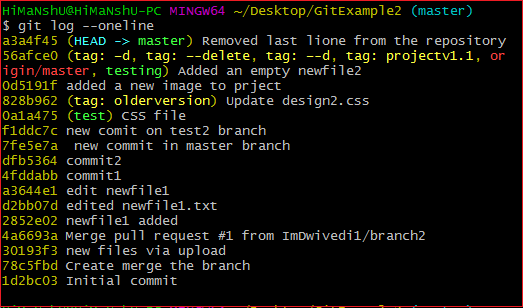
Step 4: Push the squashed commit Now, we can push this squashed commit on the remote server. To push this squashed commit, run the below command: Or The above command will push the changes on the remote server. We can check this commit on our remote repository. Consider the below image: 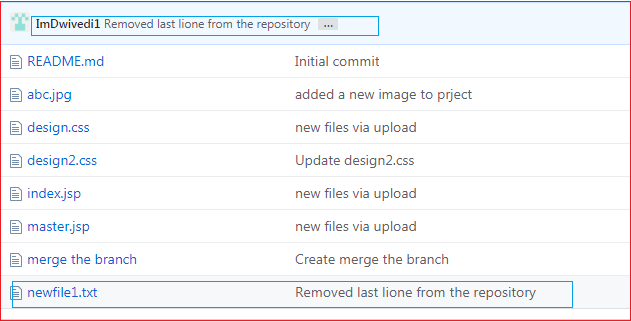
As you can see from the above image. A new commit has been added to my remote repository. Drawbacks of SquashingThere are no significant drawbacks of squashing. But we can consider some facts that may affect the project. These facts are as follows: The squashing commits, and rebasing changes the history of the repository. If any contributor does not pay attention to the updated history, then it may create conflict. I suggest a clean history because it is more valuable than another one. Although we can check the original history in the ref log. There is another drawback, we may lose granularity because of squashing. Try to make minimum squashes while working with Git. So, if you are new on Git, then try to stay away from squash.
Next TopicGit Fetch
|
 For Videos Join Our Youtube Channel: Join Now
Feedback
- Send your Feedback to [email protected]
Help Others, Please Share


