| |

Gradle BuildThe Gradle build is a process of creating a Gradle project. When we run a gradle command, it will look for a file called build.gradle in the current directory. This file is also called the Gradle build script. The build configuration, tasks, and plugins are described in this file. The build script describes a project and its tasks. Let's create a small Gradle project, run some of the basic Gradle commands, and understand how Gradle manages the project. Follow the steps below to create and test a Gradle project. Step1: Open the command line and create a directory First, Open the command line and create a directory for the project and change directory to it. Let's create a demo directory. 
Step2: Initialize a Gradle project To generate a Gradle project, run the gradle init command. It will generate a simple project. With this project, we will explore and understand everything that is generated. When we run the gradle init command, it will ask for some basic requirements. First, it will ask the type of project that we want to create. It will give four options: Select our requirements. Hence, we are just making a demo project so that we will select the basic option. To select basic option, press 1 and Enter key. Consider the below output: 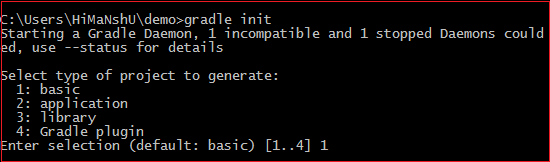
Next, it will ask for DSL. There are two options that are available for DSL: Groovy is the default DSL provided by Gradle. Select build script DSL. 
Next, it will ask for the project name. Type the project name and press Enter key. It will take a while to build a project. After the successful execution of the project, we will get a message BUILD SUCCESSFUL. 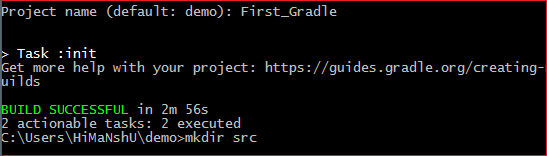
Now we have successfully created a Gradle project. Now, what will happen to our specified directory? Consider the below structure of the Gradle project. 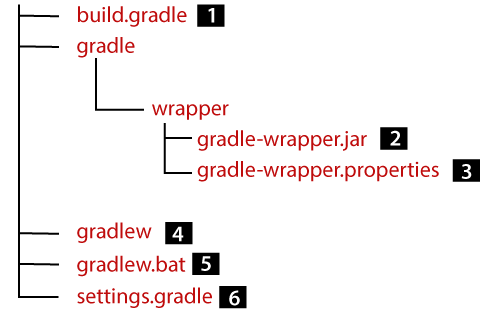
It is the default structure of a Gradle project. Gradle will generate the following things for us:
Step3: Create a task Gradle supports APIs for creating and managing tasks through a Groovy-based DSL or Kotlin-based DSL. Every project contains a collection of tasks for some basic operation. Gradle supports a library of tasks that configure the project. For example, there is a Copy task, which copies files from one location to another. The Copy task is one of the most used tasks In Gradle. To use the Copy task in build script, follow the below process. Step1: Create a directory called src. 
Step2: Add a file called myfile.txt in the src directory. Add the single line "Hello, World!" to it, also, we can leave it empty. 
Define a task called Copy in build.gradle file. It will copy the src directory to a new directory called dest. We don't have to create the dest directory; the Copy task will do it for us. We can provide anything in a group and description. Also, we can omit them, but doing so will also be omitted from the report of the task used later. Now execute our new copy task: 
After the successful execution of the task, we will get BUILD SUCCESSFUL message. The build.gradle fileThe build.gradle file is build script of a Gradle project. All the tasks and plugins are defined in this file. When we run a gradle command, it looks for a file called build.gradle in the current directory. Although we have called it a build script, strictly, it is a build configuration script. The build script defines a project and its tasks. The default build.gradle file looks like as follows: 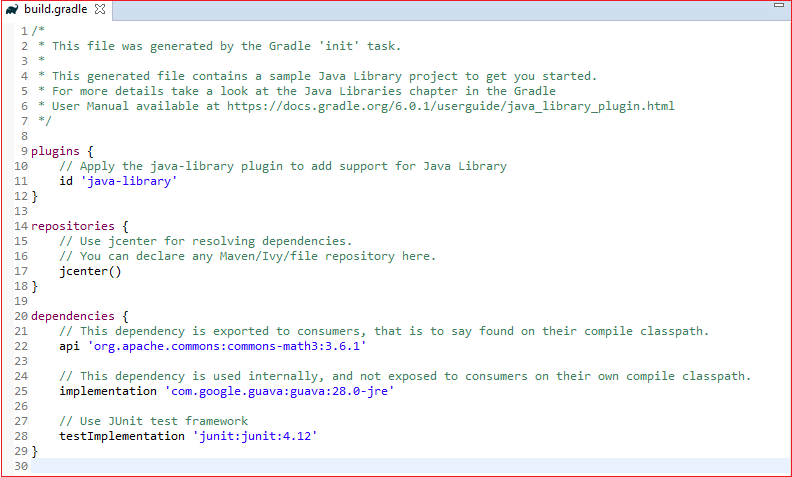
The build.gradle file contains three default sections. They are as follows:
Additionally, we can declare other project-related modules like a task in this file. Display the Information of the Gradle projectTo understand the structure, dependencies and debugging problems of a build, Gradle provides many built-in features that display information on a project. Following are some basic commands to display the information of the project: Listing projects In Gradle, all the sub-projects of a project in the workspace can be listed in a hierarchy. To do so, run the below command from the root directory of the project.
Listing Tasks Gradle allows us to list all the essential tasks of the project. To list the task, run the below command: Output: C:\Users\HiMaNshU\eclipse-workspace>gradle -q tasks ------------------------------------------------------------ Tasks runnable from root project ------------------------------------------------------------ Build Setup tasks ----------------- init - Initializes a new Gradle build. wrapper - Generates Gradle wrapper files. Help tasks ---------- buildEnvironment - Displays all buildscript dependencies declared in root projec t 'eclipse-workspace'. components - Displays the components produced by root project 'eclipse-workspace '. [incubating] dependencies - Displays all dependencies declared in root project 'eclipse-works pace'. dependencyInsight - Displays the insight into a specific dependency in root proj ect 'eclipse-workspace.' dependentComponents : It displays the dependent components of components in the root pr oject 'eclipse-workspace.' [incubating] help - Displays a help message. model - Displays the configuration model of root project 'eclipse-workspace.' [incubating] projects - Displays the sub-projects of root project 'eclipse-workspace.' properties - Displays the properties of root project 'eclipse-workspace.' tasks - Displays the tasks runnable from root project 'eclipse-workspace.' To see all tasks and more detail, run gradle tasks --all To see more detail about a task, run gradle help --task <task> To list all the tasks of the project, run the below command: To display more details about a task, run the below command: Listing Dependencies In Gradle, we can list the dependencies which are broken down by the configuration. To list the dependencies, run the below command: Output: 
Next TopicGradle Dependencies
|

 For Videos Join Our Youtube Channel: Join Now
Feedback
- Send your Feedback to [email protected]
Help Others, Please Share


