Python Programming with Google Colab
In this article, we will learn to practice Python programming using Google colab. We will discuss collaborative programming, automatic setting-up, getting help effectively. Google Colab is a suitable tool for Python beginners. IntroductionGoogle Colab is the best project from Google Research. It is an open-source, Jupyter based environment. It helps us write and execute Python based code, other Python-based third-party tools and machine learning frameworks such as Python, PyTorch, Tensorflow, Keras, OpenCV and many others. It runs on the web-browser. Google Colab is an open-source platform where we can write and Python execute code. It requires any source on the internet. We can also mount it into Google Drive. Google Colab requires no configuration to get started and provides free access to GPUs. It facilitates us to share live code, mathematical equations, data visualization, data cleaning and transformation, machine learning models, numerical simulations, and many others. Advantages of Using Google ColabGoogle Colab provides many features. These features are given below.
What are GPUs and TPUs in Google Colab?The reason for the popularity of Google Colab it provides free GPUs and TPUs. Machine learning and deep learning training model takes numerous hours on a CPU. We have faced all these issues in our local machine. With GPUs and TPUs, we can train models in a matter of minutes or seconds. Machine learning enthusiasts always prefer GPU over CPU because of the absolute power and speed of execution. But GPUs are much expensive; not everyone can afford them. That's why Google Colab comes into the scenario. Google Colab is completely free and can continuously run for 12 hours. It is sufficient to meet all requirements of the machine learning and deep learning projects. Difference between GPU and CPUA few important features are given below.
Which GPU is used today?Let's take two scenarios before using the GPU for deep learning. First Scenario: First, we need to determine our requirements regarding what kind of resources we need to accomplish our tasks. If our machine learning task is small or can be fit in complex sequential processing, we don't need a big system to work on GPU. It means if we are working on the other ML area/algorithm. We don't require using GPU. Second Scenario: If our task is much extensive and has handle-able data then we can use the GPU hardware acceleration. It enhances the execution speed and provides output within seconds or minutes. Start Working with Google ColabTo start working with Google Colab, we need to type the URL on the web browser below. It will launch the following window opens with a popup offering many features. 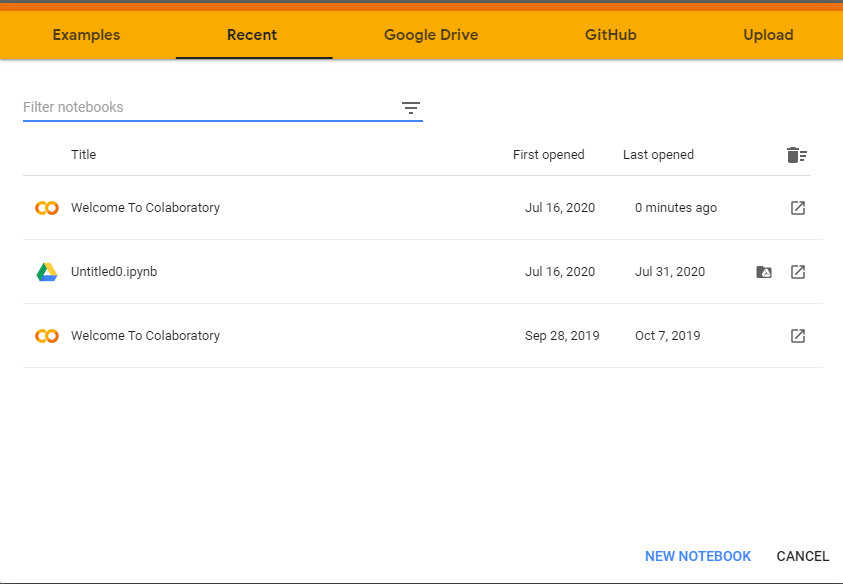
It provides few options to create notebook as well as upload and select from various sources such as - Google Drive, Local computer, GithHub. Click on the NEW NOTEBOOK button to create new a Colab notebook. 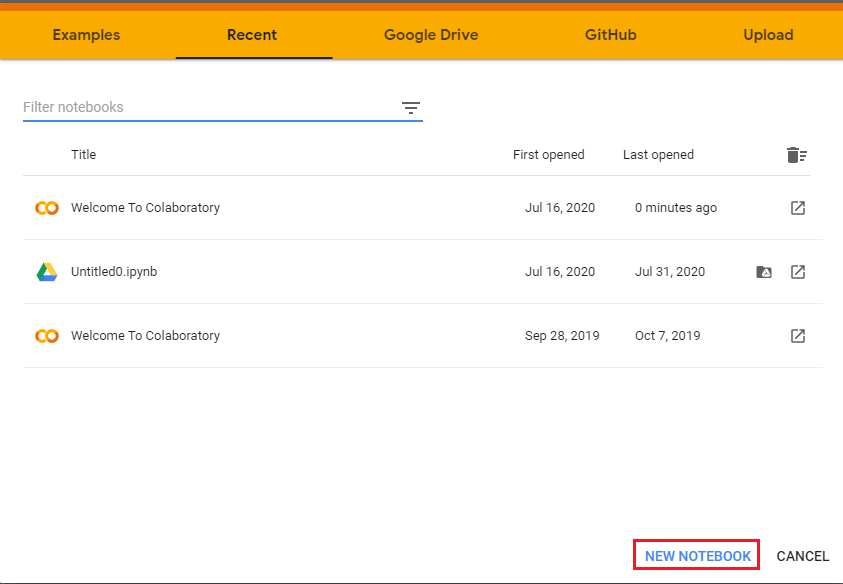
GPU is the best choice. GPUs are much suitable for intensive task. Uploading File using Goggle DriveWe can upload GitHub's project and search it to get the code. Similarly, we can upload the code directly from Google drive. We can also filter saved notebooks by name, date, owner, or modified date. 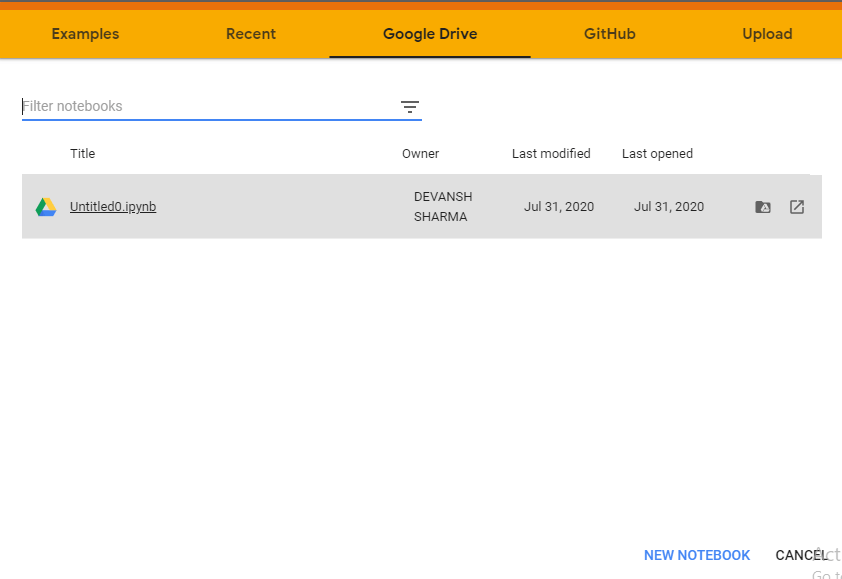
It will automatically upload the code in Jupyter Colab. 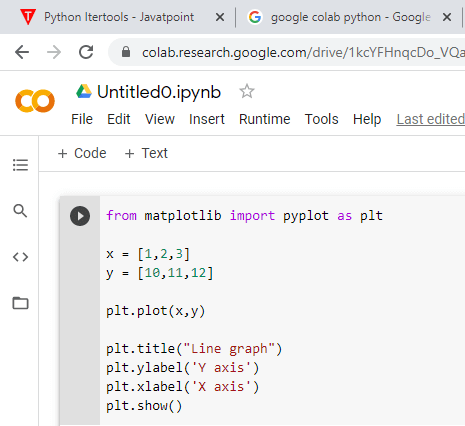
Cloning Repositories in Google ColabWe can also create a Git repository inside the Google Colab. We just need to visit any GitHub repository and copy the clone link of the repository. Step - 1: Find the Github repo and get the "Git" link. For example - We are using https://github.com/rajk9200/construction.git Clone or download > Copy the link Step - 2: Simply, run the following command. After hitting enter, it will start cloning. Step - 3: Open Folder in Google Drive. Step - 4: Open a Notebook and run the Github repo in Google Colab. Saving Colab NotebookAll the notebooks are saved in the Google Drive automatically after a certain period. Hence we don't lose our working process. However, we can save our notebook *.py and *.ipynb formats explicitly. 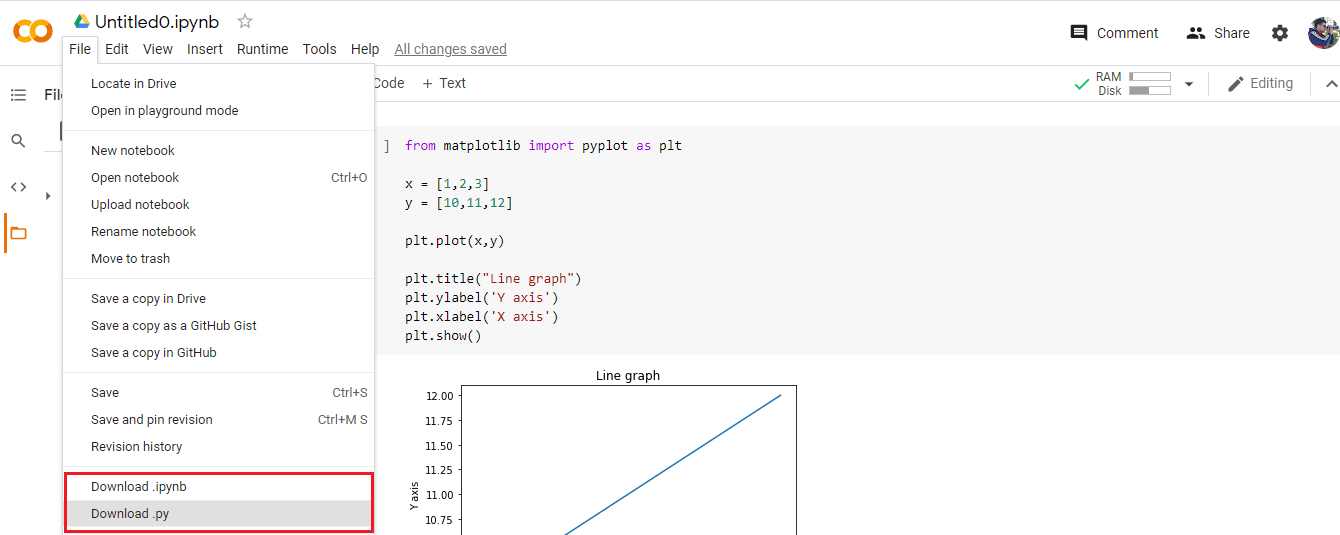
Setting up Hardware Accelerator GPU for RuntimeGoogle Colab offers a free cloud service with a GPU hardware accelerator. For the machine learning and deep learning, it requires very expensive GPU machine. GPU is most essential for doing multiple computations. Why GPU is important for machine learningNowadays, GPU has become the most dominant part of machine learning and deep learning. It provides the optimized capability of more compute-intensive workloads and streaming memory loads. Another reason of its popularity, it can launch millions of threads in one call. They function unusually better than CPUs although it has a lower clock speed and it also lacks of many core management features compared to a CPU. Setup Hardware Accelerator GPU in ColabLet's follow the given step to setup GPU. Step - 1: Go to the Runtime option in Google Colab. 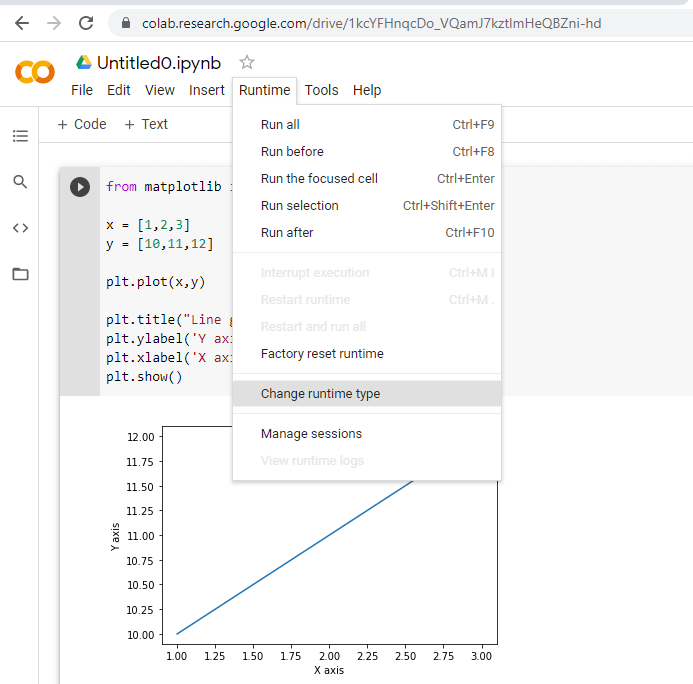
Step - 2: It will open the following popup screen change None to GPU. We can also select TPU according to our requirements by following the same process. 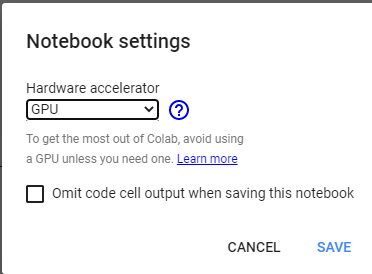
Step - 3: Now, we will check the details about the GPU in Colab. Type the following code to import the important packages. Check the GPU accelerator Output: /device:GPU:0 Now, we will check the hardware used for GPU. Output:
[name: "/device:CPU:0"
 device_type: "CPU"
 memory_limit: 268435456
 locality {
 }
 incarnation: 11369748053613106705, name: "/device:XLA_CPU:0"
 device_type: "XLA_CPU"
 memory_limit: 17179869184
 locality {
 }
 incarnation: 514620808292544972
 physical_device_desc: "device: XLA_CPU device", name: "/device:XLA_GPU:0"
 device_type: "XLA_GPU"
 memory_limit: 17179869184
 locality {
 }
 incarnation: 15275652847823456943
 physical_device_desc: "device: XLA_GPU device", name: "/device:GPU:0"
 device_type: "GPU"
 memory_limit: 14640891840
 locality {
   bus_id: 1
   links {
   }
 }
 incarnation: 1942537478599293460
 physical_device_desc: "device: 0, name: Tesla T4, pci bus id: 0000:00:04.0, compute capability: 7.5"]
Using Terminal Commands on Google ColabWe can also use Colab cell for running terminal commands. In the Google Colab, Python libraries such as Pandas, Numpy, scikit-learn. If we want to install another library of Python using the following command. It is quite easy to run the command. Everything is similar to the regular terminal. We just need to put an exclamation (!) before writing each command as below. Or Sharing Our NotebookWe can share our Colab notebook with others. It is the best way to interact with other data science expert. It helps to share our code same as sharing a Google Doc or Google sheet. 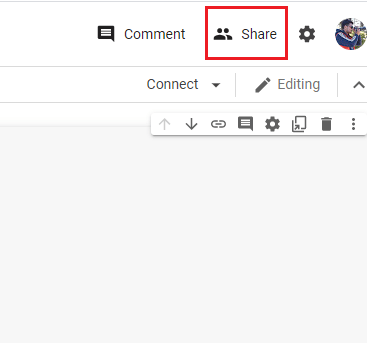
We need to click on the share button. It will show the option of creating a shareable link that we can share through any platform. There is also an option to invite the people through the email address. 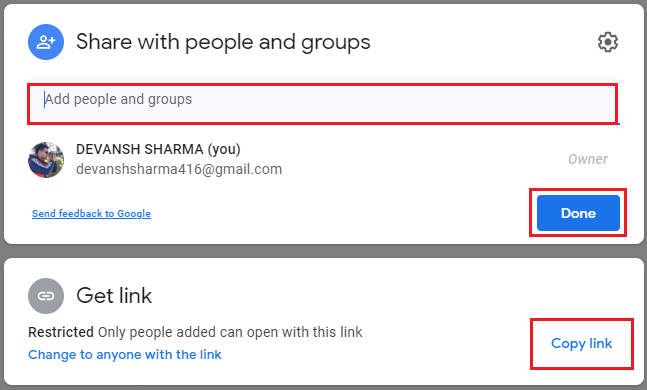
It is one of the outstanding features of Google Colab. Few Important Colab CommandsColab provides some amazing commands. It offers various commands that facilitate us to perform operations in short. These commands are used with a % prefix. List of all magic commands are given below. Output: Available line magics: %alias %alias_magic %autocall %automagic %autosave %bookmark %cat %cd %clear %colors %config %connect_info %cp %debug %dhist %dirs %doctest_mode %ed %edit %env %gui %hist %history %killbgscripts %ldir %less %lf %lk %ll %load %load_ext %loadpy %logoff %logon %logstart %logstate %logstop %ls %lsmagic %lx %macro %magic %man %matplotlib %mkdir %more %mv %notebook %page %pastebin %pdb %pdef %pdoc %pfile %pinfo %pinfo2 %pip %popd %pprint %precision %profile %prun %psearch %psource %pushd %pwd %pycat %pylab %qtconsole %quickref %recall %rehashx %reload_ext %rep %rerun %reset %reset_selective %rm %rmdir %run %save %sc %set_env %shell %store %sx %system %tb %tensorflow_version %time %timeit %unalias %unload_ext %who %who_ls %whos %xdel %xmode Available cell magics: %%! %%HTML %%SVG %%bash %%bigquery %%capture %%debug %%file %%html %%javascript %%js %%latex %%perl %%prun %%pypy %%python %%python2 %%python3 %%ruby %%script %%sh %%shell %%svg %%sx %%system %%time %%timeit %%writefile Automagic is ON, % prefix IS NOT needed for line magics. Command for List of Local Directories Output: drwxr-xr-x 1 root 4096 Dec 2 22:04 sample_data/ Command for getting Notebook History Output: %lsmagic %ldir %history Getting CPU Time Output: CPU times: user 4 µs, sys: 0 ns, total: 4 µs Wall time: 7.15 µs Getting the how long has the system has been running Output: 08:44:32 up 12 min, 0 users, load average: 0.00, 0.03, 0.03 Display available and used memory Output:
/bin/bash: -c: line 0: syntax error near unexpected token `('
/bin/bash: -c: line 0: `free -hprint("-"*100)'
Display the CPU specification Output: Architecture: x86_64 CPU op-mode(s): 32-bit, 64-bit Byte Order: Little Endian CPU(s): 2 On-line CPU(s) list: 0,1 Thread(s) per core: 2 Core(s) per socket: 1 Socket(s): 1 NUMA node(s): 1 Vendor ID: GenuineIntel CPU family: 6 Model: 63 Model name: Intel(R) Xeon(R) CPU @ 2.30GHz Stepping: 0 CPU MHz: 2300.000 BogoMIPS: 4600.00 Hypervisor vendor: KVM Virtualization type: full L1d cache: 32K L1i cache: 32K L2 cache: 256K L3 cache: 46080K NUMA node0 CPU(s): 0,1 Flags: fpu vme de pse tsc msr pae mce cx8 apic sep mtrr pge mca cmov pat pse36 clflush mmx fxsr sse sse2 ss ht syscall nx pdpe1gb rdtscp lm constant_tsc rep_good nopl xtopology nonstop_tsc cpuid tsc_known_freq pni pclmulqdq ssse3 fma cx16 pcid sse4_1 sse4_2 x2apic movbe popcnt aes xsave avx f16c rdrand hypervisor lahf_lm abm invpcid_single ssbd ibrs ibpb stibp fsgsbase tsc_adjust bmi1 avx2 smep bmi2 erms invpcid xsaveopt arat md_clear arch_capabilities Getting the List of All running VM processes Output: List all running VM processes. Done error: garbage option Usage: ps [options] Try 'ps --help <simple|list|output|threads|misc|all>' or 'ps --help <s|l|o|t|m|a>' for additional help text. For more details see ps(1). How to Design Form in Google ColabGoogle Colab provides the facility to design forms. Let's see the following code to understand how to design form in Google Colab. In this section, we will design a form takes the student information. Output: 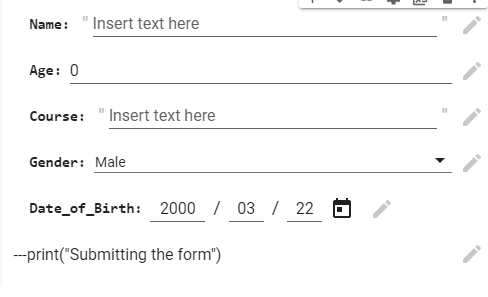
Graph PlottingWe can plot various graphs in Colab for the data visualization, as well. In the following example, the graph will show a plot containing more than one polynomial, Y = x3 + x2 + x[3]. Let's see the following code. Example - Output: 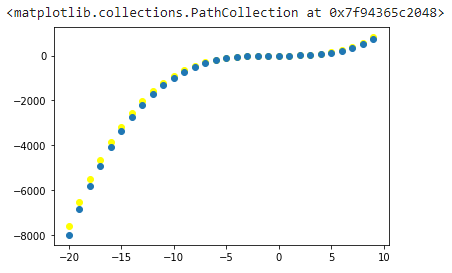
The below code will draw the heat map. Example - Output: 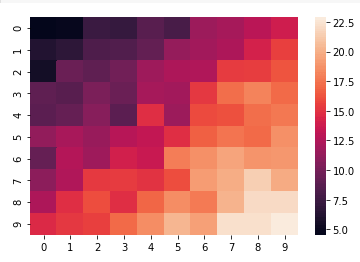
TPU (Tensor Processing Unit) in Google ColabThe TPU (Tensor Processing Unit) is used to accelerate on a Tensorflow graphs. They are based on the AI acceleration application-specification integrated circuit which is specially designed for the neural network machine. It is developed by Google. TPU consists of an excellent configuration of teraflops, floating-point performance, and others. There are 180 teraflops of floating-point performance in each TPU. Generally, a teraflop is the measurement of the computer's speed. Its speed can be a trillion floating-point operations per second. How to set up a TPU in Google Colab?The steps are the same as the setup of a GPU.
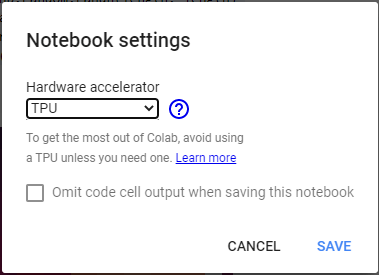
Check Running on TPU Hardware AcceleratorTo check the TPU hardware acceleration, it requires the Tensorflow package. Consider the below code. Running on TPU ['10.43.45.130:8470'] ConclusionGoogle Colab is a Jupyter notebook developed by Google Research. It is used to execute the Python-based code to build a machine learning or deep learning model. It provides the GPU and TPU hardware acceleration and available for free (unless we would like to go pro). It is quite easy to use and share due to the zero-configuration features requirement. We can combine the executable code with and HTML, images, Latex, and others. One of the best thing, it has included a vital machine learning library like TensorFlow, already installed. It is a perfect tool for machine learning and deep learning model building. Colab is outstanding for developing neural networks. The parallelism and execution of multiple threads can be achieved by the CPU based hardware accelerator. If we use the IDE for machine learning and deep learning model, it will take Nemours hour to execute code. But with the help of the Google Colab, it can be done within few seconds or minutes. It provides the facility to import data from Github and Google drive. |
 For Videos Join Our Youtube Channel: Join Now
Feedback
- Send your Feedback to [email protected]
Help Others, Please Share


