Connect to a PostgreSQL Database ServerIn this section, we are going to understand how to connect the PostgreSQL database server through an interactive terminal software called pgAdmin and the SQL Shell(psql) application. If we installed the PostgreSQL database server, then the PostgreSQL installer will also connect with some beneficial tools to work through the PostgreSQL database server. Here, we are going to discuss how we can connect the PostgreSQL database server through the below tools:
PgAdmin: It is a web-based front-end management tool for PostgreSQL, which helps us connect the PostgreSQL database server. SQL shell(psql): It is a terminal-based front-end application, and we can also use this application to connect the PostgreSQL database server. We will now connecting the PostgreSQL database server with the help of pgAdmin.
Firstly, we will understand how to connect to a database with the help of the pgAdmin application. The pgAdmin tool permits us to relate with the PostgreSQL database server through an in-built user interface. And here, we are using the pgadmin4 version to connected the database. We will follow the below steps to connect the PostgreSQL database server using the pgAdmin GUI tool: Step1: Launch the pgAdmin application Firstly, we will open the pgAdmin application. For this, we will enter pgAdmin into the search bar of our system, as shown in the below screenshot: 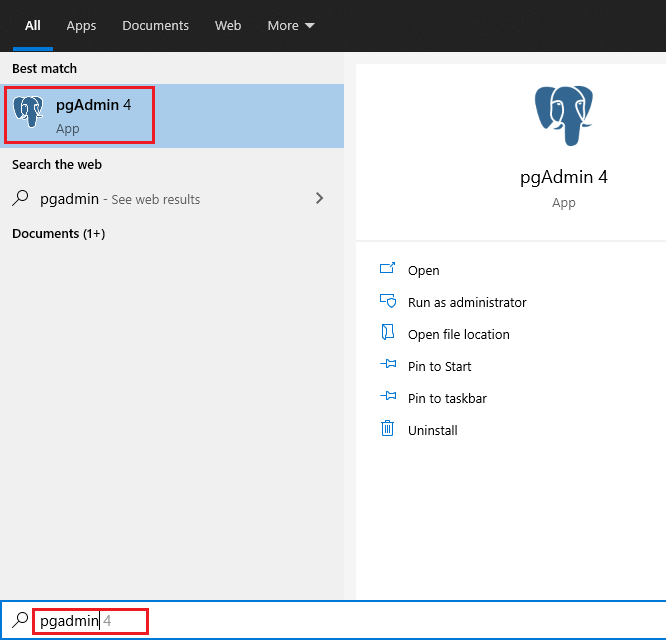
After clicking on the pgAdmin application, it will launch on the web browser, as we can see in the following screenshot: 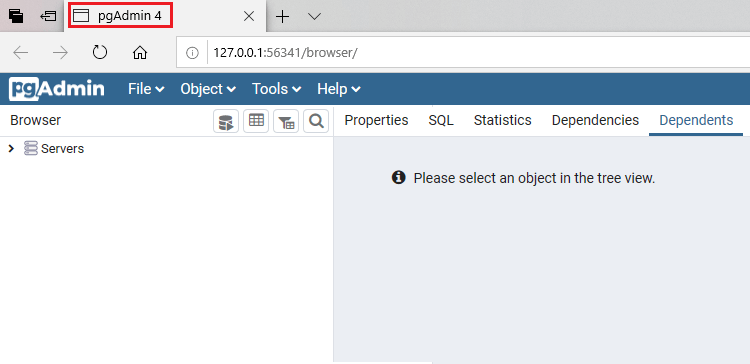
Step2: Create a server After that, we will right-click on the Servers node and select the Create → Server… menu to create a server, as we can see in the below image: 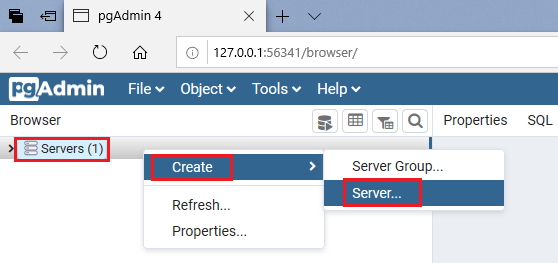
Step3: Provide the server name After selecting the Server option, the Create-Server window will be opened, where we enter the server name in the Name column, for example, PostgreSQL1 and then we will click on the Connection tab, as shown below: 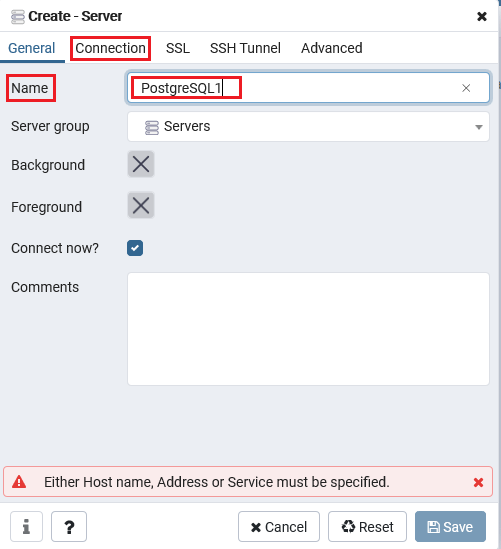
Step4: Provide the host and password After clicking on the Connection tab, we will provide the details of the host and password for the Postgres user, and after that, we will click on the Save button. 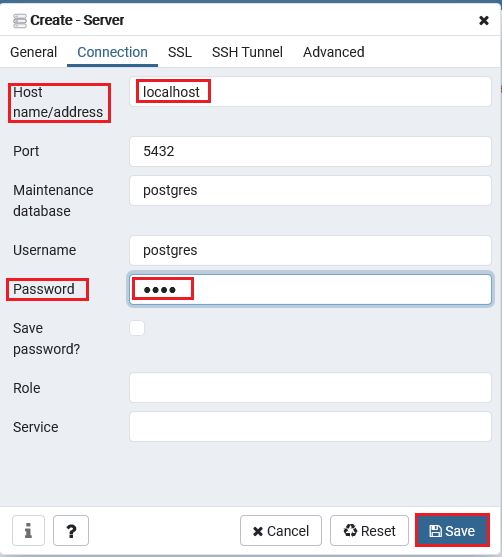
Step5: Expanding the server In the next step, we will click on the Servers node to expand the server. And PostgreSQL has a database named Postgres by default, as we can see in the following image: 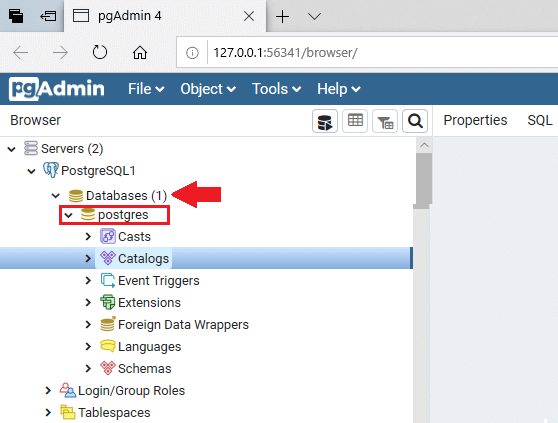
Step6: Open the Query tool Now, we will open the query tool by selecting the menu item Tool → Query Tool, or we can directly click the query tool icon nearby Browser, as we can see in the following screenshot: 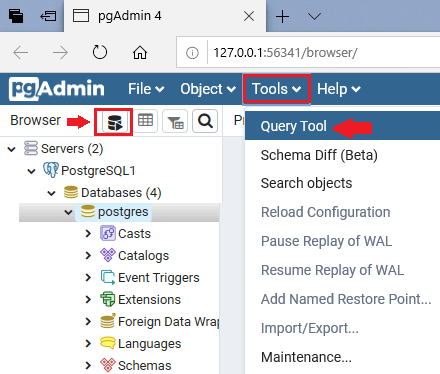
Step7: Enter the command in the Query editor Once the query tool is opened successfully, we will enter the below command in the Query Editor and click on the Execute button. And after implementing the above command, we will get the Data output of the Specified command, which display the complete information of the currently used version of PostgreSQL, as shown in the below image: 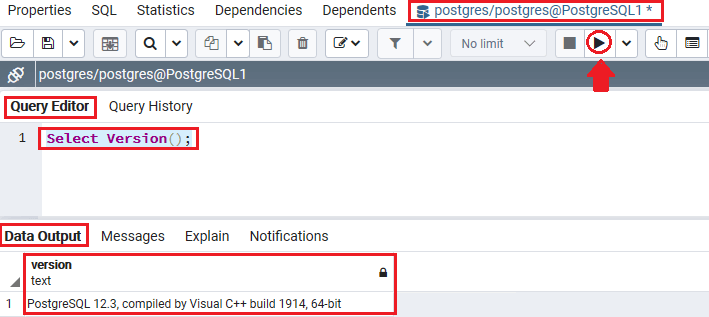
After understanding the PostgreSQL database server's connection through pgAdmin4, we will learn the connection process of the PostgreSQL database server using SQL Shell(psql).
The psql is an interactive shell tool provided by PostgreSQL. The psql permits us to interrelate with the PostgreSQL database server, for example, working on the database objects and implementing the SQL commands. To connect to the PostgreSQL database server by using the SQL shell(psql) application, we will follow the below steps: Step1: Open the psql Firstly, we will open the psql in our local system. For this, we will go to the home button and search for SQL shell(psql) and click on the Open button, as shown in the below screenshot: 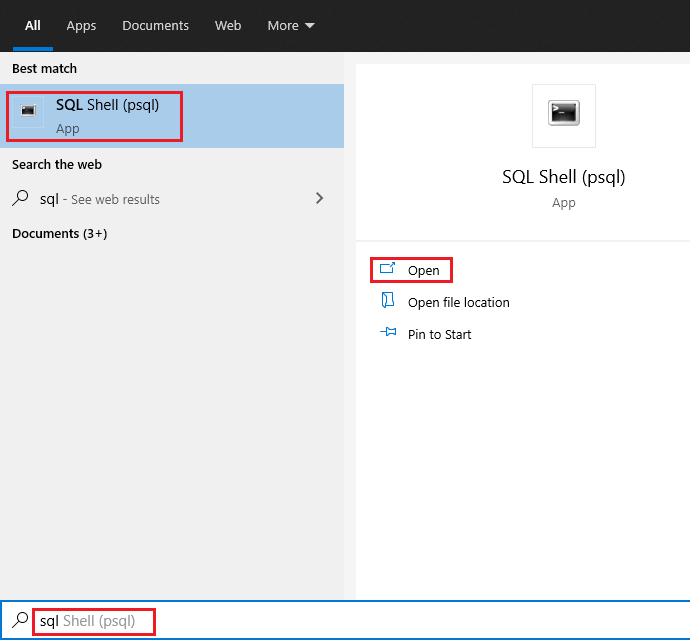
Step2: Connect the Database Once the SQL shell is opened, we will press the enter key four to five times. And then provide the password for the user (which we created earlier) to connect the database server using the Postgres user who is a by default user in PostgreSQL, as shown in the below screenshot: 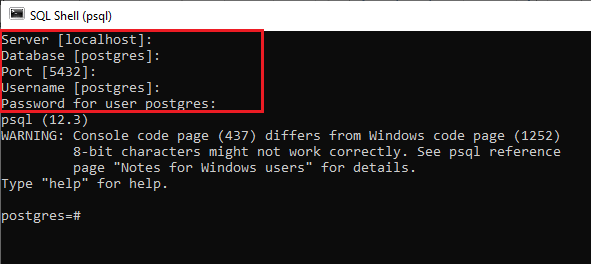
Note: If we want to provide all the details like Server, Database, Port, Username, and Password manually, we will press Enter key and the application will use the default values, which are defined in the square bracket [] and move the arrow to the new line.Suppose we have localhost as the default database server, and we were providing the Postgres user password, we will enter a similar password for the Postgres user-specified throughout the PostgreSQL installation. Step3: Entering a command to relate with the PostgreSQL Database Server In this step, we will write one SQL command, which helps us relate with the PostgreSQL Database Server. In the below command, we are trying to get the complete details about the current version of PostgreSQL: After implementing or pressing the Enter key, we will get the following output, which displays the full information about the existing version of PostgreSQL version of our system: 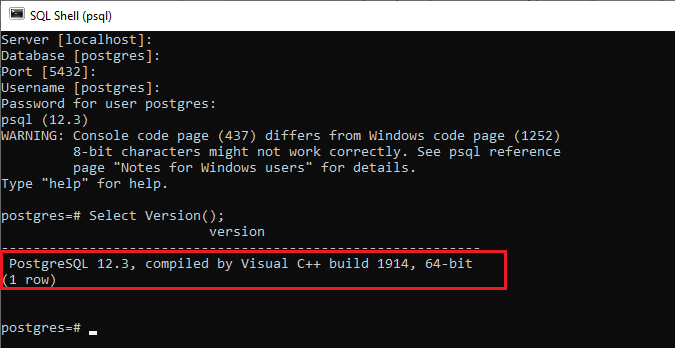
Note: While writing a command in psql, we should make sure that the specified command would end with a semicolon (;).
If any application supported by ODBC or JDBC also be connected to the PostgreSQL database server. Furthermore, when we develop an application that uses an explicit driver, the particular software can also connect to the PostgreSQL database server. For example, we can connect the PostgreSQL from JAVA, connect the PostgreSQL from Python and connect to PostgreSQL from PHP. OverviewIn the section, we have understood the connection of the PostgreSQL database server through different client tools by using the pgAdmin GUI program and SQL Shell(psql).
Next TopicPostgreSQL Create Database
|
 For Videos Join Our Youtube Channel: Join Now
Feedback
- Send your Feedback to [email protected]
Help Others, Please Share


