| |

Linux Create FileLinux file system considers everything as a file in Linux; whether it is text file images, partitions, compiled programs, directories, or hardware devices. If it is not a file, then it must be a process. To manage the data, it forms a tree structure. Linux files are case sensitive, so test.txt and Test.txt will be considered as two different files. There are multiple ways to create a file in Linux. Some conventional methods are as follows:
Apart from all of the above methods, we can also create a file from the desktop file manager. Let's understand the above methods in detail: 1. Using cat commandThe cat command is one of the most used commands in Linux. It is used to create a file, display the content of the file, concatenate the contents of multiple files, display the line numbers, and more. Here, we will see how to create files and add content to them using cat command. First of all, create a directory and named it as New_directory, execute the mkdir command as follows: Change directory to it: Output: 
Now execute the cat command to create a file: The above command will create a text file and will enter in the editor mode. Now, enter the desired text and press CTRL + D key to save and exit the file and it will return to the command line. To display the content of the file, execute the cat command as follows: Consider the below output: 
2. Using the touch commandThe touch command is also one of the popular commands in Linux. It is used to create a new file, update the time stamp on existing files and directories. It can also create empty files in Linux. The touch command is the simplest way to create a new file from the command line. We can create multiple files by executing this command at once. To create a file, execute the touch command followed by the file name as given below: To list the information of the created file, execute the below command: Consider the below output: 
To create multiple files at once, specify files and their extensions after the touch command along with single space. Execute the below command to create three files at once: To create two different types of file, execute the command as follows: The above command will create two different files named as test4.txt and test.odt. To display the file and its timestamp, execute the ls command as follows: Consider the below output: 
If we pass the name of an existing file, it will change the timestamp of that file. Note: The significant difference between touch and cat command is that using cat command, we can specify the content of the file from the command prompt comparatively the touch command creates a blank file.3. Using the redirect (>) symbolWe can also create a file using the redirect symbol (>) on the command line. To create a file, we just have to type a redirect symbol (>) followed by the file name. This symbol is mostly used to redirect the output. There are two ways to redirect the output. If we use > operator, it will overwrite the existing file, and >> operator will append the output. To create a file with redirect (>) operator, execute the command as follows: The above command will create a file, to display the existence of the created file, execute the below command: Consider the below output: 
4. Using echo commandThe echo command is used to create a file, but we should specify the file content on the command line. To create the file with the echo command, execute the command as follows: The above command will create the test6 file. To display the existence of the file, execute the below command: consider the below output: 
5. Using printf commandWe can also create a file using printf command. For this we need to specify the file content on the command line. To create a file with the printf command, execute the command as follows: To display the file details, execute the ls command as follows: To display the file content, execute the cat command as follows: Consider the below output: 
6. Using Text EditorWe can also create a file using the different text editors like vim, nano, vi, and more.
We can create a file using the Vim text editor. If you do not have the vim editor installed on your machine, execute the below command: Output: [sudo] password for javatpoint: Reading package lists... Done Building dependency tree Reading state information... Done The following additional packages will be installed: vim-runtime Suggested packages: ctags vim-doc vim-scripts The following NEW packages will be installed: vim vim-runtime 0 upgraded, 2 newly installed, 0 to remove and 64 not upgraded. Need to get 6,878 kB of archives. After this operation, 33.4 MB of additional disk space will be used. Do you want to continue? [Y/n] y Get:1 http://in.archive.ubuntu.com/ubuntu eoan/main amd64 vim-runtime all 2:8.1.0875-5ubuntu2 [5,669 kB] Get:2 http://in.archive.ubuntu.com/ubuntu eoan/main amd64 vim amd64 2:8.1.0875-5ubuntu2 [1,209 kB] Fetched 6,878 kB in 3s (2,256 kB/s) Selecting previously unselected package vim-runtime. (Reading database ... 216385 files and directories currently installed.) Preparing to unpack .../vim-runtime_2%3a8.1.0875-5ubuntu2_all.deb ... Adding 'diversion of /usr/share/vim/vim81/doc/help.txt to /usr/share/vim/vim81/doc/ help.txt.vim-tiny by vim-runtime' Adding 'diversion of /usr/share/vim/vim81/doc/tags to /usr/share/vim/vim81/doc/tags .vim-tiny by vim-runtime' Unpacking vim-runtime (2:8.1.0875-5ubuntu2) ... Selecting previously unselected package vim. Preparing to unpack .../vim_2%3a8.1.0875-5ubuntu2_amd64.deb ... Unpacking vim (2:8.1.0875-5ubuntu2) ... Setting up vim-runtime (2:8.1.0875-5ubuntu2) ... Setting up vim (2:8.1.0875-5ubuntu2) ... update-alternatives: using /usr/bin/vim.basic to provide /usr/bin/vim (vim) in auto mode update-alternatives: using /usr/bin/vim.basic to provide /usr/bin/vimdiff (vimdiff) in auto mode update-alternatives: using /usr/bin/vim.basic to provide /usr/bin/rvim (rvim) in au to mode update-alternatives: using /usr/bin/vim.basic to provide /usr/bin/rview (rview) in auto mode update-alternatives: using /usr/bin/vim.basic to provide /usr/bin/vi (vi) in auto m ode update-alternatives: using /usr/bin/vim.basic to provide /usr/bin/view (view) in au to mode update-alternatives: using /usr/bin/vim.basic to provide /usr/bin/ex (ex) in auto m ode Processing triggers for man-db (2.8.7-3) ... The Vim text editor is successfully installed. To create a file using the vim text editor, execute the below command: The above command will open the text editor, press i key to go to the insert mode of the editor. Enter the file content, press Esc key preceded by :wq to save and exit the file. The text editor looks like as follows: 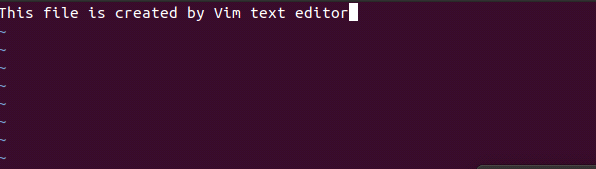
To display the file information, execute the ls command as follows: To view the file content, run the cat command as follows: Consider the below output: 
7. Using Nano editorWe can create a file using the nano text editor. To create a file, execute the below command: The above command will open the nano text editor. Enter the desired text and press CTRL + X then type y for confirmation of the file changes. Press Enter key to exit from the editor. The nano text editor looks like the below image: 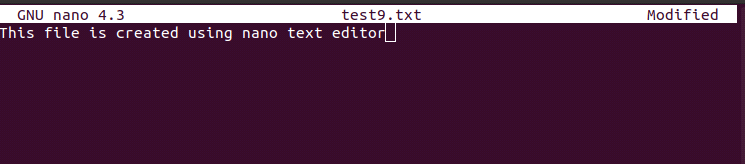
To display the file information, execute the below command: To view the file content, execute the below command: Consider the below output: 
Using Vi editorTo create a file with Vi editor, execute the below command: The above command will open the Vi editor. Press i key for the insert mode and enter the file content. Press Esc key and :wq to save and exit the file from the editor. To display the file information, execute the below command: To display the file content, execute the below command: Consider the below output: 
Next TopicLinux File Command
|
 For Videos Join Our Youtube Channel: Join Now
Feedback
- Send your Feedback to [email protected]
Help Others, Please Share


