| |

MongoDB Ops ManagerUsing the OPS manager, we can monitor, automate, and back up our MongoDB infrastructure. 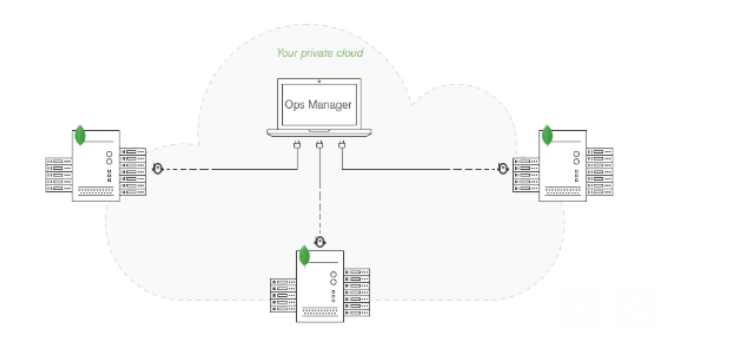
Server Pool of Ops MangerUsing the Ops Manager server pool, we can get administrative privileges, i.e., a pool of provisioned servers that already have Automation installed maintained by the administrator of Ops Manager. We can request servers from the server pool to host the deployment when we want to create a new deployment. 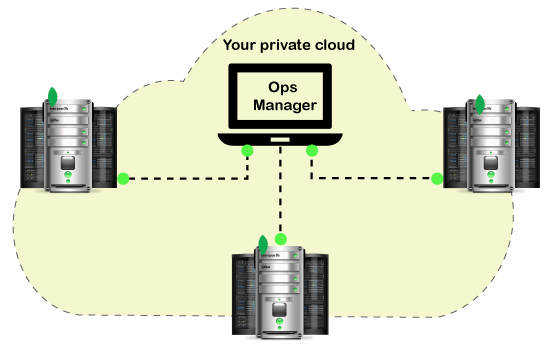
Installing Ops Manager on Microsoft WindowsStep 1: Log in to your PC with Administrative privileges, plan your configuration, deploy hosts that meet the Ops Manager System requirement, and install the Ops Manager Application Database and other optional Backup Database. Step 2: Now, open any browser available on your PC then download the latest version of the Ops Manager from the MongoDB download center. 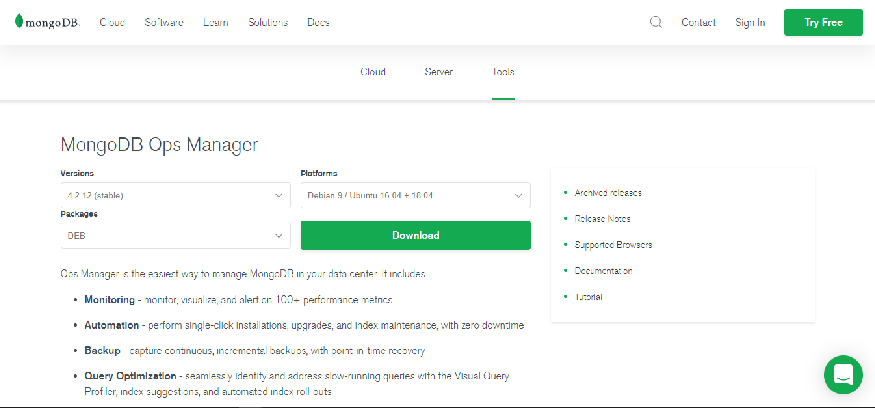
Step 3: After downloading is complete, install the Ops Manager package on all the servers you are using for the Ops Manager. Step 4: Now, with Administrator access privileges, open the <configLogPath>\Server\ Config\conf-MMS.properties on the server that is running Ops Manger. Step 5: Start the Ops Manager instances by clicking on the Start button → Administrative tools → Service → In the list right-click on the MongoDB Ops Manager HTTP Service and Finally, click on the Start button. Step 6: Now, register the first user on the Ops Manager home page.
How to update MongoDB Ops ManagerYou have to follow these steps to upgrade the Ops manager running on Windows OS. Step 1: Close your running Ops manager instance by click on the start button → Administrative tool → services → then right-click on the MongoDB Ops Manager HTTP Services and select Stop. Step 2: Now, uninstall the current version of the Ops Manager by clicking on the start button → Control Panel → Programs and Feature → then Right-click MongoDB Ops Manager and select Uninstall. Step 3: After uninstalling the old version, you have to download the latest version of the Ops Manager package. Step 4: On the host that you are upgrading, install the Ops Manager. Step 5: After installing, start the Ops Manager on the upgraded host. Start → Administrative Tools → Services → right-click on the MongoDB Ops Manager HTTP Service and select Start. Step 6: Now, repeat the process for all other Ops Manager hosts in your deployment. Step 7: Finally, update all agents once your upgrade is finished. Deploying a Replica Set to the Ops ManagerA replica set is the basic functionality of all production deployment architecture. It is a group of MongoDB deployment that has a same data set. Follow the steps given below to deploy a replica set. Step 1: Click on the Deployment option of the Ops Manager. Step 2: Now, click over the Cluster Creation view. Then you are prompted to the new popup window. Step 3: Click on the Add New arrow button on the top-right corner of the Deployment page. Step 4: Now, to open the Create New Replica Set view, select the new Replica Set option from the drop-down menu. Step 5: Select the Replica Set configuration to configure the Cluster-Wide Settings. You need to configure at least those settings which are marked with asterisk*. Step 6: After that, you need to configure each Replica Set Member. Step 7: After configuring the Replica Set Member configure your Replication settings. Step 8: Finally, click on the Create Replica Set option. You can now able to monitor the progress of cluster deployment from the Deployment view. Deploy a Sharded Cluster in Ops ManagerThe sharded cluster distributes the data set across a group of servers and provides horizontal scaling for large data sets and enables high throughput operations. Steps to deploy the sharded cluster: Step 1: First, log in to your cloud manager account, and at the home page, click on the deployment option. Step 2: Now, click over the Cluster Creation view. Then you are prompted to the new popup window. Step 3: Click on the Add New arrow button on the top-right corner of the Deployment page. Step 4: Now, to open the Create New Cluster menu, select the New Cluster from the drop-down menu. Step 5: Select the cluster configuration to configure the Cluster-Wide Settings. You need to configure at least those settings which are marked with asterisk*. Step 6: Now, click on the shard settings to open the shard configuration options from the Member Configuration. Step 7: After that, configure Each configuration Server and mongos in the cluster. Step 8: Now, from the replication setting, configure each replica set in the cluster. Step 9: Finally, click on the Create cluster button. Step 10: you can now review and deploy your changes. Deploy a Standalone MongoDB Instance into Ops ManagerWe can use the instance for testing and development to deploy a standalone MongoDB instance for Ops Manager. We cannot use these deployment systems for a production system as they lack in replication and development. Step 1: First, log in to your cloud manager account, and at the home page, click on the deployment option. Step 2: Now, click over the New Standalone. Then you are prompted to the new popup window. Step 3: Click on the Add New button on the top-right corner of the Deployment page. Step 4: Now, to open the Create New Standalone menu, select the New Standalone from the drop-down menu. Step 5: Select the standalone configuration to configure the Standalone Settings. You need to configure at least those settings which are marked with asterisk*. Step 6: Now, click on the shard settings to open the shard configuration options from the Member Configuration. Step 7: After that, configure Each configuration Server and mongos in the cluster. Step 8: Now, from the replication setting, configure each replica set in the cluster. Step 9: Finally, click on the Create Standalone button. Step 10: You can now review and deploy your changes.
Next TopicMongoDB Compass
|
 For Videos Join Our Youtube Channel: Join Now
Feedback
- Send your Feedback to [email protected]
Help Others, Please Share


