Javatpoint Logo
Javatpoint Logo

How to create a Timeline in Microsoft Excel?

In Microsoft Excel, the respective Timeline is considered as the visual representation of the various chronological data as well, and it is more often used in Pivot Tables to perform filtrations on the data and analyze the data over a given period of time. Despite this, we can easily create a timeline from specific date or time-related fields in our data. It also allows us to change the range of the particular used data we want to focus on, hence making it a most attractive and useful tool for data analysis. They are more suitable in case when we are dealing with the time series data.

Now, if we want to apply the "TimeLine "in Microsoft Excel, first of all, we are required to create a pivot table, and then from the Insert menu ribbon, we will select the Timeline from the filters section; just after that we will be right-clicking on the Timeline, and from the Report Connections, will choose the fields which we want to connect with the Timeline effectively. Now, drag the bar from right to left as per the need to filter the data with time.

How can one easily create a Timeline in Microsoft Excel?

To add the timeline feature in Microsoft Excel, we need to have a pivot table first.

So, let us understand the workings of creating timelines in Microsoft Excel with some examples as well.

#Example 1:

In this example, we have received the list of products sold region-wise and month-wise.

How to create a Timeline in Microsoft Excel

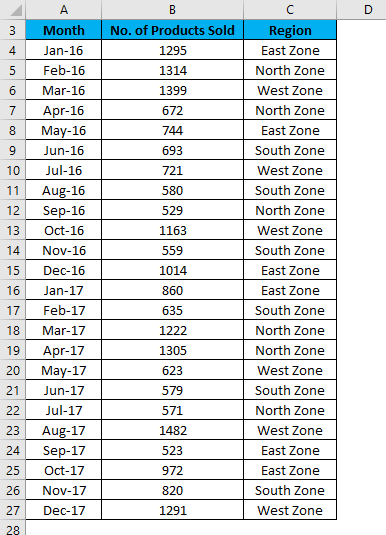
After that, we will be following the below-mentioned steps to do this in an effective manner:

Step 1: First, we must create a Pivot table for the given data.

Step 2: And after that, we are required to click on any cell in the table and then will move to the Insert tab.

Step 3: In this step, we will then click on the Pivot Table option, which is available under the "Tables section," respectively.

How to create a Timeline in Microsoft Excel

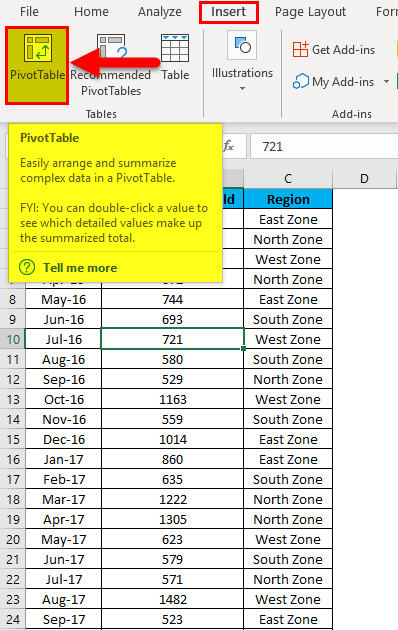
Step 4: Just after performing the above steps, we will be encountered with the creation of a Pivot table, as depicted below:

How to create a Timeline in Microsoft Excel

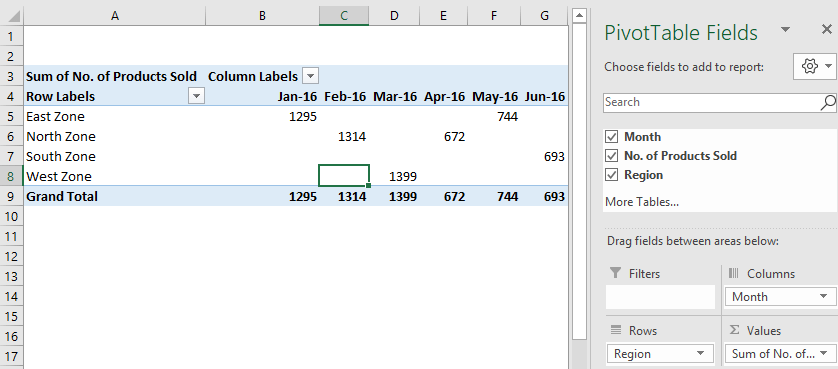
Step 5: Afterward, we will click anywhere in the created Pivot table and go to the Insert tab.

Step 6: In this step, we will click on the Timeline filter which are available under the Filters section.

How to create a Timeline in Microsoft Excel

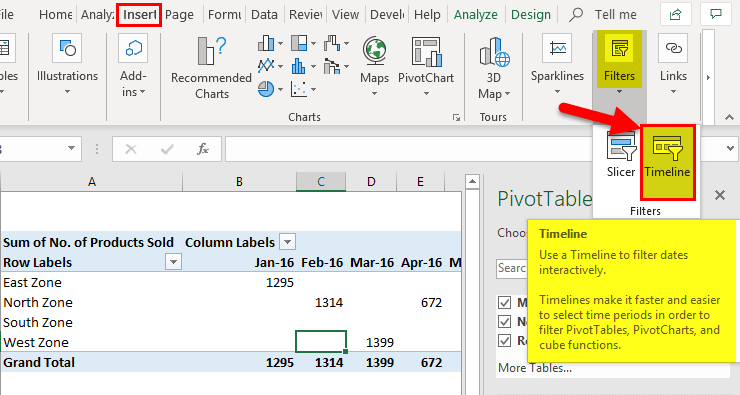
Step 7: After performing the above step, it will open an Insert Timelines dialog box. As depicted in the below-mentioned figure below.

How to create a Timeline in Microsoft Excel

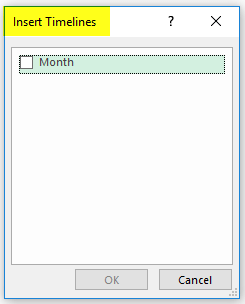
Step 8: After that, we will click on the Month checkbox inside the dialog box and then click on the OK option respectively.

How to create a Timeline in Microsoft Excel

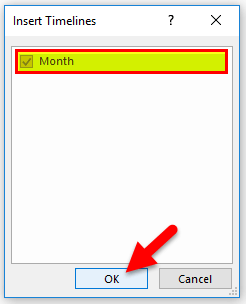
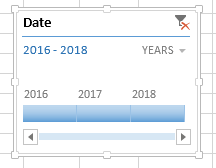
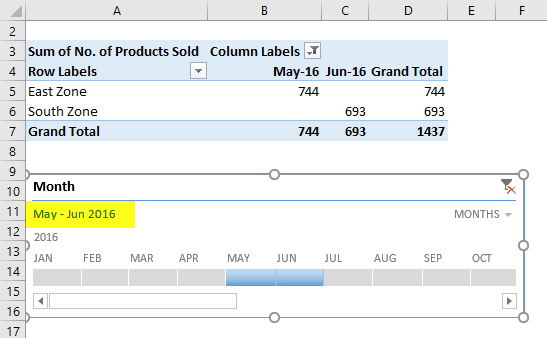
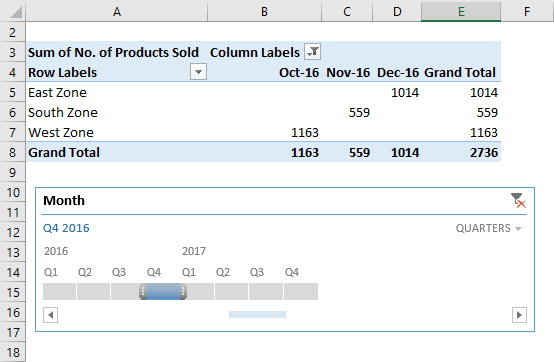
Step 9: It will then show us the Timeline, and by default, it will also depict the month's data year-wise. For example, refer to the below screenshot as well.

How to create a Timeline in Microsoft Excel

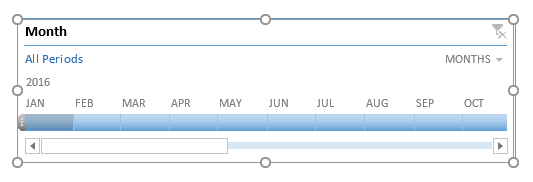
Step 10: Now, with the help of the respective Microsoft Excel Timeline, we can easily arrange the records in the Pivot table by adjusting and clicking.

How to create a Timeline in Microsoft Excel
  • From the above figure, we can see that, we have clicked on Feb month just under the 2016 year; it is displaying the data accordingly in the Pivot Table as well.
  • If we want to see the data for a continuous month, then in that particular scenario, we must drag down the bar across those months, as seen in the screenshot below. For example, we selected the data for May and June 2016, respectively.
    How to create a Timeline in Microsoft Excel
  • Besides all this, we also see the data day, quarter, and year-wise; for this, we must click the drop-down arrow on the timeline box, as shown in the screenshot below.
    How to create a Timeline in Microsoft Excel
  • After that, we will choose other date components, such as
    How to create a Timeline in Microsoft Excel
  • It will show the quarter-wise data like below:
    How to create a Timeline in Microsoft Excel
  • And if in case we want to remove the data timeline, then in that particular scenario we are about to click on the icon in the upper right corner, as depicted below. Despite this, we can also use the shortcut key ALT+Cfrom our keyboard to achieve this.
    How to create a Timeline in Microsoft Excel

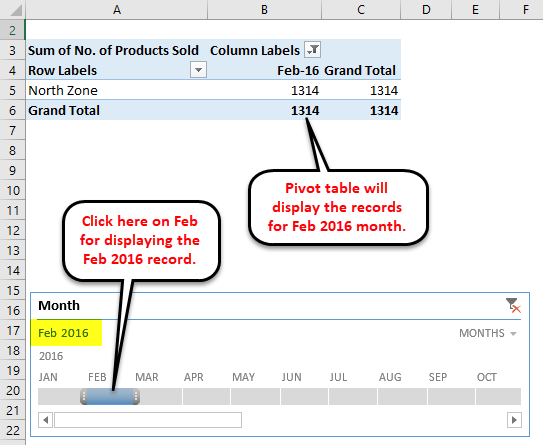
We can also customize an Excel timeline according to our needs and preferences. So for this, we are required to follow the below-mentioned steps very carefully:

Step 1: First, we must click on the Timeline window and then go to the Options tab.

How to create a Timeline in Microsoft Excel

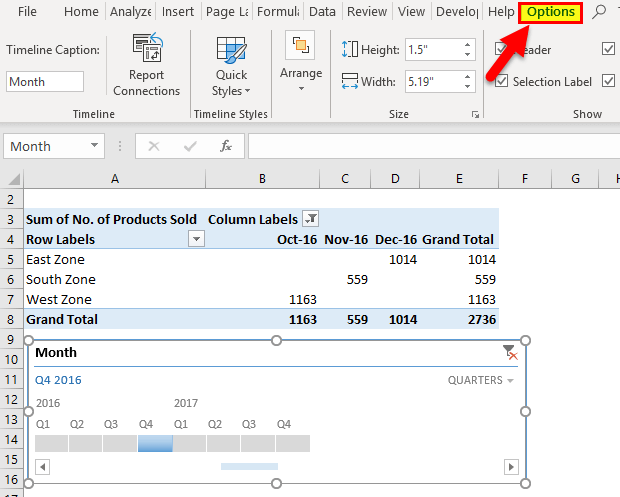
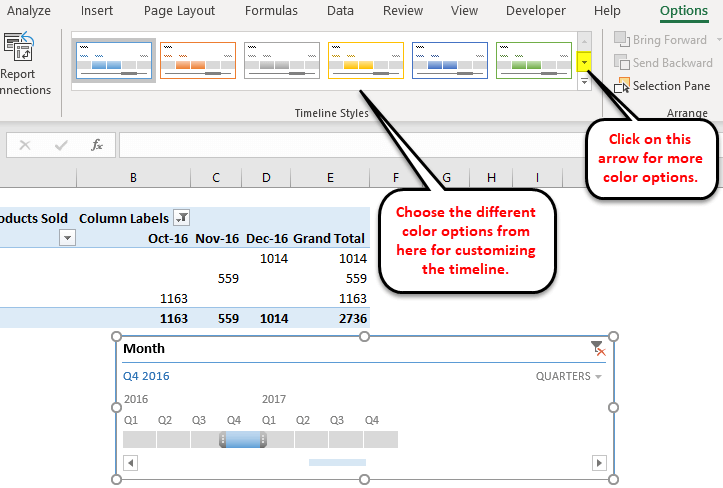
Step 2: And in this step, we need to click on any color option that are present under the Timeline Styles section, as depicted below. How to create a Timeline in Microsoft Excel

Step 3: We can also change the size of the timeline window as per our needs and requirements.

Step 4: Finally, we can change the name of the timeline window by clicking on the Timeline Captions present just under the Timeline section.

What are the Top Timeline Tools available in Microsoft Excel?

In Microsoft Excel, the respective Timelines help to filter out the particular dates of the pivot tables, and this could be effectively achieved with the various tools that will help in assisting the working of the Timeline as well.

The timeline tools appear to the right and left of the Options tab, as depicted below in the following two images.

How to create a Timeline in Microsoft Excel

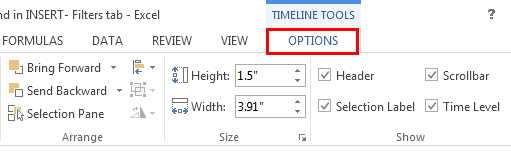
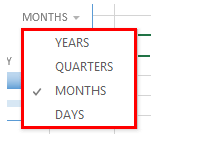
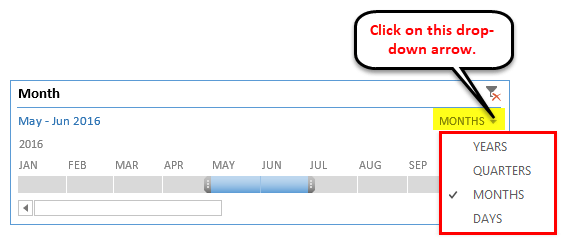
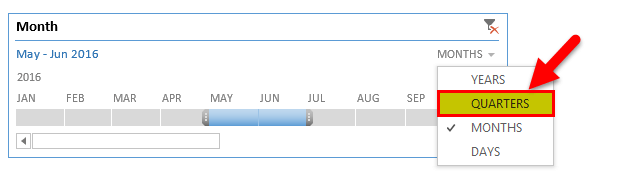
The major timeline tools are listed as follows:

1) Timeline slicer

In Microsoft Excel, the respective "timeline slicer" usually allows toggling between years, quarters, months, and days. In the dashboard, the option is to combine the Timeline with the slicer respectively.

Moreover, compared to the normal date filter, the particular timeline slicer is a more effective visual tool available in Microsoft Excel because it provides a graphical representation to help us track the critical milestones effectively.

How to create a Timeline in Microsoft Excel

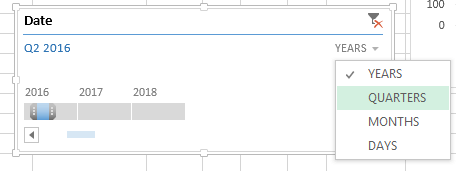
2) Scroll bar

In Microsoft Excel, the Scroll Bar usually appears in the "Options tab," and it mainly helps select the respective periods. And it will also allow us to scroll through the years, quarters, months, and days effectively.

How to create a Timeline in Microsoft Excel How to create a Timeline in Microsoft Excel

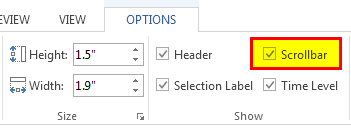
3) Time Level

Now, the Time Level tool in Microsoft Excel allows us to select from four different time levels based on our choice: years, quarters, months, and days.

How to create a Timeline in Microsoft Excel How to create a Timeline in Microsoft Excel

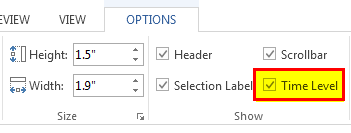
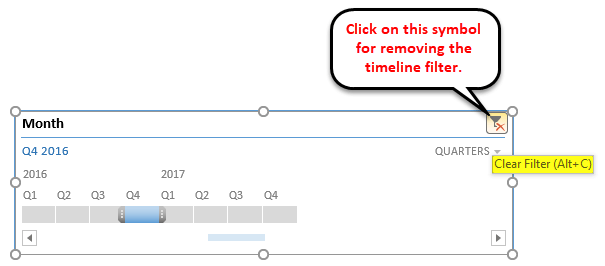
4) Filter

The Filter button in Microsoft Excel helps us effectively clear all the "time" options, such as years, quarters, months, or days.

How to create a Timeline in Microsoft Excel

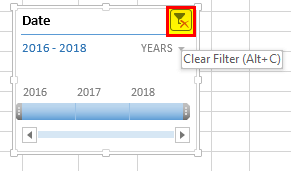
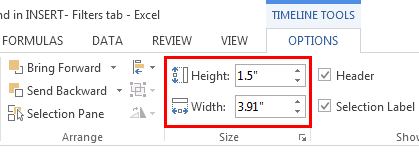
5) Timeline header

The Timeline header in the Excel sheet displays the heading or the title of the particular Timeline as well.

6) Selection label

It is purposely used to display the date range included in the filter option.

7) Timeline window size

The height and width of the respective PivotTable Timeline can be adjusted according to the requirement, and it will also provide a possible way to resize the timeline window by just dragging it from its borders.

How to create a Timeline in Microsoft Excel

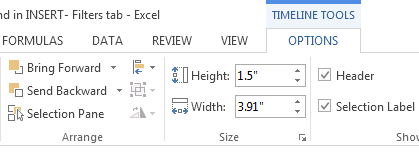
8) Timeline caption

By default, the caption box shows the column name as the caption. This is the column that was selected while inserting the Timeline respectively.

How to create a Timeline in Microsoft Excel

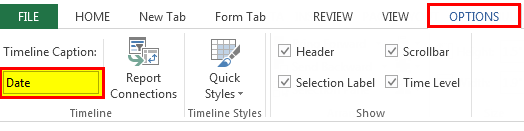
9) Timeline style

There are various style options available in Microsoft Excel for the PivotTable Timeline. The following screenshot usually depicts the 12 types of theme styles.

How to create a Timeline in Microsoft Excel

Besides all this, the style of the Timeline can also be customized according to choice and requirement.

How to create a Timeline in Microsoft Excel

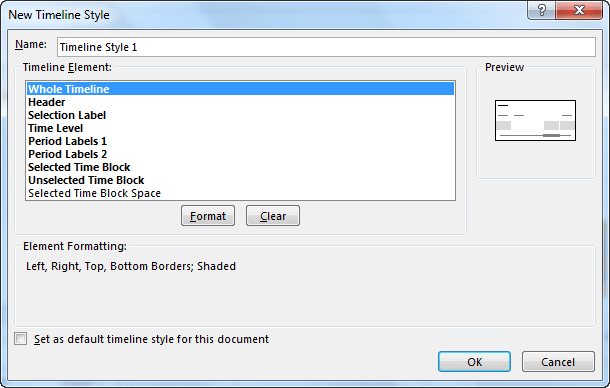
What are the various advantages of using Timeline in Microsoft Excel?

The various advantages of using Timeline in Microsoft Excel are as follows:

  1. Data Organization: It is well known that Microsoft Excel's table format primarily allows us to organize the chronological data very neatly, and this structured format makes it easier to input, update, and manage our data efficiently.
  2. Customization: Microsoft Excel provides a huge range of customization options for timelines, and with this, we can also adjust the appearance and labels, as well as perform formatting to match our specific needs and preferences.
  3. Clarity and Visualization: The Timelines in Microsoft Excel also provide a clear visual representation of the events or the milestones over time, making it easier for the respective audiences to understand the chronological order and the relationships between the different events.
  4. Compatibility: Besides all the above, Microsoft Excel is a widely used and considered to be the compatible tool by which we can easily share our Timeline with others, and they can then view and edit it if it is needed as well, even if they don't have specialized timeline software.
  5. Interactivity: Depending upon how we set up our Timeline, the respective Microsoft Excel can offer interactivity as well to the user; we can also make use of the data labels, tooltips, or hyperlinks to provide additional information about each event when users click on them.
  6. Data Analysis: Moreover, the respective Timelines in Microsoft Excel can help us to analyze trends, patterns, as well as historical data more effectively. We can easily use Microsoft Excel's built-in functions and various features to perform calculations and gain insights from our timeline data.
  7. Filtration of the Data Easily: It is well known that the respective Timelines in Microsoft Excel enable an individual to effectively filter out the data based upon specific periods, which can be especially useful when an individual is primarily dealing with huge datasets.
  8. Used in the Management of the Project: The respective Timelines in Microsoft Excel can be collectively used in the project management to track the task and the milestone for getting additional details.

What are the various disadvantages of using Timeline in Microsoft Excel?

Meanwhile, the respective timelines in Microsoft Excel have several advantages; they also come with some disadvantages as well as some limitations, which are as follows:

  1. Performance and the size of the Data: It is well known that in large datasets when we are making use of the timelines, it can slow down the performance of our respective Excel workbook, especially if complex calculations are involved.
  2. It is unsuitable for All Data Types: Timelines are the most effective when dealing with continuous data or data based on time. They may not work well for irregular or non-sequential events, respectively.
  3. It is very much limited to the Date Fields: In Microsoft Excel, the respective Timelines are primarily designed specifically for date or time-related data as well, and besides all this, they may not be suitable for other types of data that can limit their versatility.
  4. Lack of Customization: While we can customize timelines to some extent, their customization options are less extensive than dedicated data visualization tools or software.
  5. Compatibility: We all know that the respective Timelines are available in the newer versions of Microsoft Excel, none other than the Microsoft Excel version 2013 and later versions as well, which can easily create compatibility issues if we are about to share our workbook with the other users who might be using an older version of Microsoft Excel.
  6. It has limited Export Options: Exporting Microsoft Excel timelines to other various formats may not preserve their interactivity and visual appeal, which can be a limitation when sharing data externally.
  7. Limited Historical Data: It was well known that the respective Timelines are best suited for displaying recent or upcoming data; despite this, they may need help to handle the historical data with a wide range of dates.
  8. It depicts complex Data Relationships: Handling data with intricate relationships or multiple overlapping timeframes can be challenging with Microsoft Excel timelines.
  9. They are unsuitable for Real-Time Data: Microsoft Excel timelines are static and must be updated in real-time. If we are dealing with the data constantly changing, then there may be better choices for us to deal with or work with.
  10. Learning Curve: Using timelines effectively may require some knowledge of Microsoft Excel, particularly when working with the PivotTables and the Pivot Charts, which can have a learning curve for beginners.

List the important things to remember while working with the Timeline in Microsoft Excel.

The various important things that effectively need to be remembered by an individual while working with the Timeline in Microsoft Excel are as follows:

  1. It should be remembered that a timeline chart is often referred to as a Milestone chart in Microsoft Excel.
  2. An individual needs to have a built-in chart in Microsoft Excel as well.
  3. To create a timeline chart, an individual must create a helper column, which is required to place the phases of the project just one after the other.
  4. A timeline in the pivot table works as a slicer for date periods.
  5. All the respective tools of the Timeline are enabled by default.
  6. A timeline slicer in the pivot table works only for date columns.

Frequently Asked Questions about Timeline

1: What do you mean by slicer and the Timeline in Microsoft Excel?

In Microsoft Excel, a slicer is an object that allows quick filtration of the data, and the slicer shows all the possible values of the column, which the user efficiently selects. Each value appears as a button that can be used for toggling.

The slicer also displays the current filtering state, which lets the user know the exact values currently displayed. A slicer can be used with a table and with a pivot table.

A timeline allows data filtering, specifically with date fields, and the user can filter data by years, quarters, months, and days. The dates are displayed horizontally, from the oldest to the newest, as one moves from left to right on a timeline.

2: How can one make use of a timeline in Microsoft Excel?

The respective Timeline can be efficiently used with the help of the following features:

  1. Timeline period- The Timeline can use either a single period or multiple adjacent periods, and to select a period, we are just required to click on the first period and then drag the cursor to the last period. Release the click to see the selected date range as well.
  2. Date grouping- The "time level" feature allows grouping of the dates in data. The dates can be grouped into years, quarters, months, and days.
  3. Timeline handle or scroll bar- The scroll bar can increase or decrease the selected range of dates. This is done by dragging the scroll bar to the timeline range's left or right.
  4. Timeline filters- Filters can be used to reset the Timeline. For this, select the filter icon or press Alt+C on the keyboard.


Youtube For Videos Join Our Youtube Channel: Join Now

Feedback


Help Others, Please Share

facebook twitter pinterest

Learn Latest Tutorials


Preparation


Trending Technologies


B.Tech / MCA