| |

Import and Export CSV file in Laravel 5.8In this section, we are going to use Laravel 5.8 to import and export CSV files. When creating the admin project, the primary requirement is to export-import CSV or excel files from the database. We will use maatwebsite/excel version 3 to import, and export excel files or CSV files in the application of Laravel 5.8. In order to perform the import and export task, we will use maatwebsite/excel composer package. maatwebsite/excel uses the database model so that it can provide an easy way to export and import. By using excel or maatwebsite updated version 3, we can easily export or import the required data form database. In our section, we provide step by step process to perform the export and import, which is described as follows: Step 1: In this step, we will Install Laravel 5.8 application. For this, we will use the following command. So we will open our CMD or terminal in our system and then run the following command: Step 2: In the second step, we are going to Install Maatwebsite package. For this, we will use Composer package manager. For this, we will open our terminal and run the following command: Now we will open our file named as config/app.php. Then we will add aliased and service provider. config/app.php Step 3: In the third step, we are going to Create dummy records. In order to do this, we need a "users" table, which will contain some dummy records. After that, we can easily do import and export. Laravel provides us some default migration. To do import and export, we require that migration. So we will run migration by using the following command: Now we need to add some dummy records. So we will run the below command and add some records to the user file. Step 4: In the fourth step, we are going to Add Routers. For this, we will create a route of export and import file. So we will open our file named "routes/web.php". After that, we will add the following route: routes/web.php Step 5: In the fifth step, we are going to Create an import class. In order to do this, we will use maatwebsite 3 version, which is used to build the import class. We will use controller to use it. When we create a new Import class by using this way, we will realize that it is a great way for import class creation. For this, we will run the following code: Now we open our file named app/Import/UsersImport.php, and we will do some change in that fie, which is described as follows: app/Imports/UsersImport.php Step 6: In the sixth step, we are going to Create Export class. In order to do this, we will use maatwebsite 3 version, which is used to build the export class. We will use controller to use it. When we create a new Export class by using this way, we will realize that it is a great way for export class creation. For this, we will run the following code: Now we open our file named app/Export/UsersExport.php, and we will make some change in that file, which is described as follows: app/Exports/UsersExport.php Step 7: In the seventh step, we are going to Create Controller. We will use the path "app/Http/Controllers/MyController.php" to create a new controller as MyController. The view of importExport request, and return response of import and export can be easily managed by this controller. For this, we will add the following content in the controller file, which is described as follows: app/Http/Controllers/MyController.php Step 8: The eighth step is the last step, which is used to Create Blade File. For this, we will create import.blade.php for layout. For this, we will write some code which is described as follows: resources/views/import.blade.php Using the above code, we can easily export and import the required data into a CSV file in Laravel 5.8. In order to run the above code, we need to start the server of Laravel 5.8. For this, we will open our terminal or command prompt and run the following command: Using the above command, we are able to start the Laravel server. It will provide us base url of the Laravel application. We will open our browser and write the following url to test the operation of import and export data. After entering the above url, we will see the following output: 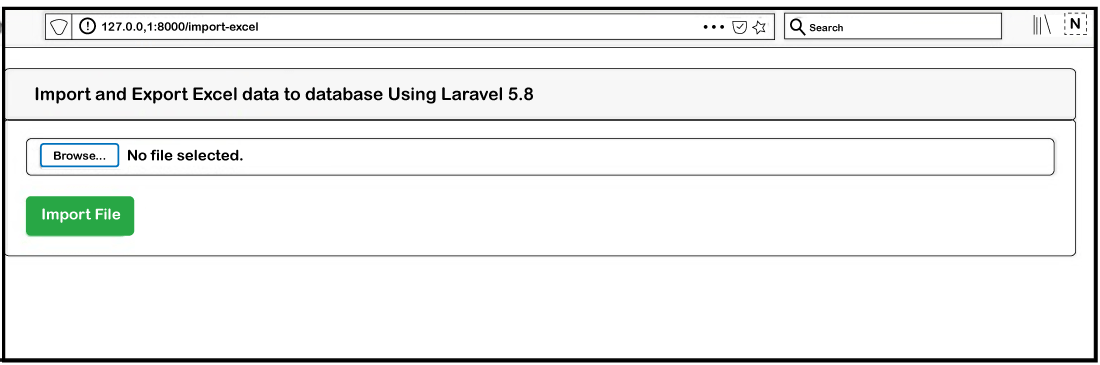
Now we have to select the excel file so that it can be upload. Before selecting the file, we have to create an excel file like this: 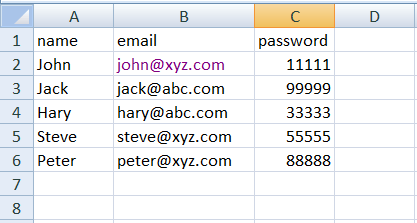
Now we will select the sample.csv file like this: 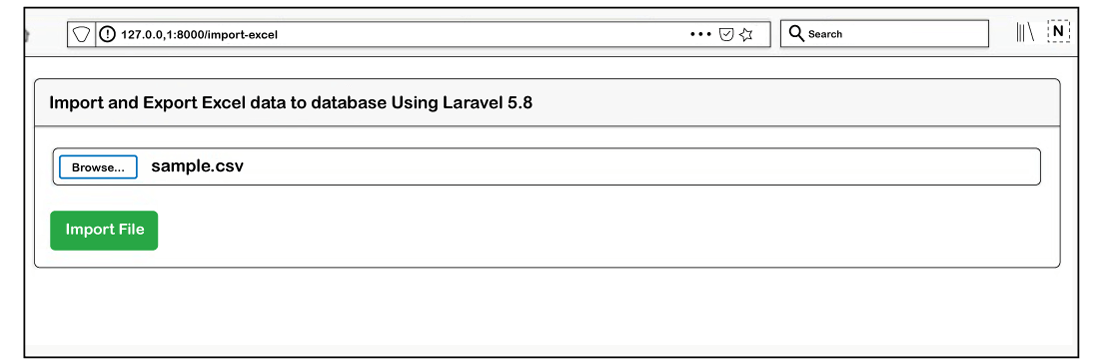
Now, we will click on the Import File option. 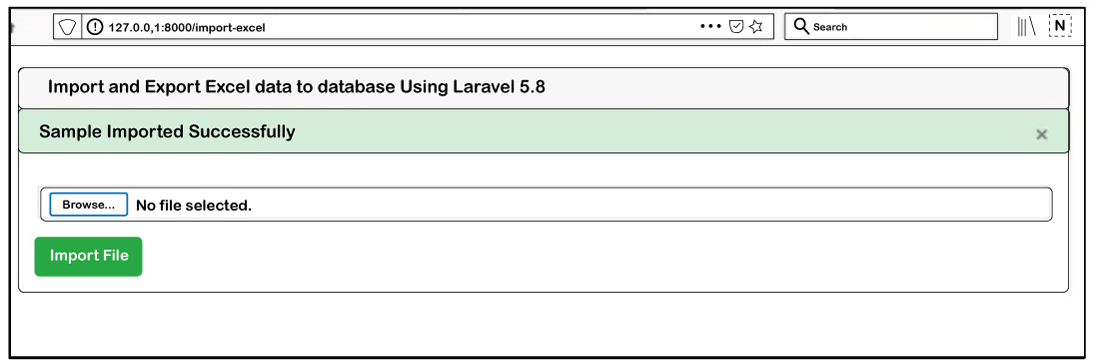
In the above image, we can see that our Sample file is successfully imported. |
 For Videos Join Our Youtube Channel: Join Now
Feedback
- Send your Feedback to [email protected]
Help Others, Please Share


