| |

Linux dig Command (DNS Lookup)Linux dig command stands for Domain Information Groper. This command is used for tasks related to DNS lookup to query DNS name servers. It mainly deals with troubleshooting DNS related problems. It is a flexible utility for examining the DNS (Domain Name Servers). It is used to perform the DNS lookups and returns the queried answers from the name server. Usually, it is used by most DNS administrators to troubleshoot the DNS problems. It is a straightforward tool and provides a clear output. It is more functional than other lookups tools. The dig command supports plenty of command-line options. Additionally, it facilitates batch mode, which is useful for accessing the lookup requests from a file. If it is not specified to the dig command to query a specific name server, it will access each of the servers from "/etc/resolv.conf." The dig without any command-line options will perform an NS query for "." (the root). Syntax:The general syntax of the dig command is as follows: In the above syntax, server: It is the name of the name server or IP address whom we want to query. It can be Ipv4 or Ipv6 address. If the given server is a hostname, it determines the name before querying the given name server. If we do not specify a server, it will seek from the "/etc/resolv.conf." If it finds a name server here, it queries this name server. If no valid addresses are found, it will forward the query to the localhost. name: It determines the name of the resource record. Type: It specifies the required type of queries such as ANY, A, MX, SIG, and more. The type argument must be valid. If no type of argument is specified, it will take the value as 'A' as the default value and look for it. Options:The following are some useful command-line options of the dig command: -4: It is used for IPv4 only. -6: It is used for IPv6 only. -b address[#port]: It is used to set the source IP address of the query. -c class: It is used to set the query class. -f file: It is used for the Batch mode. The dig command accesses lookup requests from the specified file to process. The dig processes each line systematically as they organized in the file. -i: The '-i' option is useful for "reverse Ipv6 lookups". -k keyfile: It is used to mark queries using TSIG by a key generated by the specified file. We can generate the key files using "tsig-keygen." -m: It is used to enable the memory usage debugging. -p port: It is used to forward the queries to a non-standard port on the server rather than the default port (i.e., 53). It is a handy tool for testing a name server. -q name: It is used for the domain name to query. It is a handy tool for distinguishing the name from other arguments. -t type: It is used to specify the resource record type to query. Usually, these records are any valid query type. The default value for the type argument is 'A'. -u: It is used to display the query times (in microseconds). -v: It is used to display the version information. -x addr: It is used to simplify the reverse lookups for mapping the addresses to names. -y [hmac:]keyname:secret: It is used to mark the queries by TSIG with the given authentication key. The "keyname" defines the key name, and "secret" stands for the "base64 encoded shared secret". The "hmac" specifies the name of the key algorithm. The valid options can be "hmac-md5, hmac-sha1, hmac-sha224, hmac-sha256, hmac-sha384, or hmac-sha512". Install the dig CommandThe dig command is part of the dnsutils package that is installed with BIND name servers. To install the dig utility, execute the below commands: For Debian and Ubuntu-based systems, execute the below command: For CentOS 7, execute the below command: The above command will install the required package files for the dig command. To verify the installation, execute the below command: Examples of the dig CommandLet's see the following examples of the dig command:
Query a Domain nameWe can perform a DNS lookup of a domain name by using the dig command. The default behavior of the dig command will display the type A record. To query a domain name, execute the command as follows: Consider the below command: The above command will query the given domain name. Consider the below output: 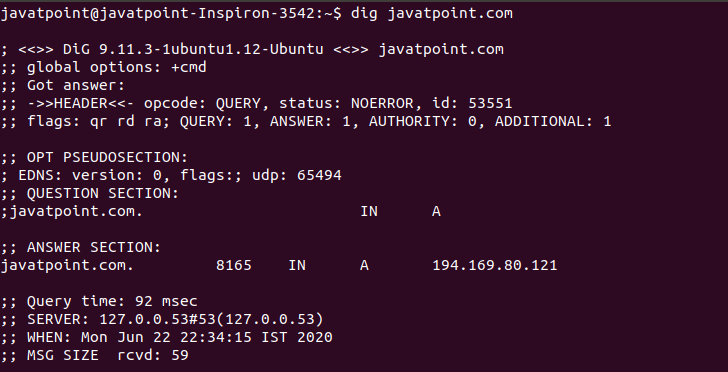
From the output, we can see dig version information, statistics about the query, other technical details, and a question section along with few other ones. Display Short OutputThe above use of the dig command displays a lot of information about the specified domain name. But, there may be a time when you just want short information. The '+short' option is used to display less output. It will only display the IP address of the given domain. Consider the below command: The above command will display the IP address of the javatpoint.com. Consider the below output: 
Display Detailed OutputIf you want to know the additional information about any domain name, execute the dig command with the '+answer' option. To prevent command for displaying all the sections, specify the '+noall' option with the command. Consider the below command: The above command will display some additional information such as country name, IP address, and more. Consider the below output: 
Query Specific nameserversThe default behavior of the dig command performs a DNS lookup for the given domain name. We can change this behavior by using the @ symbol before the IP address or hostname of the name server. Consider the below command: The above command will perform a DNS lookup to the name server ( 120.120.40.80) by using the given options. Consider the below output: 
Tracing the DNS PathWe can trace the DNS path by using the dig command. The '+trace' option is used to trace the DNS path. It will start querying the name servers form the root and traverse down the for the subsequent namespaces. To trace the DNS path execute the command as follows: Consider the below output: 
Reverse DNS LookupThe reverse DNS lookup displays the domain and hostname for the specified IP address. To perform the reverse DNS lookup, execute the command with the '-x' option and an IP address. Consider the below command: The above command will perform the reverse DNS lookup for the given IP address. Consider the below output: 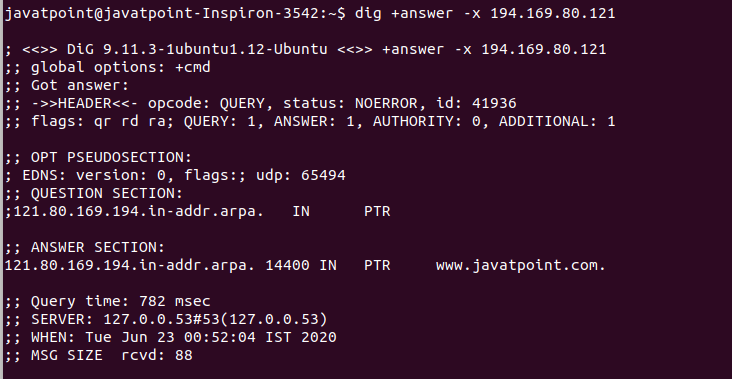
Query Multiple Domain NamesThe dig command allows us to perform the batch queries. We can perform the DNS lookup for multiple domains. To do so, we have to create a file having multiple domain names in a new line. For example, perform the DNS lookup for the domains 'javatpoint.com', 'google.com,' and 'github.com.' Create a file 'lookups.txt' as follows: Now query the domains specified domains by executing the command as follows: The above command will display the IP addresses of the specified domains in 'lookups.txt.' Consider the below output: 
Next TopicLinux nslookup
|
 For Videos Join Our Youtube Channel: Join Now
Feedback
- Send your Feedback to [email protected]
Help Others, Please Share


