| |

Validation of Convolutional Neural Network ModelIn the training section, we trained our CNN model on the MNIST dataset (Endless dataset), and it seemed to reach a reasonable loss and accuracy. If the model can take what it has learned and generalize itself to new data, then it would be a true testament to its performance. This will be done in the same way as we have done in our previous topic. Step 1: We will create our validation set with the help of our training dataset, which we have created in the training section. In this time we will set train equals to false as: Step 2: Now, similar to why we have declared a training loader in the training section, we will define a validation loader. Validation loader will also create in the same way as we have created training loader, but this time we pass training loader rather than training the dataset, and we set shuffle equals to false because we will not be trained our validation data. There is no need to shuffle it because it is only for testing purpose. Step 3: Our next step is to analyze the validation loss and accuracy at every epoch. For this purpose, we have to create two lists for validation running lost, and validation running loss corrects. Step 4: In the next step, we will validate the model. The model will validate the same epoch. After we finished iterating through the entire training set to train our data, we will now iterate through our validation set to test our data. We will first measure for two things. The first one is the performance of our model, i.e., how many correct classifications. Our model makes on the test set on the validation set to check for overfitting. We will set running loss and running corrects of validation as: Step 5: We can now loop through our test data. So after the else statement, we will define a loop statement for labels and inputs as: Step 6: We are dealing with the convolutional neural network to which the inputs are first being passed. We will focus on the four dimensionalities of these images. So there is no need to flatten them. As we have assigned our model to our device, in the same way, we assign inputs and labels to our devices also. Now, with the help of these inputs, we get outputs as Step 7: With the help of the outputs, we will calculate the total categorical cross-entropy loss, and the output is ultimately compared with the actual labels. We are not training our neural network, so there is no need to call zero_grad(), backward() or any of that. And there is also no need to compute derivative anymore. In the scope of operation to save memory, we call no_grad() method before For loop with the torch as: It will temporarily set all the require grad flag to be false. Step 8: Now, we will calculate the validation loss and accuracy in the same way as we have calculated the training loss and training accuracy as: Step 9: Now, we will calculate the validation epoch loss which will be done as same as how we calculate the training epoch loss where we divide the total running loss by the length of the dataset. So it will be write as: Step 10: We will print validation loss and validation accuracy as: 
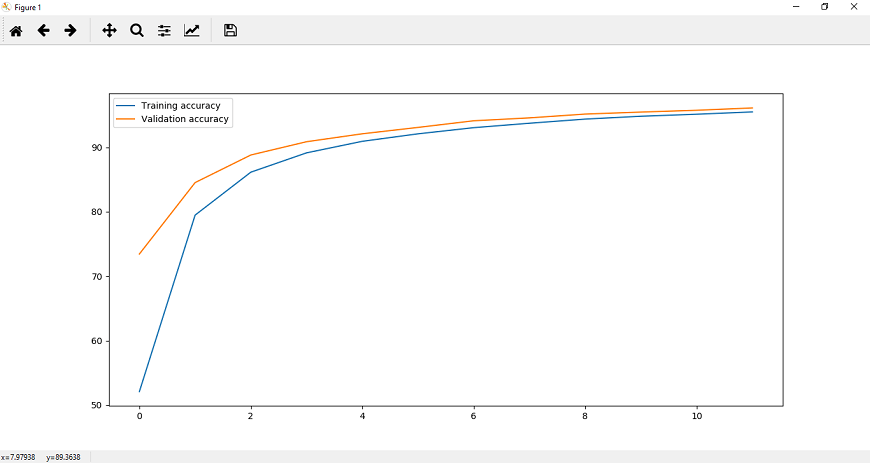
Step 11: Now, we will plot it for visualization purpose. We will plot it as: 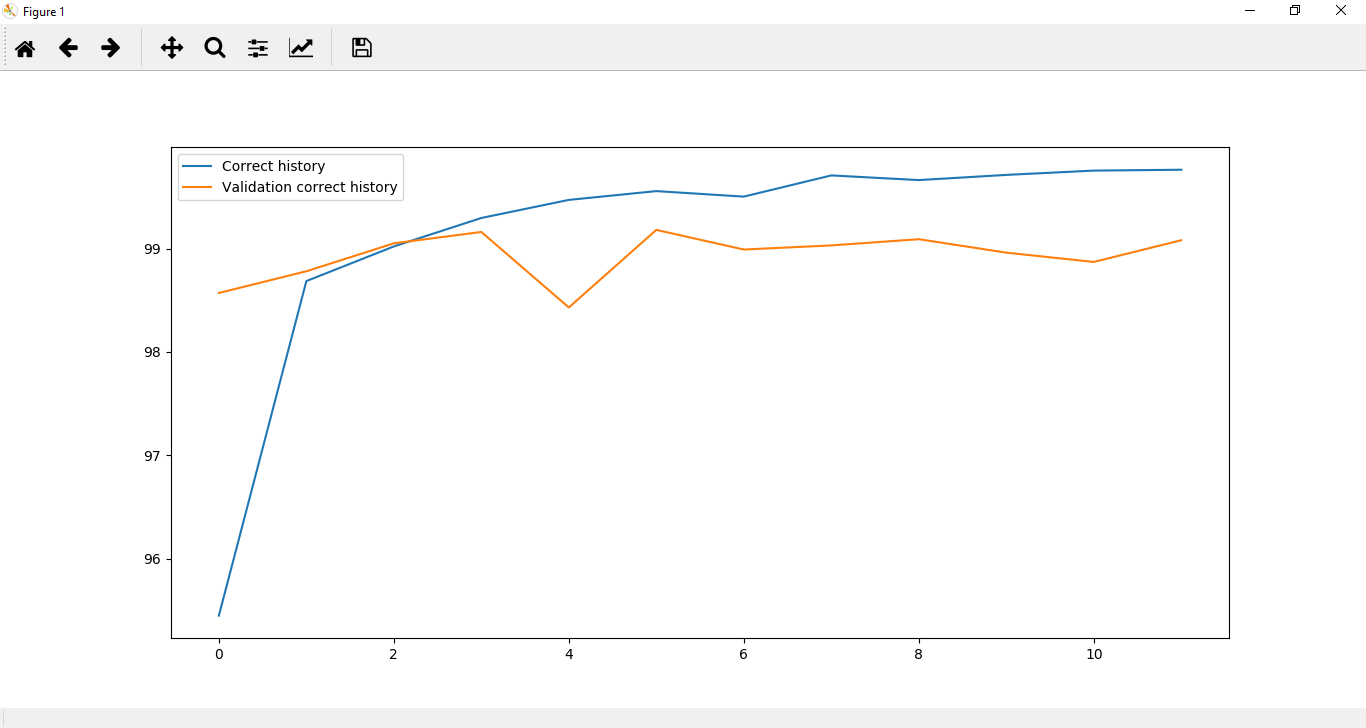
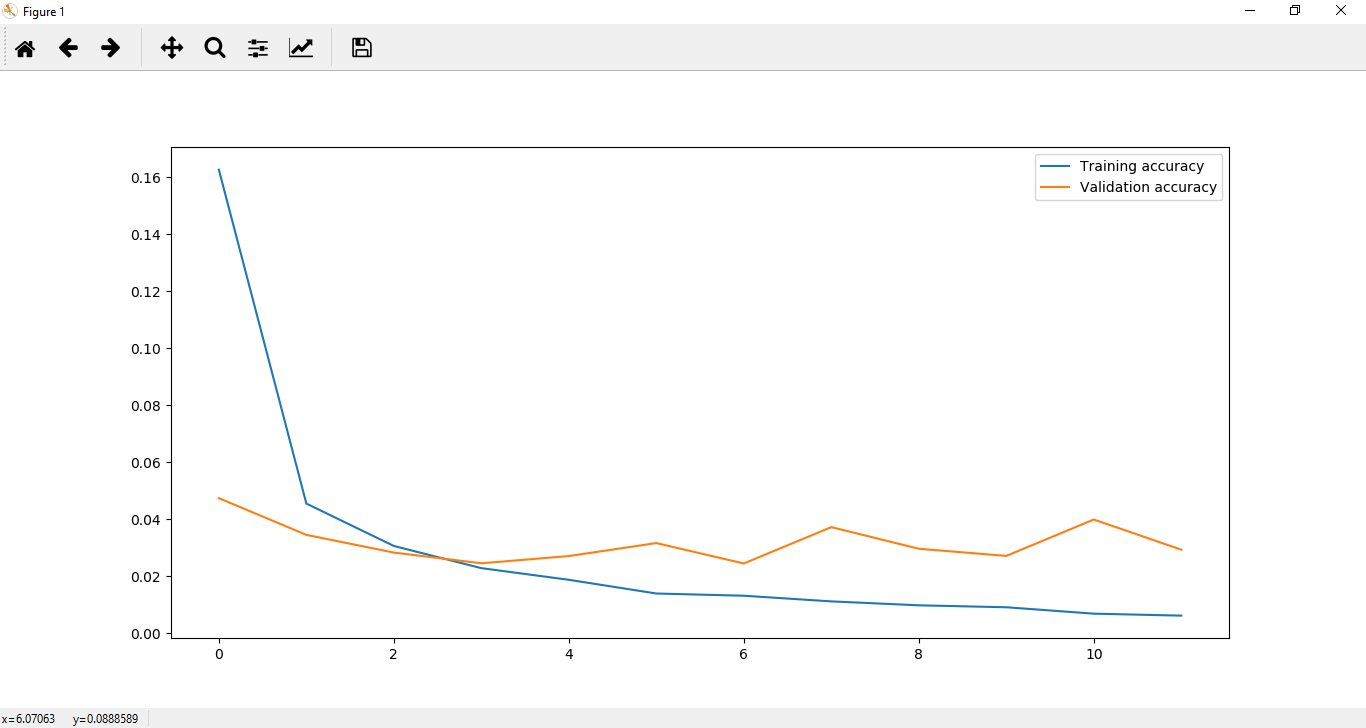
It is clear from the above diagrams that in CNN overfitting occurs. To reduce this overfitting, we will introduce another quick technique named Dropout Layer. Step 12: In the next step, we will move to our LeNet class and add a specific layer type which will reduce overfitting of our data. This layer type is called Dropout layer. This layer essentially functions by randomly setting a fraction rate of input units to 0, and each update during training. 
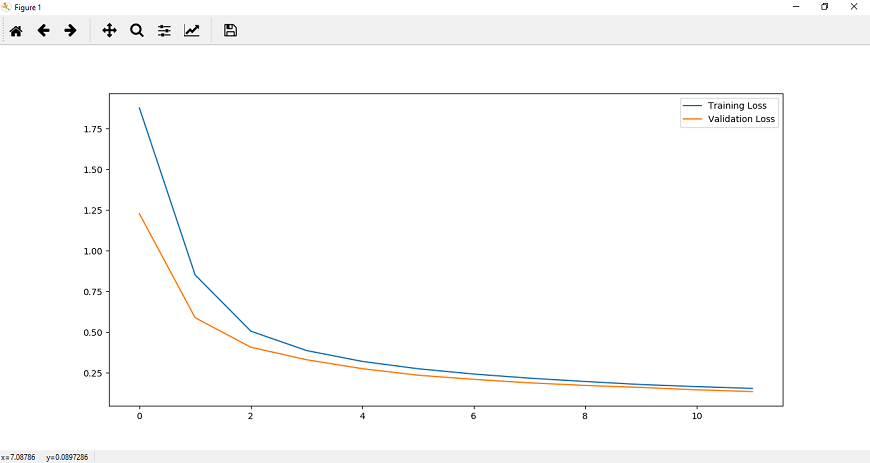
The above diagram shows a standard neural network as well as it shows the same neural network after applying dropout. We can see that some nodes have been turned off and are no longer communicating with information along with the network. We will use more than one dropout layer which will be used in a given network to obtain the desired performance. We will place these dropout layer between the convolutional layers and between the fully connected layers. The dropout layer is used in between layers which have a high number of parameters because these high parameter layers are more likely to overfit and memorize the training data. So we will set our dropout layer in between the fully connected layer. We will initialize our dropout layer with the help of nn.Dropout module and pass the dropout rate as an argument in our initializer. The probability of a given node being dropped out will be set 0.5 as: Step 13: In the next step, we will define our second dropout layer in between our fully connected layer in forward function as: Now, we will run our program and it will give us more accurate result as: 
Complete Code
Next TopicTesting of CNN
|
 For Videos Join Our Youtube Channel: Join Now
Feedback
- Send your Feedback to [email protected]
Help Others, Please Share


