| |

How to remove or replace a laptop keyboard?On a laptop, removing the keyboard is not an easy operation, and the keyboard is one important part of almost all laptop parts that needs more time or knowledge to replace than desktop parts. We advise having a computer technician replace the keyboard if you are unsure how to disassemble a laptop. There are various steps that you can use to remove or replace a laptop keyboard.
A few screws on the laptop's bottom need to be removed as a first step. The screws that you need to remove on some laptops are marked with a little keyboard icon. You have to search closely to find the right screws because other laptops don't have the keyboard icon. Most laptops include circular holes for the screws recessed into the chassis's bottom. However, the screws on certain laptops are covered by rubber parts. You need to remove the rubber bits on that kind of laptop to get to the screws.
Flip the laptop over, and then raise the lid after the screws have been taken out to reveal the keyboard. You may be able to remove the keyboard without first removing the top case around it, depending on your brand and model. Lift the keyboard first, if you can. If you want to lift the edges, you might require a tiny flat-head screwdriver. You must remove the casing if the keyboard's edges are blocked from access by the casing. To the section about cutting the laptop cord, skip ahead if you can lift the keyboard out. Look for a seam between the bottom casing and the casing that surrounds the keyboard as you proceed around the perimeter of the laptop to remove the keyboard casing. To remove the top section from the laptop, gently lift it. Use caution so as not to shatter the casing while exerting sufficient effort to lift and remove it. Moreover, be mindful of any plastic tabs that were used to secure the case to prevent damage. See your owner's manual for the precise steps to remove the case, as they vary in accordance with the make and model of your laptop. 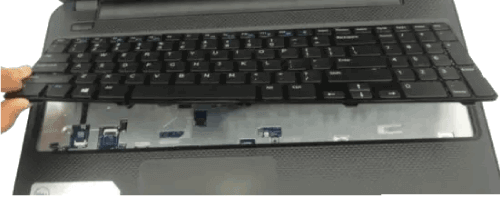
Find any screws that hold the keyboard in place from the top after removing the laptop's keyboard case. Even though there could be more, three to five screws are often present, if any. Go to the following section if you don't find any screws. In order to prevent losing them, remove the keyboard screws and keep them somewhere safe. Then, raise the laptop's keyboard off of the rest of the device.
You must unplug the cable connecting the keyboard to the motherboard while the keyboard is raised. Take care to gently remove the cable away from the motherboard while exercising prudence. Set the keyboard aside after removing the keyboard cable. 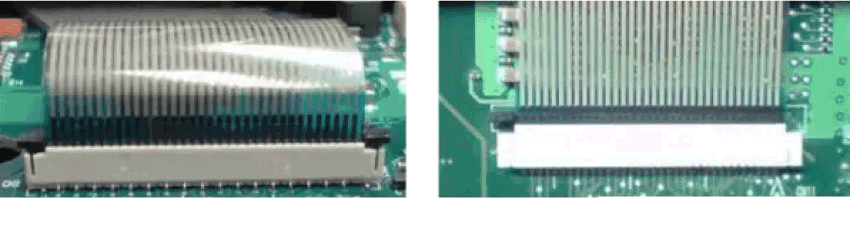
The cable from the keyboard should first be connected to the motherboard by carefully placing it into the connector. Up until it is firmly in place, use gentle pressure.
The keyboard should be placed inside the casing after the ribbon cable has been connected. The most typical approach needs you to place the keyboard's top or bottom edge first. The edge might line up with metal tabs that hold the keyboard in place or simply snap into place. Then, slide in and snap the opposite keyboard edge into position or align the metal tabs.
Screw the keyboard's mounting screws back in if you removed any that were previously there. If not, move on to the next paragraph.
If you took off the keyboard's casing, carefully put it back on, using any necessary snaps. To attach the case without damaging it, apply light pressure.
Put the screws in the laptop's shell bottom last. As you reinstall the screws, make sure to use the same quantity as you did when you first removed them. The screws shouldn't be overtightened. |
 For Videos Join Our Youtube Channel: Join Now
Feedback
- Send your Feedback to [email protected]
Help Others, Please Share


