How to Connect to MySQLIf you want to interact with the information contained in the database, then it is essential to connect to the MySQL database, where you can execute various commands. In this article, we will understand the step-by-step process of how to connect to the MySQL database using various methods and tools. Why do we require to connect to the MySQL database?
There are several methods that are used to create a connection to the MySQL database: 1. Command-Line Client:The command line client provides powerful tools that come with the MySQL installation. It helps you connect to the database by providing the required connection parameters like hostname, username, and password. 2. GUI Tools:GUI (Graphical User Interface) tools provide a visual interface for managing database connections. Various well-known GUI tools used to connect with MySQL are MySQL Workbench, phpMyAdmin, etc. 3. Programming Languages:With the help of several programming languages, you can connect to a MySQL database using suitable database drivers. Different programming languages that are used to create a connection to MySQL are Java, Python, .NET, PHP, etc. 4. Web Development Frameworks:There are many web development frameworks that help in establishing a connection to a MySQL database. Some examples of web development frameworks are Django, Ruby on Rails, etc. We will study several methods that can be used to connect to MySQL, which are as follows: Connecting to MySQL database using MySQL Shell:Step 1: Install MySQL database on your computer. Along with the installation of the MySQL database, you will get the MySQL Shell as part of the MySQL installation. Step 2: Open MySQL Shell on your computer. Step 3: Once MySQL shell is open, it uses JS language by default to run commands, as shown below. 
We will use SQL to run the commands and connect to MySQL. To change the language from JS to SQL, we need to use the following command: As you can see, the language has been changed to SQL. 
You need to provide the connection parameters, which are username, hostname, port number, and password, to establish a connection. To provide connection details, you have to use the given syntax: In the above syntax, you need to use the username of your database along with the hostname and port number of the MySQL server (the default port number is 3306). Step 4: After providing the connection parameters, it will ask you to enter the password, as shown below. 
Now, type the password and press Enter. Step 5: After entering the password, it will give you some options to save the password. You can pick any option as per your necessity. After selecting one of the options, it will give a message that confirms the successful connection and provides details of the MySQL server version and MySQL connection ID, as you can see below. 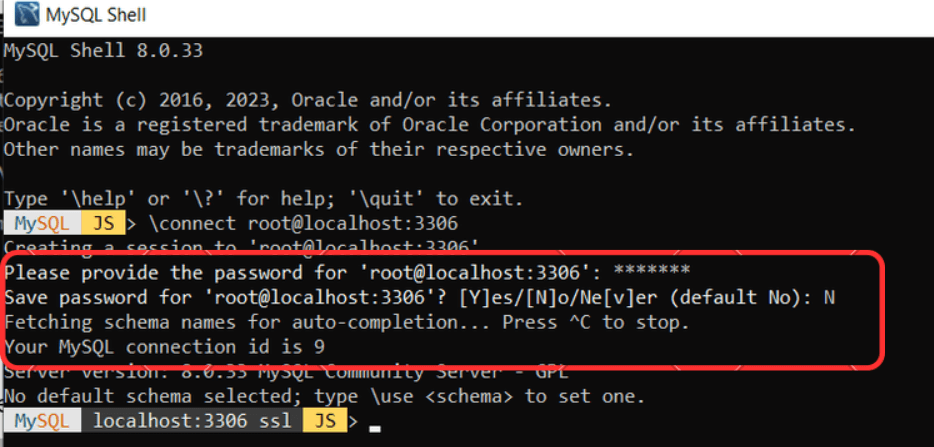
Now, you will be connected to the MySQL server. After connecting to the MySQL database, you can use SQL commands to execute them. You can create tables, insert data, or perform any other database operations. All you have to do is type the SQL commands and hit Enter to run them. If you wish to quit the MySQL database, you can type exit or quit. Connecting to MySQL database using MySQL Command Line Client:Step 1: Install MySQL database on your computer. Along with the installation of the MySQL database, you will get the MySQL command line client as part of the MySQL installation. Step 2: Open the MySQL Command line client on your computer. Step 3: Use the given command to launch the MySQL command-line client: You need to write your MySQL username and then press Enter. If you are connecting as a root user, then you can use the following command: Step 4: Now, it will ask you to put the password. You must write the password and press Enter. As you can see below, you are connected to the MySQL server. 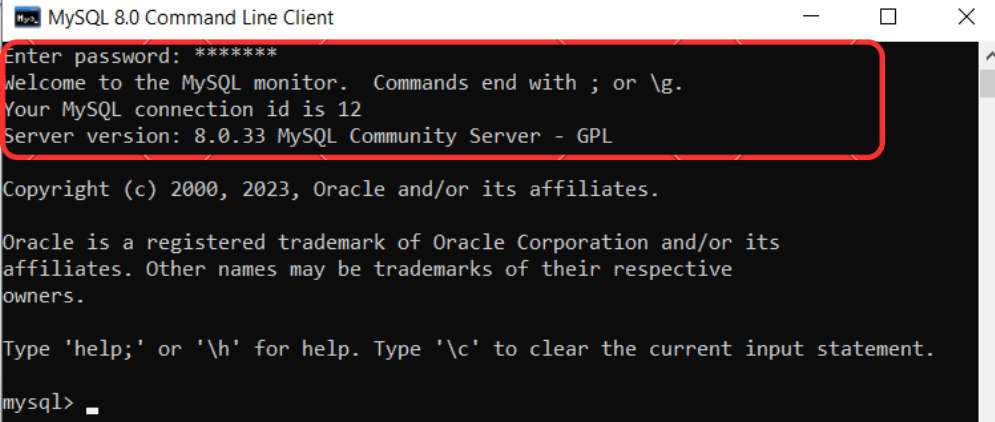
Now, you can run commands to construct tables, insert data, etc. If you wish to quit the MySQL database, you can type exit or quit. Connecting to MySQL database using Windows Command Prompt:Step 1: To open a command prompt on your computer. Press the Win + R keys, type cmd, and press Enter. Step 2: Now, go to C drive on your computer and find Program Files, then go to MySQL and click on MySQL Server 8.0 or whatever version you have. Afterward, go to the bin folder; here, you will find all MySQL commands at this location, so now we have to copy the path which we have followed. You can see the selected path as shown below. 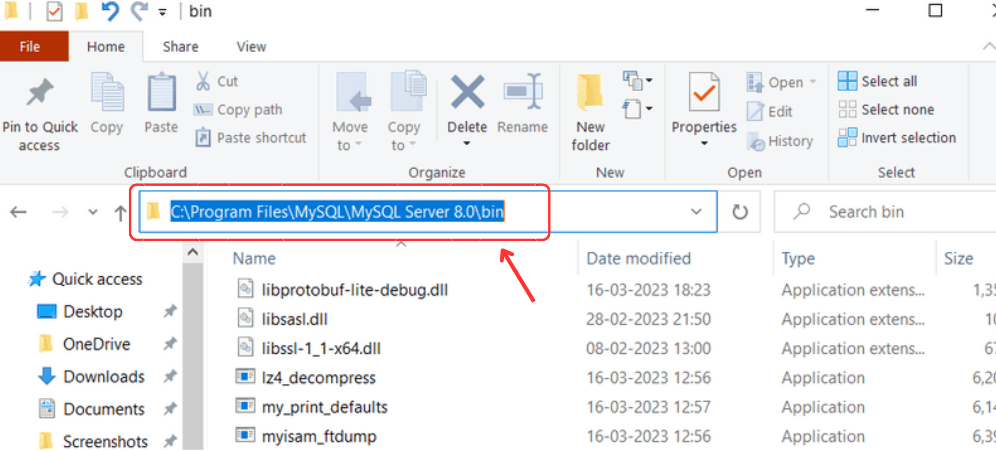
To copy this path, use the shortcut keys Control + C, or you can right-click on the selected path, then click Copy. Step 3: To change the directory, use the cd command, paste the copied path, and press Enter. You are in the bin folder, as you can see below. 
Step 4: Now, to connect to MySQL, you need to type the following command: Step 5: After executing the above command, it will ask you to enter the password. You must type the password and press Enter. You will be connected to the MySQL database, as you can see below. 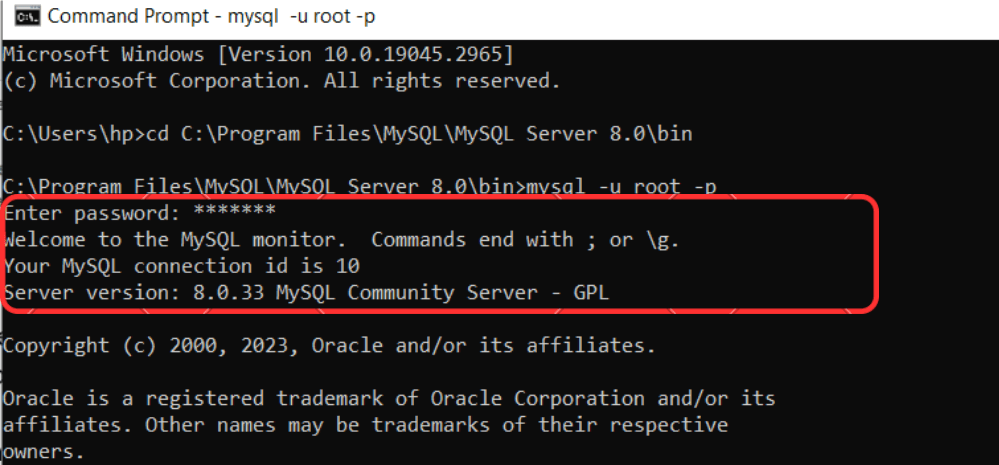
Now, you can give commands to build tables, insert data, run queries, etc. If you want to exit the MySQL database, you can type exit. Connecting to MySQL database using MySQL Workbench:Step 1: Press the Windows key and find MySQL Workbench, then open it. Step 2: Now, click on the plus sign. As shown below, a dialog box will be visible where you can establish the connection. Enter details such as connection name, port number (default number is 3306), username, and password (the password you entered while installing MySQL). 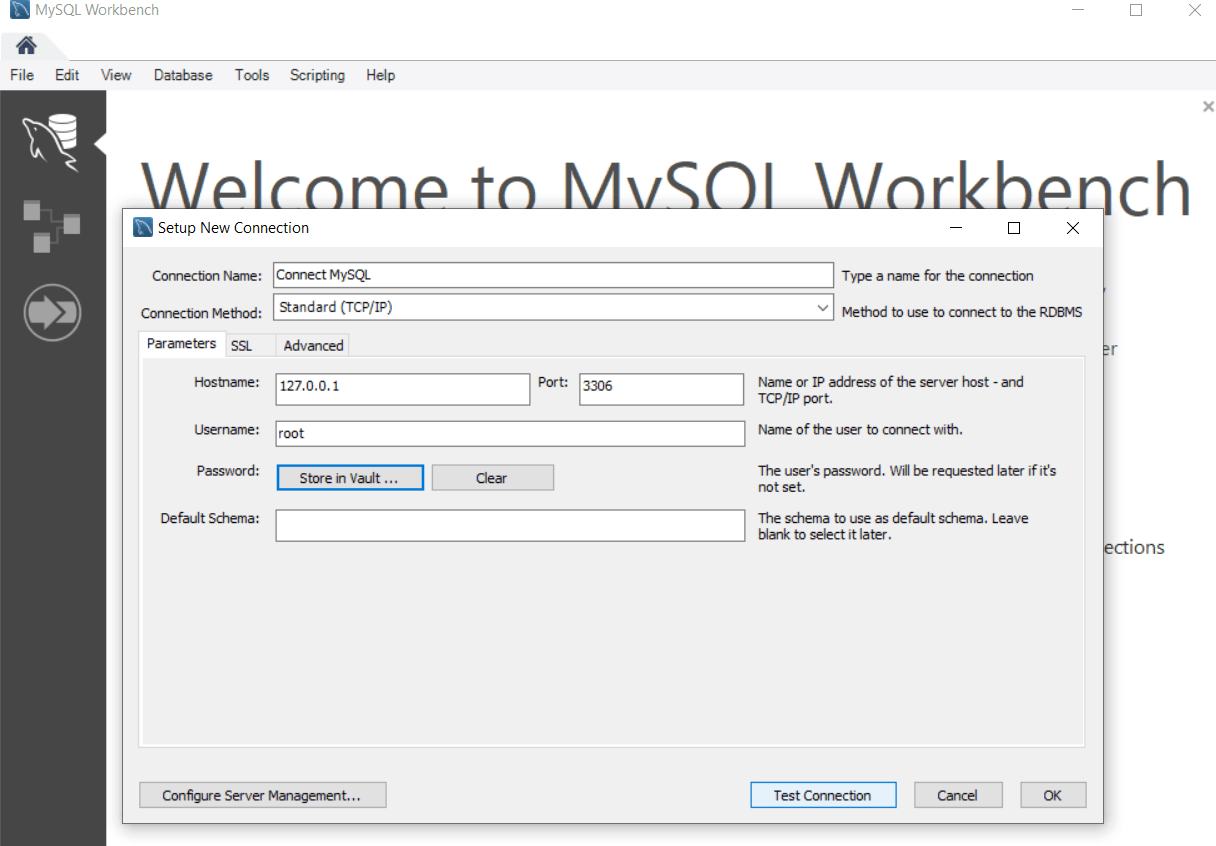
Step 4: Now, click on Test Connection. It will give the message of MySQL successfully created connection as shown below. Press OK. 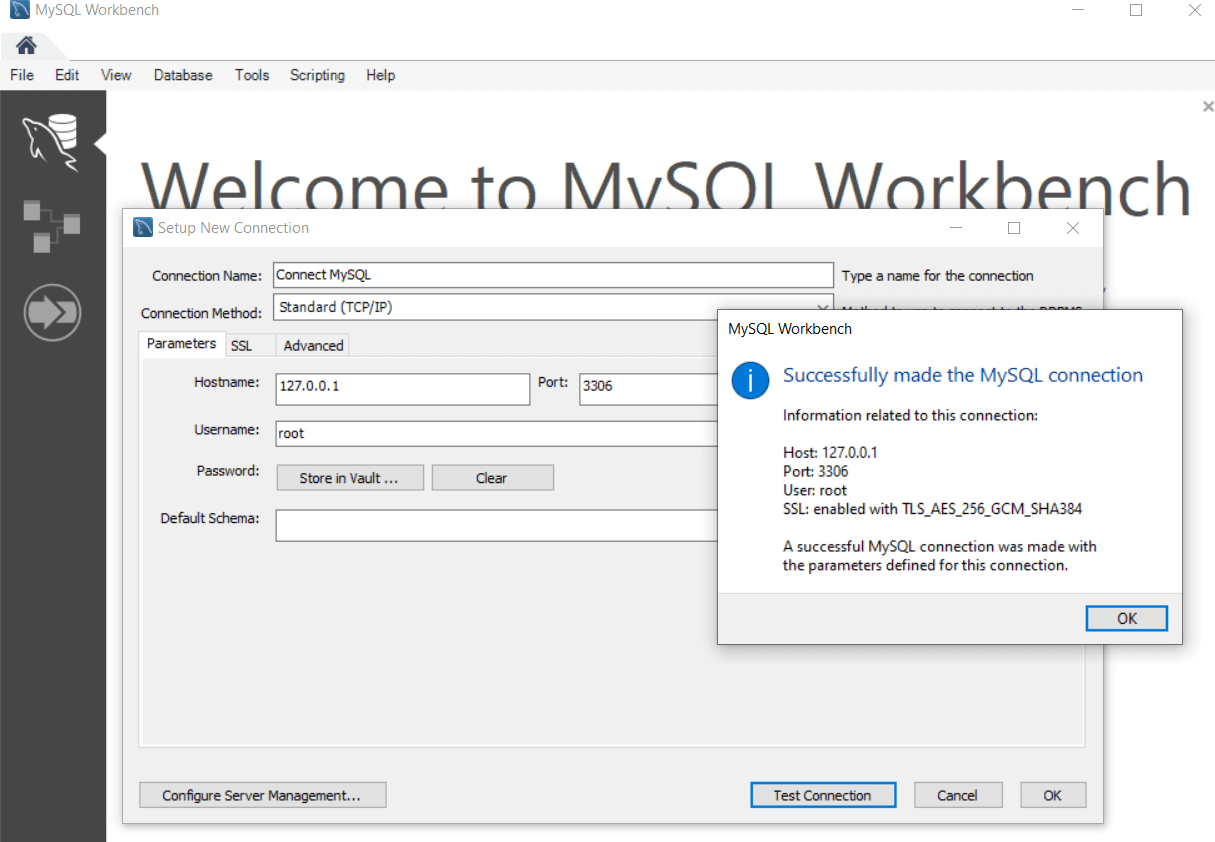
Step 5: The connection has been created, and you are connected to the MySQL server. Now, you can click on the connection and open it. You can start working with the database. You can give commands to create tables, insert data, etc. Connecting to MySQL database using XAMPP and phpMyAdmin:Step 1: First of all, search XAMPP on Google and download the latest version of XAMPP. Now, install XAMPP on your computer. When installing, it will ask you to permit this app to make modifications to your system. You have to click 'yes' and complete the installation. Step 2: Once XAMPP is installed, open it. XAMPP Control Panel has been started, as you can see below. 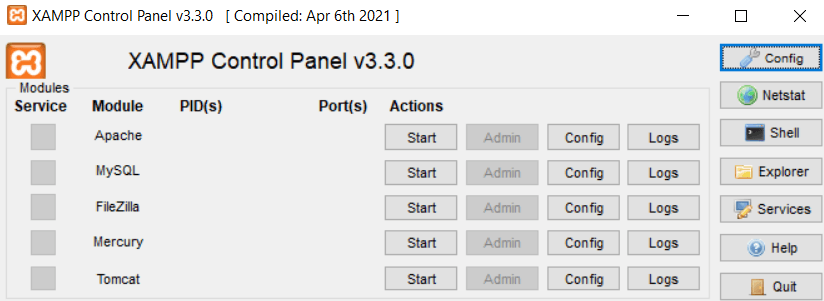
Step 3: You will see a list of modules on the XAMPP control panel with some buttons in front of them. Click the 'Start' button to start the Apache and MySQL services. If Apache and MySQL turn green, it means that both services have started successfully. 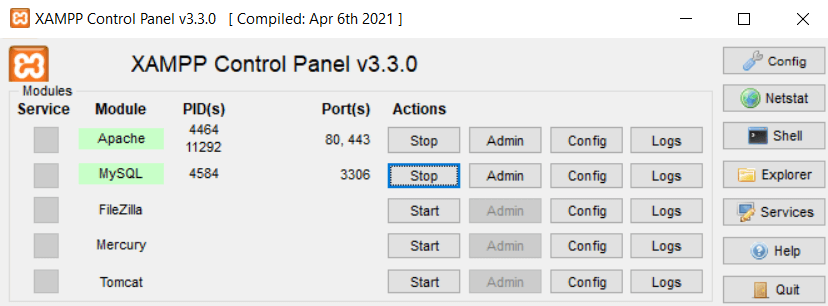
Step 4: Now, open your web browser, type the following URL, and press Enter. Step 5: Now, you will see a phpMyAdmin window with the list of databases on the left side, as shown below. 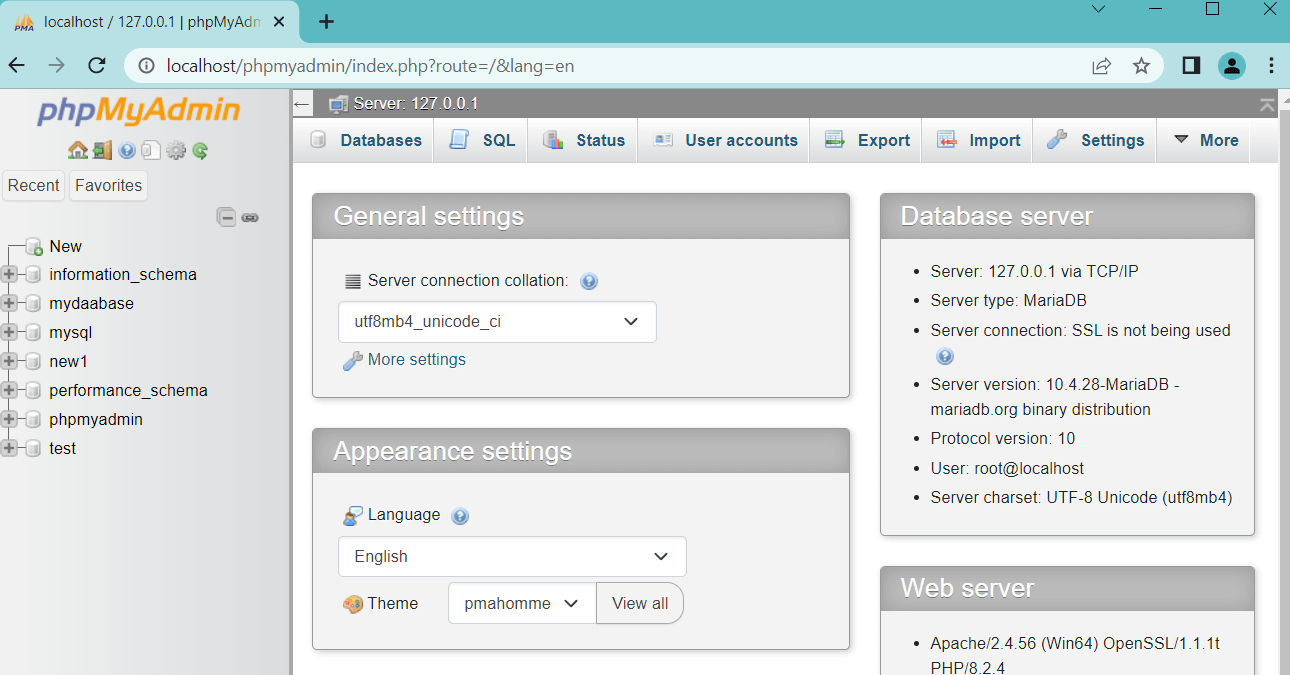
phpMyAdmin provides various features and options for creating and managing MySQL databases. You can create tables, insert data, run queries, and do many other database-related tasks. Conclusion:In this article, you have learned the importance of connecting to a MySQL database in order to interact with the data contained in it. You have understood that there are different ways to set a connection to the MySQL database. You have learned the step-by-step instructions of various ways to connect to MySQL, such as connecting to MySQL database using MySQL command line client, connecting to MySQL database using Windows command prompt, connecting to MySQL database using MySQL workbench, connecting to MySQL databases using XAMPP and phpMyAdmin. |
 For Videos Join Our Youtube Channel: Join Now
Feedback
- Send your Feedback to [email protected]
Help Others, Please Share


