MySQL Export Table to CSVMySQL has a feature to export a table into the CSV file. A CSV file format is a comma-separated value that we use to exchange data between various applications such as Microsoft Excel, Goole Docs, and Open Office. It is useful to have MySQL data in CSV file format that allows us to analyze and format them in the way we want. It is a plaintext file that helps us to export data very easily. MySQL provides an easy way for exporting any table into CSV files resides in the database server. We must ensure the following things before exporting MySQL data:
To export the table into a CSV file, we will use the SELECT INTO....OUTFILE statement. This statement is a compliment of the LOAD DATA command, which is used to write data from a table and then export it into a specified file format on the server host. It is to ensure that we have a file privilege to use this syntax. We can also use this syntax with a values statement to export data directly into a file. The following statement explains it more clearly: If we want to export all table columns, we will use the below syntax. With this statement, the ordering and number of rows will be controlled by the ORDER BY and LIMIT clause. From the above, LINES TERMINATED BY ',': It is used to indicate the lines of rows in a file that are terminated by a comma operator. Each line contains each column's data in the file. FIELDS ENCLOSED BY '"': It is used to specify the field of the file enclosed by double quotation marks. It prevents the values that contain comma separators. If the values contained in double quotations marks, it does not recognize comma as a separator. Storage Location of Exported FileThe storage location of every exported file in MySQL is stored in the default variable secure_file_priv. We can execute the below command to get the default path of an exported file. After execution, it will give the result as follows where we can see this path: C:/ProgramData/MySQL/MySQL Server 8.0/Uploads/ as the default file location. This path will be used at the time of running an export command. 
If we want to change the default export location of the CSV file specified in the secure_file_priv variable, we need to edit the my.ini configuration file. On the Windows platform, this file is located on this path: C:\ProgramData\MySQL\MySQL Server X.Y. If we want to export MySQL data, first, we need to create a database with at least one table. We are going to use this table as an example. We can create a database and table by executing the code below in the editors we are using: If we execute the SELECT statement, we will see the following output: 
Export MySQL data in CSV format using the SELECT INTO ... OUTFILE statementTo export the table data into a CSV file, we need to execute the query as follows: We will get the following output, where we can see that six rows are affected. It is because the specified table contains six rows only. 
If we execute the same statement again, MySQL produces an error message that can be seen in the below output: 
The error message tells us that the specified file name already exists in the specified location. Thus, if we export the new CSV file with the same name and location, it cannot be created. We can resolve this either delete the existing file on the specified location or rename the file name to create it in the same place. We can verify the CSV file created in the specified location or not by navigating to a given path as follows: 
When we open this file, it will look like below image: 
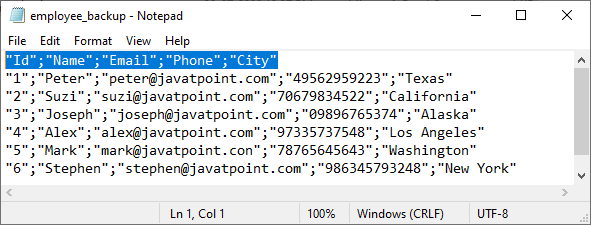
In the image, we can see that the numeric fields are in quotation marks. We can change this style by adding OPTIONALLY clause before ENCLOSED BY: Exporting Data with Column HeadingSometimes we want to export data along with column headings that make the file convenient. The exported file is more understandable if the first line of the CSV file contains the column headings. We can add the column headings by using the UNION ALL statement as follows: In this query, we can see that we have added heading for every column name. We can verify the output by navigating to the specified URL where the first line contains the heading for each column: 
Export MySQL Table in CSV FormatMySQL OUTFILE also allows us to export the table without specifying any column name. We can use the below syntax to export table in a CSV file format: If we execute the above statement, our command-line tool produces the following result. It means the specified table contains six rows, which exported in employee_backup.csv file. 
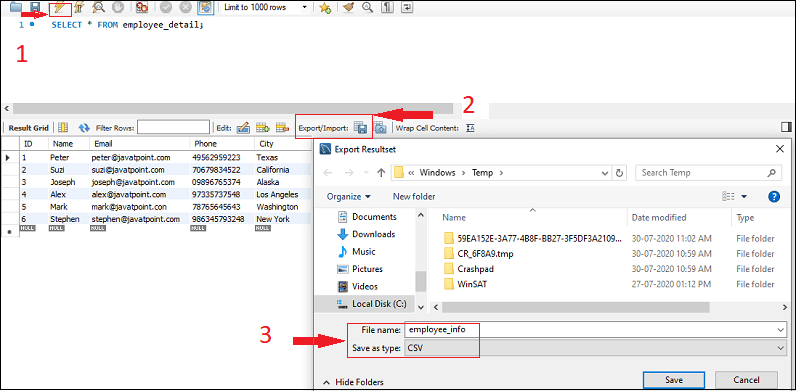
Handling Null ValuesSometimes the fields in the result set have NULL values, then the target file (exported file type) will contain N instead of NULL. We can fix this issue by replacing the NULL value by "not applicable (N/A)" using the IFNULL function. The below statement explains it more clearly: Export Table into CSV Format Using MySQL WorkbenchIf we do not want to access the database server for exporting the CSV file, MySQL provides another way, i.e., using MySQL Workbench. Workbench is a GUI tool to work with MySQL database without using a command-line tool. It allows us to export the result set of a statement to a CSV format in our local system. To do this, we need to follow the below steps:

Now, we can verify the result by navigating to the specified path.
Next TopicMySQL Subquery
|
 For Videos Join Our Youtube Channel: Join Now
Feedback
- Send your Feedback to [email protected]
Help Others, Please Share


