How to use MySQL Trigger?MySQL triggers are powerful database objects that let you automate tasks on the basis of specific events within the database. By defining triggers, you can improve data integrity, apply business rules, and streamline data management processes. In this article, we are going to comprehend how to use MySQL triggers effectively. We will learn about triggers, the syntax of triggers, and various kinds of triggers with examples. What do you mean by MySQL triggers?MySQL triggers are stored programs that are automatically executed in response to specific events that occur in your database tables. These specific events can be INSERT, UPDATE, or DELETE records. A trigger consists of three major parts: a trigger event, which defines the event; a trigger action, which defines the action that needs to be taken; and trigger time, which tells when the trigger will be executed. Syntax and Structure of MySQL Triggers:You need to use the CREATE TRIGGER command to create a trigger, which follows a specific syntax. The structure of a MySQL trigger contains the triggerName, triggerTime, triggerEvent, triggerAction, and the delimiters used to define the trigger. triggerName is the name given to the trigger for identification purposes. triggerTime defines the time at which the trigger should execute, which can be either before or after the triggering event occurs. triggerEvent defines the event that fires the trigger, such as UPDATE, INSERT, or DELETE. tableName is the name of the table on which the trigger is applied. FOR EACH ROW tells that the trigger should be executed for each affected row. Inside the BEGIN and END blocks, you must write the SQL statements that define the actions that need to be taken when the trigger fires. These statements may include calls to data modification, calculations, or other stored procedures. Why use triggers in MySQL:
Types of MySQL triggers:There are two kinds of triggers in MySQL: BEFORE triggers and AFTER triggers. 1. BEFORE Trigger:BEFORE trigger is also called pre-triggers, it is executed before the triggering event occurs. It lets you change data or perform additional actions before the actual change takes place. It is typically used for data validation or for applying business rules. There are three various kinds of MySQL BEFORE triggers: BEFORE INSERT Trigger: This trigger is executed before the INSERT operation is executed on the table. It can be used to modify the values being inserted or validate the data before it is inserted into the table. BEFORE UPDATE Trigger: This trigger is executed before the UPDATE operation is performed on the table. It lets you modify the values being updated or apply certain conditions to modify the update operation. BEFORE DELETE Trigger: This trigger is executed before the DELETE operation is performed on the table. It can be used to execute specific actions before the deletion takes place. You can use it to prevent the deletion of particular rows or perform cascading deletes. 2. AFTER Trigger:AFTER trigger is also called post-trigger, it is executed after the triggering event is completed. It is used to execute actions on the basis of the result of the triggering event. It is commonly used for tasks such as updating related tables, logging changes, etc. There are three various types of MySQL AFTER triggers: AFTER INSERT Trigger: This trigger automatically executes after a new row is inserted in the table. It can be defined as performing some actions or calculations based on the inserted data. AFTER UPDATE Trigger: This trigger executes automatically after one or more rows are updated in the table. It is commonly used to take action based on updated data. AFTER DELETE Trigger: This trigger executes automatically after one or more rows are deleted from the table. It lets you perform actions on the basis of deleted data. Some examples to demonstrate the use of MySQL triggers are as follows:Example 1: Let us create a table called 'passengers', which has the fields such as Id, Name, Address, and Charges. To create the table, use the provided command: The table has been created, and it will look like it is shown below:
After inserting the values in the 'passengers' table, it will look like it is shown below:
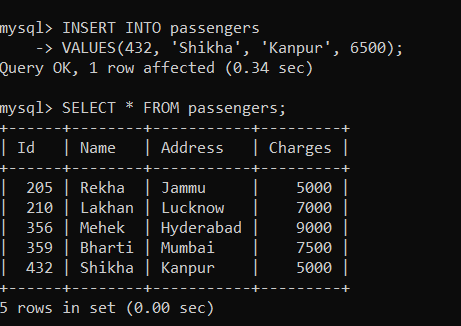
Now we will create a trigger called 'flight', which will be set to subtract 1500 charges from the new charges when a new record is entered in the table. Use the given statements to create a trigger: After creating a trigger, execute it. Now, we will insert a new record in the 'passengers' table using the given command: Use the following statement to see the result: As you can see below, 1500 charges have been deducted from the new charges. 
Example 2:Let us create two tables: 'college_student', which has fields such as Id, Name, Age & Address, and 'college_audit', which has fields such as Id and audit_description. Use the given command to create the 'college_student' table: The table is created, and it will look like it is shown below:
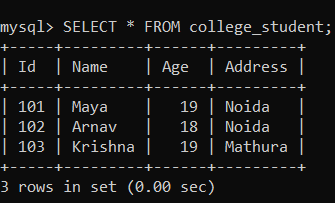
Now, we will insert values in the 'college_student' table, After inserting the values in the 'college_student' table, it will look like it is shown below: 
Now, we will create the 'college_audit' table using the following command: The table is created, and it will look like it is shown below:
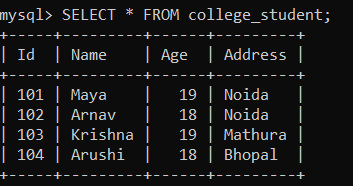
Now we will create a trigger called 'afterInsertCollege', which will be set to insert the audit details into the 'college_audit' table when a new row is added to the 'college_student' table. Use the following statements to create a trigger: After creating a trigger, execute it. Now, we will insert the values in the 'college_student' table, After inserting the values in the 'college_student' table, it will appear as shown below; 
As we have applied the trigger on the 'college_student' table, with the insertion of each new row in the 'college_student' table, the date and time get added to the 'college_audit' table. We will use the following statement to view the 'college_audit' table: As you can see below, the date and time are automatically added to the 'college_audit' table. 
Example 3:Let us create a table called 'workers', which has fields such as Id, Name, Age, Address, and Salary. Use the given command to create the 'workers' table: The table is created, and it will look like it is shown below:
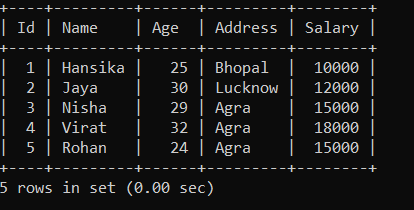
Now, we will insert the values in the 'workers' table using the given command: After inserting the values in the 'workers' table, it will look like it is shown below:
We will create a trigger called 'salary_update', which will be used to update the salary of the new worker inserted in the table. If the salary of the new worker is less than 15000, then the salary of the new worker will be updated to 15000. We are going to use the following statements to create the trigger: After creating a trigger, execute it. Now, we will insert a new record to the 'workers' table using the following statements: After executing the above statement, we will use the following statement to display the 'workers' table: As you can see below, the salary of the new worker added to the table has been updated to 15000. 
Limitations of MySQL triggers:
Conclusion:In this article, we have learned how to use MySQL Triggers. A trigger is a user-defined SQL statement that is automatically performed in response to an event such as an INSERT, DELETE, or UPDATE. You have understood the syntax and structure of MySQL triggers. You have gained knowledge on the need to use triggers and the limitations of triggers. You have learned that there are two kinds of triggers: AFTER trigger and BEFORE trigger. You have understood the examples which explain how you can use triggers properly.
Next TopicHow to use MySQL Before Trigger
|
 For Videos Join Our Youtube Channel: Join Now
Feedback
- Send your Feedback to [email protected]
Help Others, Please Share


