How to use MySQL After TriggerIn MySQL, an AFTER trigger is a kind of trigger that is executed after a specified event, specially after an INSERT, UPDATE, or DELETE operation on a table. It permits you to define actions or processes that must be performed automatically after the event occurs. In this article, we will learn how to use MySQL AFTER trigger. Syntax and structure of MySQL AFTER trigger:triggerName: It is the name you give to the trigger. triggerTime: It indicates that the trigger should be executed after the specified event. triggerEvent: It specifies the trigger event that will activate the trigger. tableName: It is the name of the table on which the trigger is being created. FOR EACH ROW: It signifies that the trigger will be executed for each row affected by the triggering operation. BEGIN and END: The trigger logic and actions should be written between the BEGIN and END statements. Few points to remember about MySQL AFTER triggers:
Types of MySQL AFTER trigger:There are three kinds of MySQL AFTER trigger: AFTER INSERT trigger, AFTER UPDATE trigger, and AFTER DELETE trigger. 1. AFTER INSERT trigger:In MySQL, an AFTER INSERT trigger is a database object that permits you to execute actions automatically after a new record is added to the table. To create an AFTER INSERT trigger in MySQL, you have to use the CREATE TRIGGER statement, specifying the table name, table event (INSERT), and trigger timing (AFTER). The trigger body can contain one or more SQL statements enclosed within the BEGIN and END keywords. Syntax: In the above example, "afterInsertTrigger" is the name you assign to the trigger, "tableName" is the name of the table on which the trigger is created, and "columnName" is the name of a particular column within the table. You can define your custom logic and functions inside BEGIN and END blocks. Example 1: Let us create two tables: 'school_student', which has fields such as Id, Name, Class, Age & Address, and 'school_audit', which has fields such as Id and audit_description. Use the given command to create the 'school_student' table: The table is created, and it will look like it is shown below:
Now, we will insert values in the 'school_student' table, After inserting the values in the 'school_student' table, it will look like it is shown below:
Now, we will create the 'school_audit' table using the following command: The table is created, and it will look like it is shown below:
Now we will create a trigger called 'after_insert_school', which will be set to insert the audit details into the 'school_audit' table when a new row is added to the 'school_student' table. Use the following statements to create a trigger: After creating a trigger, execute it. Now, we will insert the values in the 'school_student' table, After inserting the values in the 'school_student' table, we will use the given statement to see the table: The 'school_student' table will appear as shown below; 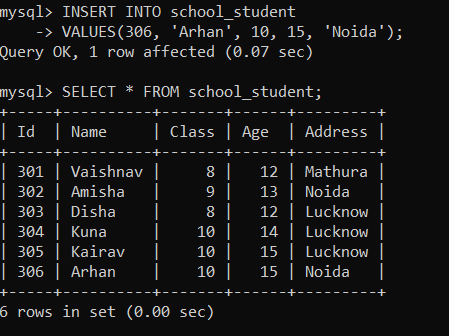
As we have applied the trigger on the 'school_student' table, with the insertion of each new row in the 'school_student' table, the date and time are inserted into the 'school_audit' table. We will use the following statement to view the 'school_audit' table: As you can see below, the date and time are automatically inserted in the 'school_audit' table. 
Example 2: Let us create two tables: 'factory_worker', which has fields such as Id, Name, Age, Address & Wage and 'factory_audit', which has fields such as Id and audit_description. Use the given command to create the 'factory_worker' table: The table is created, and it will look like it is shown below:
Now, we will insert values in the 'factory_worker' table, After inserting the values in the 'factory_worker' table, it will look like it is shown below:
Now, we will create the 'factory_audit' table using the following command: The table is created, and it will look like it is shown below:
Now we will create a trigger called 'after_insert_factory', which will be set to insert the audit details into the 'factory_audit' table when a new row is added to the 'factory_worker' table. Use the following statements to create a trigger: After creating a trigger, execute it. Now, we will insert the values in the 'school_student' table, After inserting the values in the 'factory_worker' table, use the given command to view the table: The 'factory_worker' table will appear as shown below. 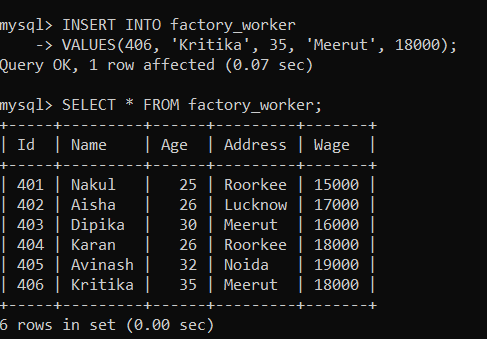
As we have applied the trigger on the 'factory_worker' table, with the insertion of each new row in the 'factory_worker' table, the date and time are inserted into the 'factory_audit' table. We will use the following statement to view the 'factory_audit' table: As you can see below, the date and time are automatically inserted in the 'factory_audit' table. 
2. AFTER UPDATE trigger:In MySQL, an AFTER UPDATE trigger is a database object that permits you to execute actions automatically after a new record is added to the table. To create an AFTER UPDATE trigger in MySQL, you must use the CREATE TRIGGER statement, specifying the table name, trigger timing (AFTER), trigger event (UPDATE), and the trigger body. The trigger body consists of one or more SQL statements enclosed within the BEGIN and END keywords. Syntax: In the above example, "afterUpdateTrigger" is the name you assign to the trigger, "tableName" is the name of the table on which the trigger is created, and "columnName" is the name of a particular column within the table. You can define your custom logic and functions inside BEGIN and END blocks. Example1: Let us create the first table called 'snacks_details', which has fields such as Id, Name, snacks_type, Quantity, Price, and Calories. Use the following command to create the 'snacks_details' table: The table is created, and it will look like it is shown below:
Now, we will insert the values in the 'snacks_details' table using the given command: After inserting the values in the 'snacks_details' table, it will appear as shown below:
Now, we will create the second table called 'price_details', which has fields like Id, snacks_id, old_price, new_price, and updated_date_time. The table is created, and it will look like it is shown below:
Now, we will create a trigger called 'after_update_price', which will be used to add a new row in the 'price_details' table whenever the quantity is updated in the 'snacks_details' table. We are going to use the following statements to create the trigger: After creating a trigger, execute it. Now, we will update the price of snacks of 'Id=1' in the 'snacks_details' table using the following statements: After executing the above statement, let us check the 'snacks_details' table using the following statement: As you can see below, the price of 'Id=1' has been changed. 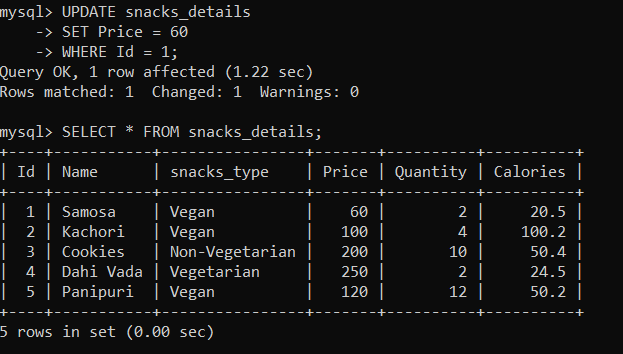
Now, let us check the 'price_details' table using the following statement: As you can see below, a row has been inserted in the table with old and new price details. 
Let us again update the price of snacks on the 'snacks_details' table. This time we will update the price of snacks of 'Id=4' using the following statements: After executing the above statement, let us check the 'snacks_details' table using the following statement: As you can see below, the price of 'Id=4' has been changed. 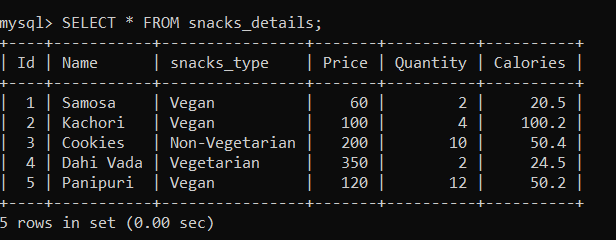
Now, let us check the 'price_details' table using the following statement: As you can see below, a new row has been inserted in the table with old and new price details. 
Example 2: Let us create the first table called 'electrical_appliances', which has fields such as Id, Name, Quantity, manufacturing_year, and Price. Use the following command to create the 'electrical_appliances' table: The table is created, and it will look like it is shown below:
Now, we will insert the values in the 'electrical_appliances' table using the given command: After inserting the values in the 'electrical_appliances' table, it will appear as shown below:
Now, we will create the second table called 'quantity_details', which has fields like Id, appliances_id, old_quantity, new_quantity, and updated_date_time. The table is created, and it will look like it is shown below:
Now, we will create a trigger called 'after_update_quantity', which will be used to add a new row in the 'quantity_details' table whenever the quantity is updated in the 'electrical_appliances' table. We are going to use the following statements to create the trigger: After creating a trigger, execute it. Now, we will update the quantity of 'Id=2' in the 'electrical_appliances' table using the following statements: After executing the above statement, let us check the 'electrical_appliances' table using the following statement: As you can see below, the quantity of 'Id=2' has been changed. 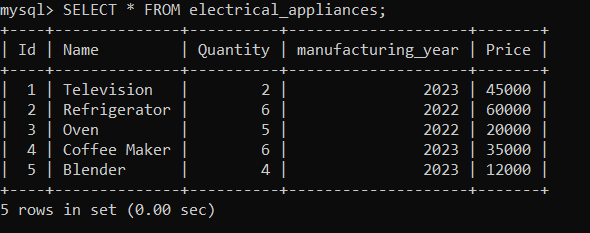
Now, let us check the 'quantity_details' table using the following statement: As you can see below, a row has been inserted in the table with old and new price details. 
Let us again update the quantity of the 'electrical_appliances' table. This time we will update the quantity of 'Id=5' using the following statements: After executing the above statement, let us check the 'electrical_appliances' table using the following statement: As you can see below, the quantity of 'Id=5' has been changed. 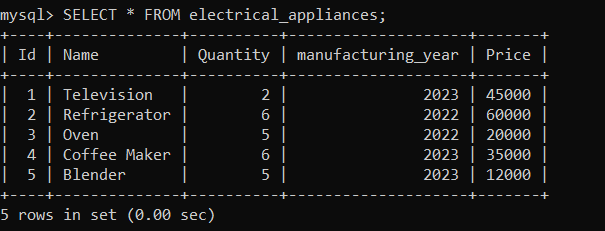
Now, let us check the 'quantity_details' table using the following statement: As you can see below, a new row has been inserted in the table with old and new quantity details. 
3. AFTER DELETE trigger:In MySQL, an AFTER DELETE trigger is a database object that permits you to execute actions automatically after a new record is added to the table. To create an AFTER DELETE trigger in MySQL, you have to use the CREATE TRIGGER statement, specifying the table name, table event (DELETE), and trigger timing (AFTER). The trigger body can contain one or more SQL statements enclosed within the BEGIN and END keywords. Syntax: In the above example, "afterDeleteTrigger" is the name you assign to the trigger, "tableName" is the name of the table on which the trigger is created, and "columnName" is the name of a particular column within the table. You can define your custom logic and functions inside BEGIN and END blocks. Example 1: Let us create a table called 'customers', which has fields such as Id, Name, Age, and Address. Use the given command to construct the 'customers' table: The table is created, and it will look like you can see below:
Now, we will insert the values in the 'customers' table using the given command: After inserting the values in the 'customers' table, it will look like you can see below:
Now, we will create another table named 'backup_data', which will store the deleted data from the 'customers' table. The 'backup_data' table consists of fields like user_name and comments. The table is created; it will look like you can see below:
We will create a trigger called 'data_delete' using the given statements: After creating a trigger, execute it. Now, we will use the given command to delete data from the 'customers' table: Now, we will look at the 'customers' table using the given statement: As you can see below, the data of 'Id=2' is deleted. 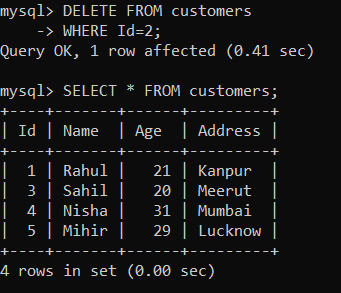
Now we will check the 'backup_data' table to see whether the deleted data has been stored in the table or not. We will use the given statement to see the 'backup_data' table: As you can see below, the deleted data has been stored in the table. 
Example 2: Let us create a table called 'staff', which has fields such as Id, Name, Age, Address, and Salary. Use the given command to construct the 'staff' table: The table is created, and it will look like you can see below:
Now, we will insert the values in the 'staff' table using the given command: After inserting the values in the 'staff' table, it will look like you can see below:
Now, we will create another table named 'backup', which will store the deleted data from the 'staff' table. The 'backup' table consists of fields like User and Comments. The table is created, and it will look like you can see below:
We will create a trigger called 'after_delete' using the given statements: After creating a trigger, execute it. Now, we will use the given command to delete data from the 'staff' table: Now, we will look at the 'staff' table using the given statement: As you can see below, the data of 'Id=1' is deleted. 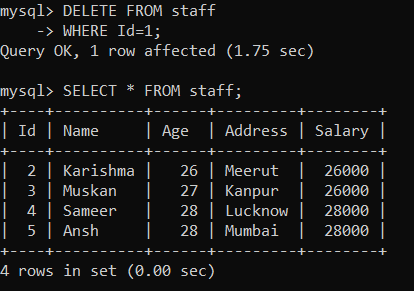
Now we will check the 'backup' table to see whether the deleted data has been stored in the table or not. We will use the given statement to see the 'backup' table: As you can see below, the deleted data has been stored in the table. 
Conclusion:In this article, we have learned how to use MySQL AFTER trigger. We have learned that there are three kinds of AFTER trigger: AFTER UPDATE trigger, AFTER INSERT trigger, and AFTER DELETE trigger. We have understood each type of AFTER trigger properly with the help of examples.
Next Topic#
|
 For Videos Join Our Youtube Channel: Join Now
Feedback
- Send your Feedback to [email protected]
Help Others, Please Share


