| |

SQL Server ConstraintsConstraints are the predefined set of rules and restrictions applied on the tables or columns for restricting unauthorised values to be inserted into the tables. They are responsible for ensuring the column's data accuracy, integrity, and reliability inside the table. Constraints also tell that the data will be inserted into the table when the inserted data satisfies the constraint rule. Otherwise, the insert operation will be terminated if the inserted data violates the defined constraint. SQL Server categorises the constraints into two types:
Constraints used in SQL ServerThe following are the most common constraints used in the SQL Server that we will describe deeply with examples:
NOT NULL ConstraintColumns in SQL Server by default store NULL values. We can restrict NULL value from being inserted into a given column by using a NOT NULL constraint. If we try to insert the NULL value in that column, it is considered an invalid value. It means we must provide the valid non-null value in the table while using the INSERT or UPDATE operations as the column will always have data. We can apply NOT NULL constraints either during the creation of the table or after creating the table using the ALTER statement. The following example will apply NOT NULL constraint in the column when the table is created: Next, we will insert some values into the table to see how this constraint works. Executing the above insert statement will return the below output. Here, we can see that the first INSERT query executes correctly, but the second statement fails and gives an error that says column 'Amount' does not allow nulls. 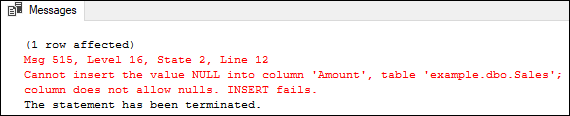
When we created a table "Sales", we can see the there is no constraint applied with the Vender_Name column. Therefore, it will insert the default value NULL. If we want to restrict the NULL value into this column, we use the below statement: SQL Server also allows us to create a NOT NULL constraint in the table without the execution of a SQL statement. We can do this by using the management studio by first right-clicking on the desired table and choosing the design option. Check all the columns in the "Allow Nulls" option that stores the null value in the design window. 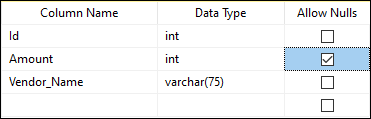
Unique ConstraintThe UNIQUE constraint ensures that no duplicate values can be inserted into a column or combination of columns that are not part of the PRIMARY KEY and are participating in the UNIQUE constraint. This constraint always inserts unique and non-repetitive values into the column. It is similar to the primary key, but it allows one null value. It can be applied while creating a table or after creating the table using the ALTER statement. The following example will create a UNIQUE constraint in the column when the table is created: Next, we will insert some values into the table to see how this constraint works. Executing the above insert statement will return the below output. Here, we can see that the first INSERT query executes correctly, but the second statement fails and gives an error. This error says that the ID column does not allow duplicate values, and the specified ID value has already been entered into that column. 
If we want to add unique constraints in the existing table to prevent from entering duplicates, we can use the following statement: If we accidently added constraint in the wrong column, we can drop it also in the SQL Server. The below statement is used to drop the constraint from the specific column: SQL Server also allows us to create a UNIQUE constraint in the table without the execution of a SQL statement. Using the management studio, we can do this by first right-clicking on the desired table and choosing the design option. In the design window, select the columns in which you want to add a constraint, right-click, and choose the Indexes/Keys option. A new wizard will appear; click Add. Next, click Type in the General property and choose Unique Key from the drop-down list, and then click Close. Finally, save the table on the file menu. 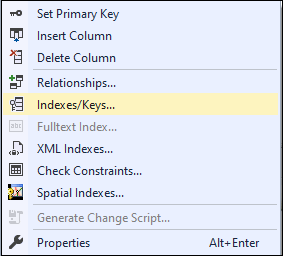
CHECK ConstraintThis constraint is used to limit the range of values in a column. It ensures that all the inserted values in a column must follow the specific rule. In other words, it determines whether the value associated with the column is valid or not with the given condition. It controls the value in a particular column and assures no corrupted information is entered in a column. We can specify more than one check constraint for a specific column. When a NULL value is included in the condition, this constraint will yield an UNKNOWN value. We can apply CHECK constraints while creating the table or after creating the table using the ALTER statement. The following example will apply the CHECK constraint in the salary column when the table is created. This constraint indicates that the salary column cannot store less than or equal to 10000. Next, execute the following insert statements to add records into the table: Executing this will return the below result: 
From the result, it is clear that the first insert statement added record without any error as the provided value in the salary column meets the check condition. The second insert statement will be failed as the provided value in the salary column do not meet the check condition due to inserting a value less than 10000. We know that this constraint can also insert NULL values if the participating columns allow NULL. These NULL values will be evaluated as UNKNOWN without generating an error. Although the salary column value is NULL in the below statement, it was executed successfully and added records into the table: Verifying the table will return the below output where the salary column shows NULL value in the row ID 3. 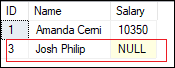
We have not mentioned the constraint name while creating a table, then SQL Server will automatically assign a unique name to this constraint. To check the constraint name, use the INFORMATION_SCHEMA.TABLE_CONSTRAINTS system object that retrieves information about all defined constraints in the given table. Here is the statement: It returns the below output where all constraint name is shown for the given table. 
If we want to drop the CHECK constraint, execute the below command: If we want to add CHECK constraint in the existing table, execute the below command: We can also create the CHECK constraint using the management studio tool. To do this, first right-click on the desired table and choose the design option. In the design window, select the columns in which you want to add a constraint, right-click, and choose the "Check Constraints" option. A new wizard will appear, specify the constraint name, expression and if checking the existing data is required, and then click Close. Finally, save the table on the file menu. 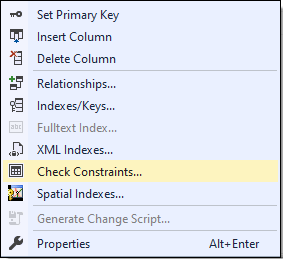
DEFAULT ConstraintThis constraint is used to insert the default value in the column when the user does not specify any value for that column. It helps to maintain domain integrity when no value is provided into the specified default constraint column. It also assures that the column must contain a value including constant value, system-defined value, or NULL. It can also be created either during the creation of the table or after creating the table. Let us understand it with an example. The following statement will create a table containing four columns. Here we have defined a DEFAULT constraint on the Salary_Date column that assigns the system date value for that column in case we have not specified it in the INSERT statement: Execute the below statement to insert records into the table: The above statement executes successfully. We can verify the inserted records using the SELECT statement. Here we see that the Salary_Date column value for the second row assigned the current date and time value as we have not mentioned it in the INSERT statement: 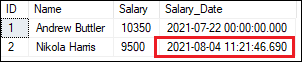
The below statement will add the DEFAULT constraint after creating the table. This statement should be executed for the above table after deleting the constraint from the Salary_date column. To delete the default constraint from the column, we need to first get the constraint name by expanding the Constraints node under the current table. 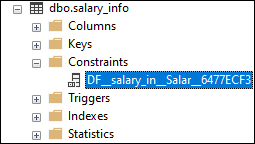
Then, we can use the below statement to drop the constraint from the column: We can also create the DEFAULT constraint using the management studio tool. Go to the design option, select the columns in which you want to add a constraint, and then assign a default value by browsing the Column Properties window as shown below. Finally, click on Close and then save the table on the file menu. 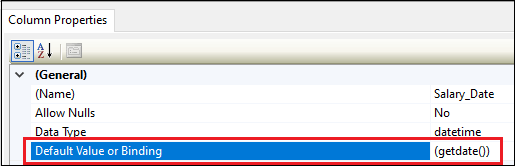
PRIMARY KEY ConstraintThis constraint consists of one or more columns with values and identifies each record in a table uniquely. We cannot enter the null, empty, or duplicate values in the primary key constraints columns. Each table can contain only one primary key column; however, it can have duplicate columns. It always contains unique values in a column. We mainly used this constraint to enforce the entity integrity of the table. If we define the primary key constraint with the combination of multiple columns, then it is possible to insert duplicate values on each column individually; however, the combined values of all PRIMARY KEY columns must be unique. This constraint differs from the UNIQUE constraint as the table can create multiple unique constraints, but the primary key can be only one for each table. The following statement creates a table "person" with three columns: ID, Name, and Country. Here, we define the ID column as a PRIMARY KEY for the table for identifying each record of the table by ensuring that this column cannot have NULL, empty, or duplicate values. Here is the statement: Next, we will execute the following three insert statements: Executing the statements will return the following message. It shows that the first insert query executes successfully and add two records into the table as all the provided column values are valid. The second insert statement failed because the ID column is defined as a primary key, so that this column is mandatory and cannot be NULL. The third insert operation failed because the given ID value already exists, and the duplicate values cannot be entered in the PRIMARY KEY column. 
As we have not specified the name for the PRIMARY KEY constraint during the table definition, the SQL Server will automatically assign it with a unique name. We can see the primary key constraint name using the INFORMATION_SCHEMA.TABLE_CONSTRAINTS system object. Here is the output: 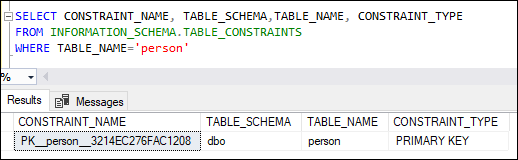
If we want to provide another name to the primary key constraint, we first delete the default name using the below statement: Now, we use the below statement to add the primary key constraint after creating the table or after deleting the default name for specifying a new name. NOTE: We ensure that adding the primary key constraint to the column using the ALTER TABLE command must have declared with the NOT NULL constraint (when the table was first created) and have only UNIQUE values. Otherwise, the query will be failed.We can also create the PRIMARY KEY constraint using management studio. Right-click the desired table, select the design option and choose the columns in which you want to add the constraint. Again, right-click on your column and set a PRIMARY KEY option that will automatically uncheck the Allow NULLs checkbox: Finally, click on Close and then save the table on the file menu. 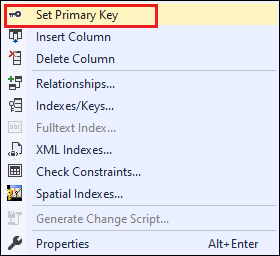
FOREIGN KEY ConstraintA foreign key is a database key that links two tables together. This constraint is also known as referencing key as it identifies the relationships between the tables by referencing a column of the child table containing the foreign key to the PRIMARY KEY column of the parent table. It means the foreign key column in one table refers to the primary key column of another table. The FOREIGN KEY constraint is different from the PRIMARY KEY constraint as each table can only have one PRIMARY KEY. In contrast, each table can have several FOREIGN KEY constraints by referring to multiple parent tables. Also, we cannot insert NULL values in the primary key column, but we can have NULL values in the foreign key column if there is no NOT NULL constraint defined to this key. SQL Server allows adding the FOREIGN KEY constraint either during the table creation or after the table creation. Let's understand its functionality by first creating two new tables where the first table acts as the parent table and the second table acts as the child table. The PID column in the parent table is defined as a PRIMARY KEY, and the CID column in the child table is defined as the FOREIGN KEY column that references the parent table's ID column. Here is the code script for creating both tables: Next, we will execute the following insert statements. The first insert statement add three rows to the parent table, and the other two insert statements add two records in the child table: Executing the statements will display the following result: 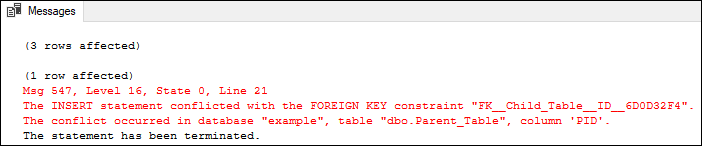
The above output image shows that the first insert query adds three rows into the parent table. The second insert statement will add the one record into the child table without any error because the ID value of 1 already exists in the parent table. The third insert statement will fail, and no record will be added to the child table since the ID value of 4 does not exist in the parent table. We will not be able to insert an ID value to the child table that does not exist in the parent table due to the FOREIGN KEY restriction. We can verify the inserted records in the parent and child table using the SELECT statement. 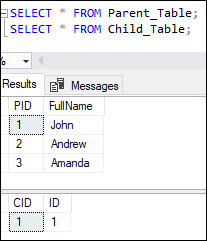
Suppose we want to define the FOREIGN KEY constraint name after automatically creating the child table assigned by the SQL server. To do this, we first need to retrieve the constraint name from the INFORMATION_SCHEMA.TABLE_CONSTRAINTS statement, drop this name and then assign a unique name using the ALTER statement. Here is the code script: We can also define the foreign key constraint using the SQL Server Management Studio tool. Select the Design option by right-clicking on the desired table. We will see the Design window box, right-click on it and select the Relationships option from the menu: 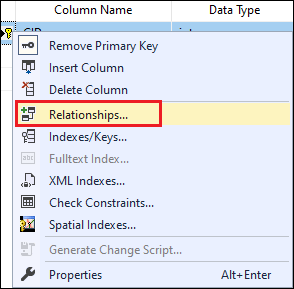
The relationship option displayed another window where we will specify the foreign key constraint name along with the tables and columns that will participate in that relationship by clicking on the Tables And Columns Specification. Now, click on the OK button to complete the operation when the referenced record is deleted or modified on the parent table. 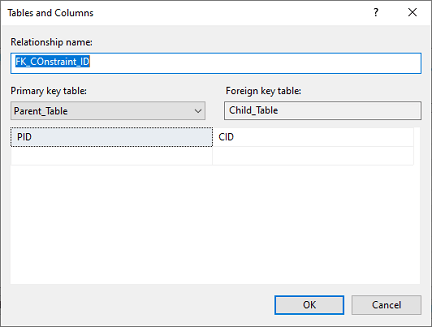
Next TopicSQL Server PROFILER
|
 For Videos Join Our Youtube Channel: Join Now
Feedback
- Send your Feedback to [email protected]
Help Others, Please Share


