| |

Export Design Assets in Adobe XDThe Adobe XD allows us to export assets such as icons, background patterns, textures, images in different image formats. The basic process of a design is creating a design share with the team and modifying the feedback provided by them. Once we are done with the application design, the next step is to share the assets with the development team to add them to the actual code of the application and create the application according to created design. We can export assets such as icons, images, background, objects, text, and even artboards from XD in different image formats such as PNG, SVG, JPG, and PDF. Adobe XD provides a convenient way to export these assets in an optimized format for deployment on different platforms such as iOS, Android, or web apps. If you are using XD on macOS, we have an option to bring our designs into third-party integrations such as Zeplin, Avocode, Sympli, Kite Compositor, and Protopie. Let's understand how to export assets from XD to your local system for different platforms: How to Export Assets in Adobe XD?Follow the below steps to export assets from adobe XD: Step1: Select-Object or Artboard To export any object or artboard, select it in the workspace using the select tool. For example, if we want to export an icon from our artboard, select it on the workspace. Consider the below snap of the email field from the login page: 
From the above image, we are exporting the checkmark icon. Step2: Navigate to File > Export Menu Select the export option by navigating to the File > Export menu. Alternatively, we can press the Ctrl + E keys as a shortcut in Windows and Command + E keys in mac OS. It will open the export window with different export options. We can also select the options to export single or batch export by navigating through the file menu: 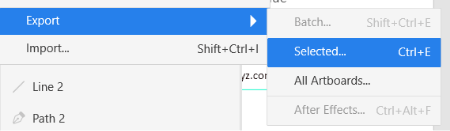
Here, we can find the all artboards option to export all the artboards available in the workspace. Step3: Specify the Export options Now, specify the export options in the export window. Following options are available in the export window: 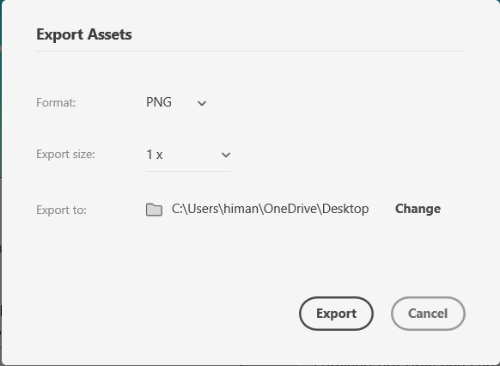
Format: The format menu contains different format options to export the selected assets. The format option contains the PNG, SVG, PDF, and JPG. Select the required option from this menu. Export Size: The export size allows us to specify the size of the selected assets. It contains different options such as 0.5x, 1x, 2x, 3x, 4x, Web, iOS, and Android options. The x format exports assets in the multiply of the selected option. For example, selecting the 0.5x option will export the assets half of their original size; similarly, 2x will export in the double, and 1x will export the assets in the original size. The Web option will export the assets in the 1x and 2x format for web requirements. The iOS option will export the assets in 1x, 2x, and 3x format for the iOS device's requirements. The Android option will export the assets in idpi, mdpi, hdpi, xhdpi, xxhdpi, and xxxhdpi format for the Android devices requirements. These assets are optimized as follows:
We can easily organize the assets for the different teams by exporting them to different folders. It will help the development team get the assets in all the required formats. Export to: The export to option allows us to specify the location for the assets. We can create a specific folder for a specific team and export its assets. For example, to provide the assets to the Android team, we can create a separate folder named Android to place all the assets related to the Android team. Step4: Export the Assets Once we have specified all the assets options per our requirement, we can now export it by clicking on the Export button. It will save the assets in the specified folder. Now, we can share them with the team. Summary: The basic process of a design is creating a design share with the team and modifying the feedback provided by them. Once we are done with the application design, the next step is to share the assets with the development team so that they can add them to the actual code of the application and create the application according to created design. To share the assets easily, select the assets and press the Ctrl + E keys as a shortcut and export them as per the requirement.
Next TopicPlugins for Adobe XD
|
 For Videos Join Our Youtube Channel: Join Now
Feedback
- Send your Feedback to [email protected]
Help Others, Please Share


