Layer Effects and Styles in PhotoshopIn the previous section, we have discussed the Layers in Photoshop. We can style our layers and apply several effects to make our work attractive. We can apply different types of the effects such as shadows, glows, and bevels that will completely change the appearance of the image's content in a non-destructive way. Non-destructive means it will not affect the original image content. The layer effects will be linked with the layer content. When we edit or move the layer's content, the same applied effect will be work on the modified content. For example, if we add a drop shadow to the text and then add new text or edit the text, the shadow will be automatically applied to the updated content. In this section, we will discuss the layer styles and effects. We have included:
A layer style is one or more than one effect applied to a layer or layer group. Photoshop also provides some preset styles, or we can create a customized style using the layer style option. The layer effects icon (Fx) is available at the right of the layer name in the panel. We can expand the layer style by clicking on it and can view or edit it by applying or removing effects. We can apply several effects on a single-layer style. The layer style will be displayed as follows: 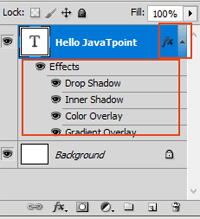
We can click on the layer style icon (fx) given right on the layer. It will show and hide the layer style. When we save a custom style, it will be saved in preset styles and displayed in the Style panel. We can apply this style to a layer or layer group with just a single click. Let's understand how to apply effects and style to a layer: How to Apply Layer Effects and Styles in PhotoshopApplying a layer effect is a straightforward process. Follow the below steps to apply a layer effect: Step 1: Open or Create a Document To apply a layer style, we need a document having layers. If you open an image, you can add different layers such as text, images, styles, etc., to it. To open an image, stroke the Ctrl + O keys, and to create an image, stroke the Ctrl + N keys. Step 2: Add Layers When we select a new tool and start drawing something on our image, it will automatically start drawing in a new layer. But, we can specifically create a new layer by stroking the Ctrl + Shift + N keys and start drawing something on it. Step 3: Add Content to Style For example, we are adding the text on our image to style it by selecting the text tool. Step 4: Add Effects Now add effects to the created layer. To add effects, select the layer and navigate to the Layer-> Layer Style menu. There are several effects such as Drop Shadow, Inner Shadow, Outer Glow, Inner Glow, Bevels & Emboss, Gradient Overlay, Pattern Overlay, etc., available to apply. We can choose any of them. 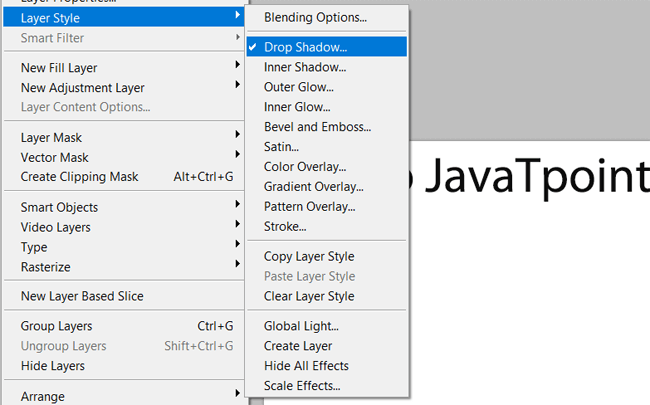
We can also apply effects by clicking on the layer style icon available at the layer. In case it is not displayed, open it by double-clicking in the layer (Just next to layer name). Don't double click on the layer name; it will open the renaming the layer option. It will open the style options as follows: 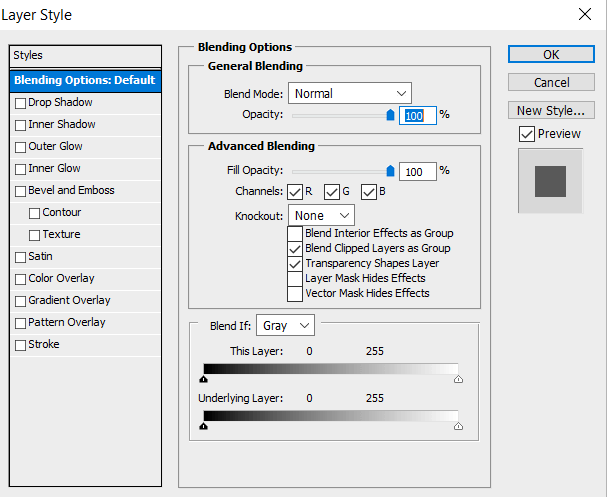
We can also apply the effects from the above window. Both the ways of applying effects are the same. They will give the same result. Hence we can apply any of the available effects to our layer's content. Consider the below image: 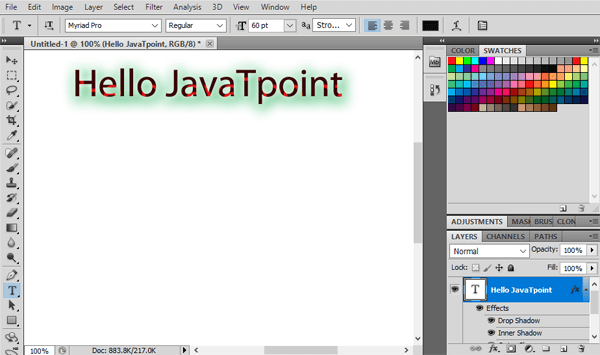
In the above image, we have applied different effects such as Drop Shadow, Inner Glow, Color Overlay to our text layer. Similarly, we can add style to any layer. Display/Hide Layer Effects & StylesJust like layers, we can display or hide layer effects and styles too. To hide layer style, click on the layer style icon (fx) and to hide a specific effect, just click on the eye icon available on the layer effect. 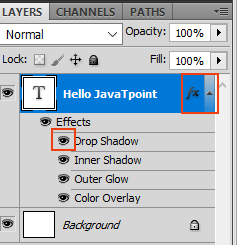
This will hide the applied style and effect on the layer. Remember hiding the layer style will not change the appearance of the image; instead, it will hide the applied effects options. If you want to hide the complete applied style, click on the eye icon available on the effects. Alternatively, we can do the same by navigating to the Layer > Layer Style > Hide All Effects or Show All Effects menu. Copy Layer StylesWe can copy-paste the layer styles to a layer. It is an easy way to apply the same style to other layers or layer groups. To copy a layer style, right-click on the layer and select the copy layer style option. 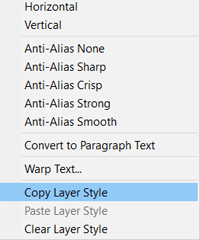
Similarly, we can paste the Layer Style by right-clicking on the layer on which we want to apply the same style. Alternatively, we can copy-paste the layer style by navigating to the Layer > Layer Style > Copy Layer Style and Layer > Layer Style > Paste Layer Style menu. Copy Layer Style by DraggingWe can also copy the layer style to another layer by dragging. To copy a layer style by dragging, press the Alt-drag shortcut key (Option-drag for Mac) and drop it to the desired layer. It will create a duplicate layer having the same style. If you want to just apply a single effect, then apply it to the individual effect. Remove a Layer Effect & StyleTo remove a layer effect, drag the layer effect to the delete icon given at the bottom-right of the layer panel. It will instantly remove the selected effect. However, we can undo that by using the Ctrl + Alt + Z keys. To remove an entire style from a layer, drag the layer style icon (fx) to the delete icon given at the bottom-right of the layer panel. Alternatively, we can also do the same by navigating to the Layer > Layer Style > Clear Layer Style menu. Layer Style OptionsPhotoshop provides several layer style options to style the content of the layer. For example, we can apply an effect and set its orientation such as angle, size, altitude, etc. Let's see some useful layer style options: Altitude: It is used to set the height of the light source in the Bevel and Emboss effect. The value 0 is equivalent to the ground level, and the value 90 is straight above the layer. Angle: The Angle value specify the lighting angle for the applied effect to the layer. We can also drag in the document to adjust the angle of an effect such as drop shadow, inner shadow, pattern overlay, or satin effect. Anti-alias: The anti-alias is used to blend the edge pixels of a contour or gloss contour. Generally, it is used on small shadows with complex contours. Blend Mode: The blending mode specifies the layer style blending with the underlying layers. These layers may or may not include the active layer. For example, the inner shadow filter blends with the currently active layer because the effect is applied on top of the active layer, but the drop shadow filter blends with the below layer of the active layer. It is recommended to leave the blend mode as default because, in most cases, it will produce the best result. Choke: The choke option is used to shrink the boundaries of the matte of inner glow or shadow prior to blurring. Color: The color options lets choose the colors from a wide range for shadow, glow, or highlight. To choose a color, click on the color box and select it. Contour: The counter option is also a very useful style option. It is used for the following purposes:
Distance: The distance option defines the offset distance for a shadow or satin effect. We can also adjust the offset option by dragging in the document window. Depth: The depth option defines the depth of the bevel and pattern. Use Global Light: The global light option allows us to set the one master lighting angle, which is then available in all the layer effects that have shading. Gloss Contour: This option is used to create a glossy, metallic appearance. Gloss Contour is applied after shading a bevel or emboss. Gradient: The gradient option is used to apply the gradient effect. To apply the gradient filter, click on the Gradient options to open the gradient options. Highlight or Shadow mode: The highlight or shadow effect is used to highlight or apply a shadow on the layer. Jitter: It is used to vary the applications of the color and opacity of a gradient. Noise: The noise option is used to specify the number of random elements in the glow or shadow opacity. Opacity: The opacity option is used to set the opacity of the layer effect. The opacity defines the transparency of an object or color. To set the opacity, enter the value or drag the slider. Position: The position option is used to define the stroke effect as outside, inside, or center. Range: The range option is used to specify the range of the glow. Size: The size option specifies the radius and size of the blur or the size of the shadow. Besides the above options, there are several other options available that are used to style the layer.
Next TopicShapes in Photoshop
|
 For Videos Join Our Youtube Channel: Join Now
Feedback
- Send your Feedback to [email protected]
Help Others, Please Share


