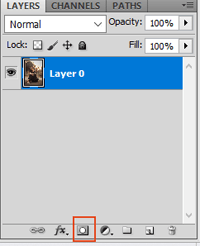
Photoshop Layer MaskThe layer mask is one of the most useful features of Photoshop. It provides the ability to hide and show the parts of the layers by performing non-destructive editing. Non-destructive editing means we can edit the image without affecting the original content. It helps designers to become more creative and efficient. The Layer mask is like a transparent cover over an image. When we apply a layer mask to the layer, it covers the original layer's content. If we apply any filter on the layer mask, it will not affect the layer's content, but it will change the image's look. It is just like an extra transparent layer over the layer. The layer mask is helpful in joining multiple images into one or removing an object from the image. It doesn't look very easy to use a layer mask, but it is easy to use, just like a black and white filter. In this section, we will discuss how to use layer masks, how they work, and when we need to apply them. Before understanding layer masks, make sure you have some basic understanding of the layers in Photoshop. Let's discuss the type of masks: Types of MasksWe can create the following two types of masks in Photoshop: Layer Masks: These masks are resolution-dependent masks which means they can be edited using the painting or selection tools. Vector Masks: These masks are resolution-independent masks which means they can be created using a pen or shape tool. All these masks provide non-destructive editing, which means we can edit the mask without losing the image's original pixel data. The layer masks are displayed on the layer with an additional thumbnail next to the layer thumbnail. For the layer masks, the thumbnail is displayed as a greyscale channel at the layer. For the vector masks, the thumbnail is shown as a path of the content on the layer. If you want to add a layer mask over the background layer, convert the background layer into a regular layer by navigating to layer -> New-> Layer from the background menu. We can edit a layer mask to add or remove an object from an image. It is like a greyscale image; the hidden area is painted in black, and the visible area is painted in white. Let's understand how to add a layer mask: How to Add Layer MasksFirst, open an image using Ctrl + O keys and make sure no selection tool is activated. If there is any tool selected, deselect it using Ctrl + D keys. Now, follow the below steps to add a layer mask: Step1: Select a Layer or Layer Group Now, select a layer over which you want to apply the layer mask. If you want to apply to the background layer, unlock it by double-clicking on the layer. Step2: Click on the Layer Mask Button The Layer mask button is available at the bottom of the Layers panel. Click on it to apply the layer mask. 
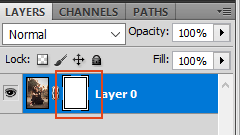
We can also do the same by navigating to Layers-> Layer Masks -> Reveal All menu. Step3: Verification If the layer mask is successfully applied to the layer, the layer mask thumbnail can be seen next to the layer thumbnail. 
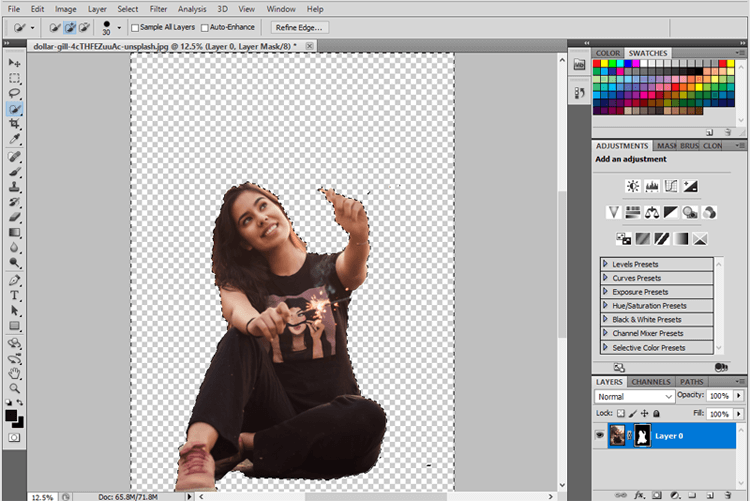
How to use Layer MaskLet's understand how to perform non-destructive editing using a Layer mask. The Layer mask offers flexible control over image transparency. It is one of the basic and finest tools of Photoshop. As we can see in the above image, the layer mask thumbnail is white, which means nothing is changed, and every pixel of the image is visible. A layer mask is nothing but a type of layer which exists in a parallel space of the layer. To perform the editing over the image, apply the layer mask and select it by clicking on the layer mask thumbnail. Now, what we edit will be performed over the layer mask, not on the image. For example, we have selected the magic wand tool to remove the background of the image. The magic wand tool magically selects all the similar pixels. To select the magic wand tool, press the w key. Now, select the background of the image by holding the shift key and dragging it over the image canvas. Press the Delete key to delete the selected region of the image. Consider the below image: 
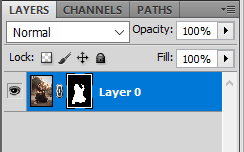
From the above image, we have removed the image background. But it is not actually removed from our image; instead, it is applied as a filter over the layer mask. If you see the layer mask thumbnail, the picture is clearly displayed here: 
We can see at the layer mask thumbnail that the deleted pixels are black, which means they are hidden, and the visible part of the image is white. Thus, we can perform the non-destructive editing using a layer mask. Similarly, we can apply a layer mask on every layer and layer group. We can edit photos without affecting them. We can merge several photos with a layer mask's help, which is one of the most demanding tasks for graphics designers. Here, we have discussed what the layer masks are and how to use them. The layer mask is just like an extra layer over the layer which exists in the parallel space. They are like a greyscale image in which black color hides the part of the image, and white colors make the image content visible.
Next TopicSmart Object in Photoshop
|
 For Videos Join Our Youtube Channel: Join Now
Feedback
- Send your Feedback to [email protected]
Help Others, Please Share


