| |

Make Gif in PhotoshopGIF stands for "Graphics Interchange Format"; it is a compressed image file format that allows animate the images. It is a collection of images looping for certain times, and it is a bitmap image format having a ".gif" file extension. It is a platform-independent image format that can be used anywhere on the web. Mostly, it is used for greeting messages, graphical images, annotated images, advertisements, and so on. GIFs are very trendy these days can be seen popping up everywhere on the web. We can create an impressive impact and attracts users by using GIFs. As we are all aware Photoshop, it supports an excellent way to deal with animations. So, we can easily create animated GIFs in Photoshop by following few easy steps. We can create separate images frames and combine them into a single timeline to make the Gif. Also, we can set the sequence time, looping time, and more settings for these images using Photoshop animation. In this section, we will discuss how to make Gif in Photoshop using a sequence of images. Further, we will discuss how to set loop time & limit in GIF for these images. How to make Animated GIFs in PhotoshopPhotoshop is an excellent tool for dealing with animations. We can efficiently edit photos and combine them in animation using Photoshop. Let's understand how to create an animated GIF in Photoshop: Following are the steps to create an animated GIF in Photoshop:
It is an easy process; let's discuss each step in detail to avoid any complications in making GIF animation: Step1: Load all images in Photoshop We can open the images by using the traditional drag and drop or Ctrl+O method. But, for a sequence of the images, below is the recommended process, as it will automatically load all the images and align their sizes as per requirement. To open a sequence of the images, navigate to File -> Scripts -> Load File into Stack menu. 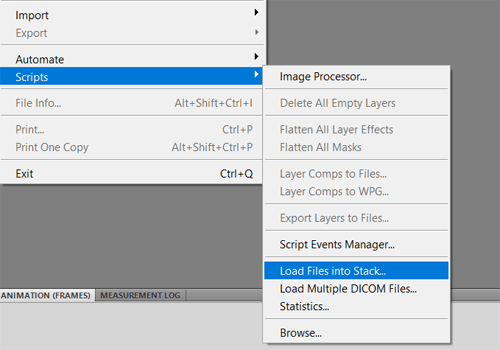
It will open a dialogue window to load all the images in a new layer stack: 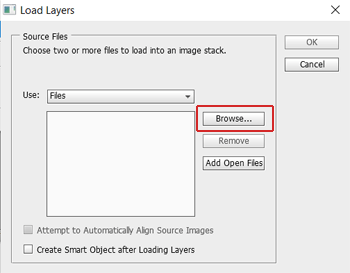
Select the Browse option from the above window. It will open the file explorer to select the files. It is recommended to keep all the files in one folder with a naming sequence in order. 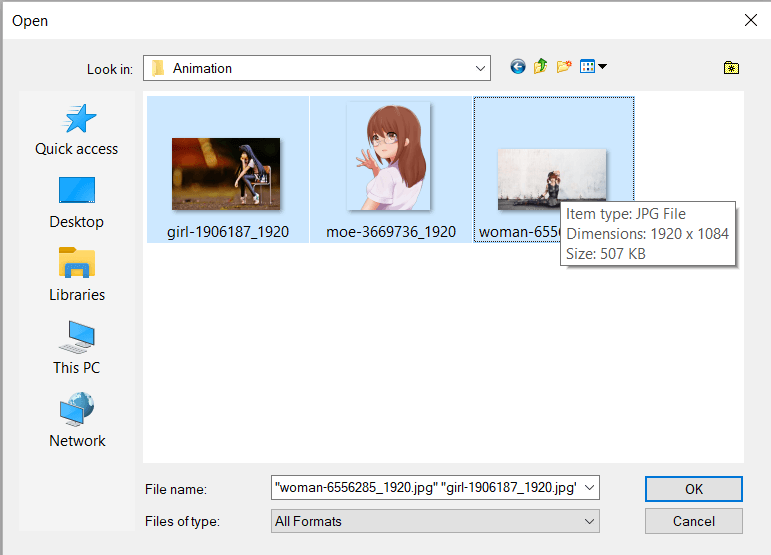
Select all the files by pressing the Ctrl+ click key. Once all the files are selected, click OK to continue. It will take a while and load all the image files in a layer stack. Step2: Open timeline Now, open the animation timeline by navigating to window -> Animation menu. It will open the animation timeline just below to the workspace. 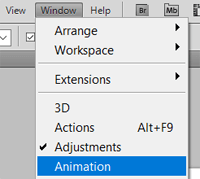
Now, we can see our image frame in the timeline, and we need to open every image in a separate frame. Step3: Manage layers Now, open the layers panel given bottom-left to the workspace to manage the layers if the layers panel is not available in the workspace. You can reset the essential workspace or hit the f7 key to open it. It will look as follows: 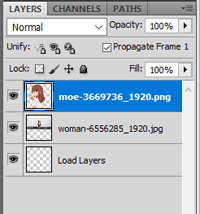
Each layer contains an image; these layers will define the sequence of the images in a GIF file. So, keep them in order that you want to display. We can adjust the layer order by dragging and dropping it from upside or downward as per the requirement. Step4: Open the timeline menu Now, navigate to the timeline and select the hamburger menu (Three lines) given at the top-right corner of the timeline window. It contains an option to control the GIF images. 
The timeline menu provides several options to control the GIF visibility. We can create, delete, select, copy, & paste the image frames using this menu. Step5: Make frames from layers There are several options in the timeline menu bar, but we will choose the suitable option for our current scenario. As we have all the images in different frames, we will choose the make frames from the layers option, and it will create a new frame for every layer. 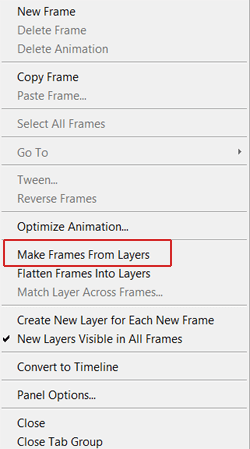
It will open all the images in a new frame in the animation timeline. Consider the below snap of the timeline: 
From the above image, we can see every image is opened in a new image frame, and it will play the image in the sequence in which it is available. Our GIF image is almost ready; all we need to save this File in the GIF format. But before saving the file, preview it. Step6: Preview the File We can preview the File by clicking on the play button at the left bottom of the timeline window. Consider the below image: 
Once we click on the preview button, it will start playing the animation in the workspace. Once we get the finalized animation, we can save it in Gif Format in our local storage. Step7: Save GIF file To save the animation in GIF format, navigate to the File -> Save for web & devices menu. Alternatively, we can press the Shift+ Ctrl+ Alt+ S keys together to save it for the web & devices. 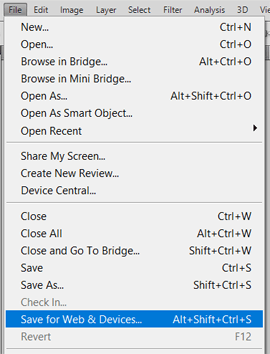
It will open a dialogue window to specify the file properties. From this window, select the GIF option from the file type drop-down menu. 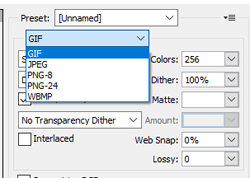
After specifying the file properties, click on the save button to save this File in GIF format. Our GIF file is created, and we can use it anywhere on the web or social media platforms. Below is our created GIF file: 
Similarly, we can create animation for the text to create a greeting message. We need to create multiple text layers and put them in a separate frame for the animation. How to Set the Loop Time & Limit for the GIF in PhotoshopWe have full control for the loop time & limit of animation in Photoshop. We can set the animation time for an individual image or a group of images. To set the animation time, like after how much time the second, third, fourth, and so on images will be displayed, specify the time by selecting the duration option at the bottom of the frame. Select the multiple photos by pressing the Shift keys and specify at one place, and it will be reflected in all the selected images. 
From the above snap of the timeline, we have specified the animation time for zero seconds. So the animation will instantly play the next image. If we want to change the value for the animation time, we can specify other values in the above given box. To specify the loop limit, we will select the other drop-down given the bottom left of the timeline window as follows: 
In the above box, we can specify the loop time like 5, 10, 20, and so on, or we can also select the forever option. It will play the animation a specified no of times. If you select the forever option as we did in the above example, it will keep playing. Summary: We can easily create a GIF file in Photoshop using the Photoshop animation features. We have discussed how to create an animation in Photoshop and save it in GIF format. Also, we have discussed how to set the delay time and loop time for the animation.
Next TopicBlur Tool in Photoshop
|
 For Videos Join Our Youtube Channel: Join Now
Feedback
- Send your Feedback to [email protected]
Help Others, Please Share


