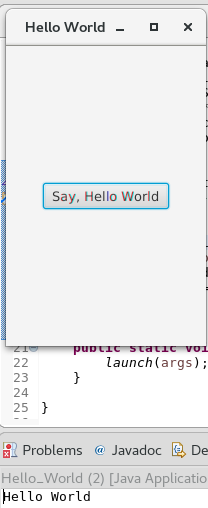
Creating Our first JavaFX ApplicationHere, we are creating a simple JavaFX application which prints hello world on the console on clicking the button shown on the stage. Step 1: Extend javafx.application.Application and override start()As we have studied earlier that start() method is the starting point of constructing a JavaFX application therefore we need to first override start method of javafx.application.Application class. Object of the class javafx.stage.Stage is passed into the start() method therefore import this class and pass its object into start method. JavaFX.application.Application needs to be imported in order to override start method. The code will look like following. Step 2: Create a ButtonA button can be created by instantiating the javafx.scene.control.Button class. For this, we have to import this class into our code. Pass the button label text in Button class constructor. The code will look like following. Step 3: Create a layout and add button to itJavaFX provides the number of layouts. We need to implement one of them in order to visualize the widgets properly. It exists at the top level of the scene graph and can be seen as a root node. All the other nodes (buttons, texts, etc.) need to be added to this layout. In this application, we have implemented StackPane layout. It can be implemented by instantiating javafx.scene.layout.StackPane class. The code will now look like following. Step 4: Create a SceneThe layout needs to be added to a scene. Scene remains at the higher level in the hierarchy of application structure. It can be created by instantiating javafx.scene.Scene class. We need to pass the layout object to the scene class constructor. Our application code will now look like following. we can also pass the width and height of the required stage for the scene in the Scene class constructor. Step 5: Prepare the Stagejavafx.stage.Stage class provides some important methods which are required to be called to set some attributes for the stage. We can set the title of the stage. We also need to call show() method without which, the stage won't be shown. Lets look at the code which describes how can be prepare the stage for the application. Step 6: Create an event for the buttonAs our application prints hello world for an event on the button. We need to create an event for the button. For this purpose, call setOnAction() on the button and define a anonymous class Event Handler as a parameter to the method. Inside this anonymous class, define a method handle() which contains the code for how the event is handled. In our case, it is printing hello world on the console. Step 7: Create the main methodTill now, we have configured all the necessary things which are required to develop a basic JavaFX application but this application is still incomplete. We have not created main method yet. Hence, at the last, we need to create a main method in which we will launch the application i.e. will call launch() method and pass the command line arguments (args) to it. The code will now look like following. The Application will produce the following output on the screen. 
Next TopicJavaFX 2D Shapes
|
 For Videos Join Our Youtube Channel: Join Now
Feedback
- Send your Feedback to [email protected]
Help Others, Please Share


