
How to Create A Discord BOTHaving strong support for programmable bots, Discord is a well-known real-time chat application. On Discord, bots are common as well as provide a variety of services, such as entertainment, gaming, web searches, money processing, and moderation support. Randall Schmidt, a Toptal Freelancer Software Engineer & Chatbot Programmer, talks about the Interface and APIs for bots within Discord and offers a Discord bot tutorial in this post. The creator of one of Discord's most well-known bots, Rythm, ImBursting, provides his insights on creating and managing his substantial infrastructure and codebase. What is Discord?Discord is a website for real-time communications that describes itself with a "all-in-one text and voice chatting for gamers." Discord has grown quickly and is gaining popularity even among those who don't care much about video games because of its attractive design, simplicity of use, and wealth of functionality. Its user base expanded from 56 million people to over 150 million during 2018 and 2022. One of Discord's most appealing aspects is its use of bots. Discord has strong support for customizable bots that enhance user engagement and enable Discord connect with the outside world. On Discord, bots are commonplace and provide a variety of services, such as entertainment, gaming, internet searches, money processing, and moderation support. Before going on to the course where we'll construct a basic JavaScript Discord bot, in this Discord bot programming tutorial, we'll explore the Discord ui as well as its REST and WebSocket APIs for bots. Last but not least, the creator of one of Discord's most well-known bots will discuss his experiences building and managing his massive network and codebase. User Interface for DiscordPrior to getting into technical aspects, it's crucial to comprehend how users engage with Discord and how the application seems to them. (Though obviously non-visual, it theoretically displays itself in a similar fashion to how bots do.) Bots utilise the very same APIs as official Discord apps use. The Discord rules of service prevent this, even though it is theoretically viable to operate a bot with minimum modification inside of a normal user account. Running in bot accounts is a requirement for bots. A screenshot of the Chrome browser-based Discord programme is shown below: 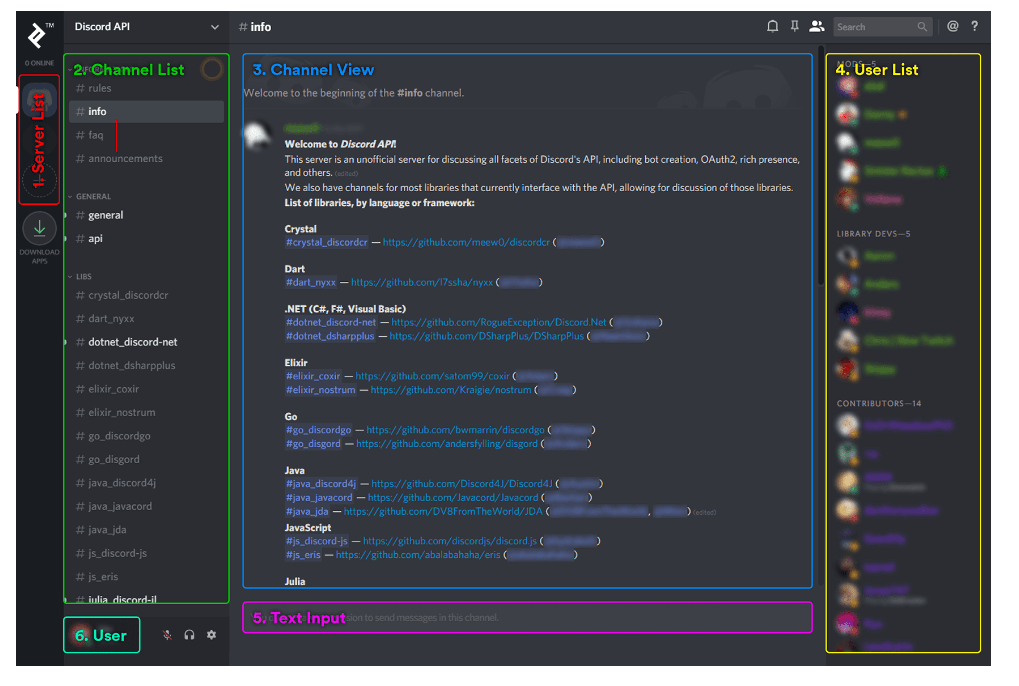
Web Interface for DiscordNote: The web Interface for Discord, packed with Electron, is essentially identical to the desktop programme. React Native was used to build the iOS app. Native Java for Android is used in the Android application. Let's simplify it. 1. Server ListMy server membership list is shown on the far left. If you're acquainted with Slack, a server is comparable to a workspace on that platform. It symbolises a group of users who may communicate with one another over one or even more channels on a certain server. With the appropriate rights, a server's creator, staff, or users may administer it. The criteria of the server, the organisation of the server's channels, and user management are all defined by the inventor and/or staff. My personal server list is topped by the Discord API server. It's an excellent location to chat to other devs and obtain assistance. That is followed by a server I named Test. We'll test our bot there later after we've made one. A button to start a new server is located underneath Test. With only a few clicks, anybody can launch a server. It should be noted that although the word "server" is used within Discord's user interface, the term "guild" is utilized in the developer documentation and API. Both phrases may be used. 2. Channel ListThe network list is shown alongside the channels again for server I'm now exploring (in the case of, the Discord API server). There is no restriction on how many categories will be used to categorise the channels. Information, General, and Libraries are some of the categories available on the Discord API server, as has been shown. Users may communicate about a certain subject in each channel, which serves as a chat room. The backdrop of the channel ("info") that we are presently watching is a little lighter. The channel names appear in white whenever a new message is posted. 3. View the ChannelThe channel view provides information on the subjects that people have been debating. One message's preview is shown, along with a list of links to help servers for various Discord bot libraries. Regular users of the service cannot publish messages because of the configuration. For posting critical information where it will be seen and not masked by conversation, administrators use these channels as a bulletin board. 4. User ListThe list of people who are connected to this server straight away is on the far right. The names of the users are coloured differently and they are categorised into several groups. Due to the roles they play, this occurs. A role outlines the category (if any) that the user should be listed under, the colour of their name, and the rights that they have on the server. The outcome in the event of a user having many roles depends on some precedence math (which occurs rather often). The @everyone role is the bare minimum that each user possesses. The server staff designates and assigns additional responsibilities. 5. Text EntryIf I were permitted to, I would use this text input to write and send messages. I am unable to type in this channel since I am not authorised to send messages there. The Discord APIWebSocket API & REST API are the two components that make up the Discord API. In general, real-time events from Discord are received using the WebSocket API, while operations inside of Discord are carried out using the REST API. 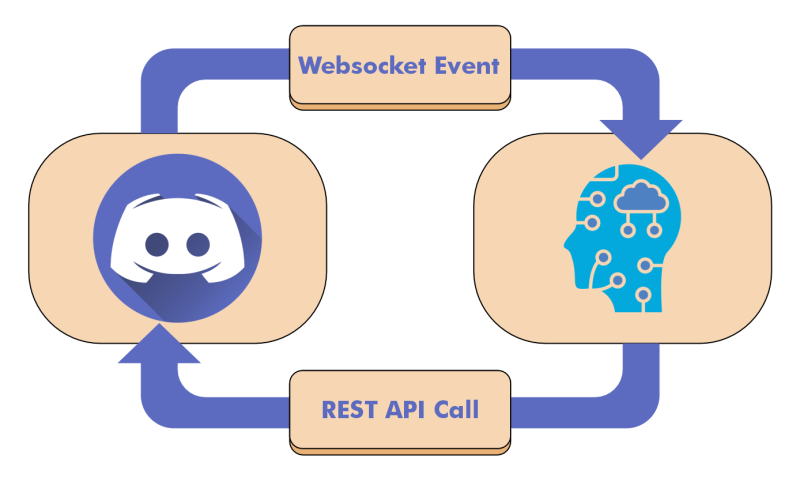
The WebSocket APIThe WebSocket API primarily focused on receiving Discord activities, such as message creation, deletions, account kick/ban events, authorization changes for users, and more. On the contrary side, there is less room for communication when a bot is using the WebSocket API. The WebSocket API is used by bots to do a number of basic tasks, including connecting to servers, identifying themselves, keeping their hearts beating, managing voice communications, and more. The gateway documentation for Discord has further information. Additional activities are carried out via the REST API. According to the kind of the event, the payloads of events from WebSocket API includes information. As an example, an user object identifying the message's writer will be present with each and every Message Create event. Nevertheless, the user object by itself does not have all of the user-related data. For instance, no detail regarding the user's permissions is provided. You might use the REST API to request further details if necessary, but for the reasons discussed in the following section, you should typically retrieve the cache which you should have created using the payloads from earlier events. The following events, among others, Guild Creation, Guild Roles Updating, and Channel Update, all provide payloads that are pertinent to a user's rights. Per WebSocket connection, a bot is permitted in a total of 2,500 guilds. The implementation of sharding and opening of several independent WebSocket connections to Discord are required for a bot to be able to appear in multiple guilds. This extra complexity can seem pointless if your bot only uses one process on one node. However, Discord's sharding capability makes this lot simpler than it otherwise would be if your bot is really well-liked and has to have its back-end split among several nodes. The REST APIMost activities, including sending texts, banning or booting users, and changing user rights, are carried out by bots using the Discord REST API. Although information may also be retrieved through the REST API, bots often depend on WebSocket API events and save the data they get in caches. Why? Two fundamental factors exist. For example, because of the REST API's rate restrictions, querying it repeatedly to obtain user information does not scale. Most of the time, it is redundant as well since the WebSocket API provides the appropriate data, and you should already have a cache of it. There are several exceptions, however, and there are situations when you could require data that isn't in your cache. Each guild receives one Guild Create event and one Ready event whenever a bot first connects to a WebSocket gateway, allowing the bot to fill its cache with the latest recent state. Only details regarding online individuals is included in the Guild Create events for densely populated guilds. Your cache may not have the necessary data if your bot wants to get information about an offline user. It makes logical in this situation to send a request to the REST API. Or, if you regularly need to get data about offline users, you may choose to utilise the WebSocket API by sending a Request Guildmates opcode to obtain inactive guild members. The absence of any connection to the WebSocket API in your application is another exception. Suppose, for instance, that your bot has an online dashboard where users can sign in and modify the setting on their servers. The WebSocket API connections as well as the Discord data cache could not be used by the web dashboard since it may be operating in a distinct process. It could simply need a few REST API calls now and then. To acquire the information you want in this situation, it makes logical to use the REST API. Wrapper APIsAlthough it's always a smart option to have a basic grasp of every layer of your technological stack, directly accessing the Discord WebSocket or REST APIs is time-consuming, fallible, typically unneeded, and even harmful. Discord offers a carefully chosen list of authorised libraries and cautions that: A permanent ban could be imposed for the usage of non-compliant libraries or specialised implementations that misuse the API or lead to high rate limitations. The libraries that Discord has formally reviewed are typically developed, well documented, and provide complete coverage of the Discord API. A bespoke implementation won't often be created by bot creators for any other reason than curiosity. For your preferred language, there might be one, two, or more libraries. Making a selection on which to utilise might be challenging. You may wish to join the informal Discord API server in addition to reading the relevant documentation to get a sense of the community that backs each library. Creating a Discord BotLet's get right to work. To monitor webhooks from Ko-fi, we'll build a Discord bot that resides on our server. With the help of Ko-fi, it's simple to receive contributions into your PayPal account. Because setting up webhooks there is simple compared to PayPal, where you require a business account, it's ideal for processing modest donations or serving as a demonstration platform. A user receives a Premium Member position when they give $10 or more, which alters the colour of their name and puts them at the top of the list of online users. We'll be using Node.js and the Eris Discord API library for this project. Not all JavaScript libraries are like Eris. Instead, you might use discord.js. Whichever library you use, the code will be pretty identical. Another contribution processor, Patreon, offers a dedicated Discord bot and enables setting up Discord roles as contributor perks. Though it will be simpler, we're planning to put something similar into practise. The tutorial's source code may be found on GitHub at https://github.com/mistval/premium bot. For the sake of conciseness, some of the stages in this article exclude unmodified code. If you feel like you may be missing anything, visit GitHub using the links given. Generating a Discord Bot AccountAn account for the bot is necessary before we can begin writing code. A user account is necessary before we can build a bot account. Click here for information on how to establish a user account. In order to set up a bot account, we then: 1) With in developer portal, build a programme. 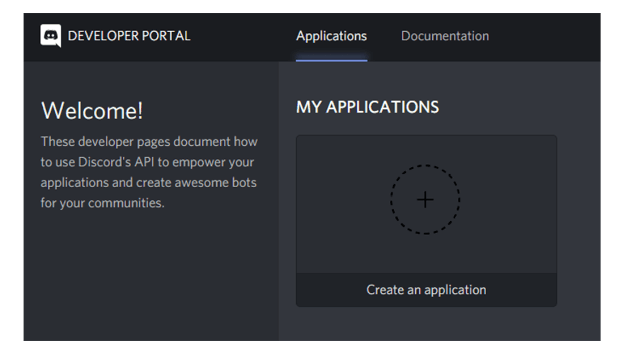
2) Complete the application's fundamental information (take note of the CLIENT ID displayed here; we'll need to use it later). 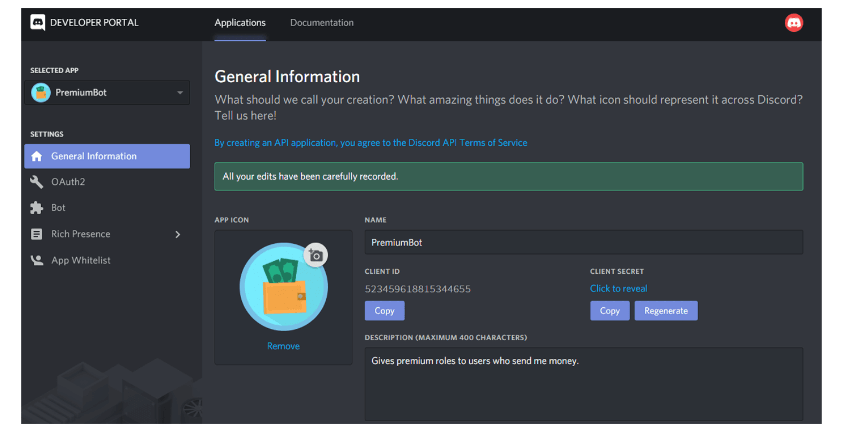
3) Add one bot user who is logged into the programme. 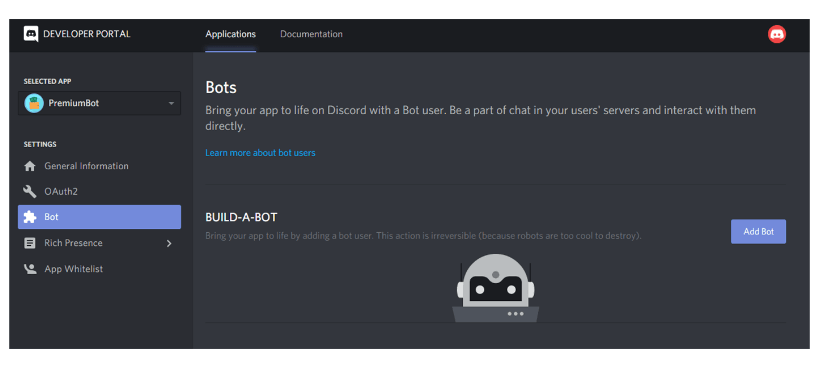
4) Activate the PUBLIC BOT option, then take note of the displayed bot token (we'll need it later). It is critical that you refresh your bot token as soon as you discover any leaks, such as when it appears in a picture in a Toptal Blog article. Anybody who has access to your bot token may take control of it, interfere with your users' experience, and possibly create major, long-lasting problems for you and them. 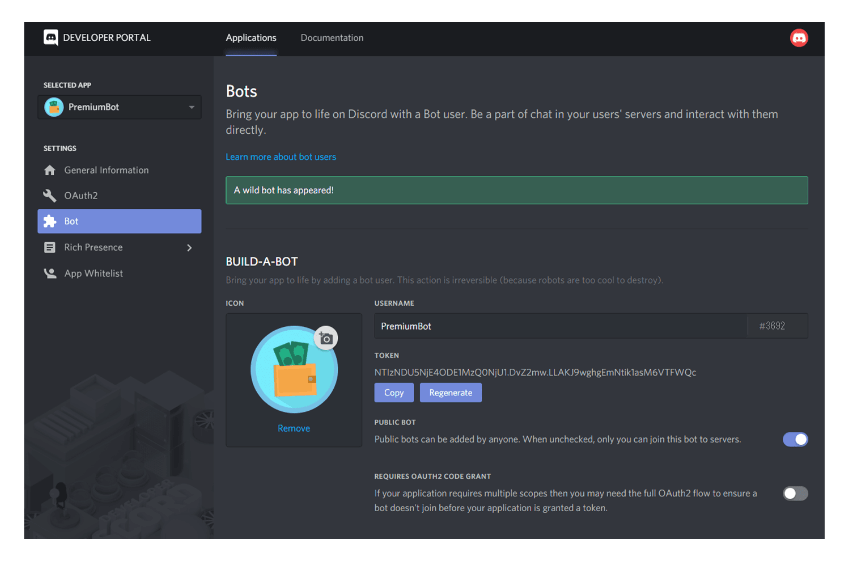
5) Include the bot in your trial guild. Fill in the given URI in a browser with the client ID of the bot you want to add to the guild (it was previously shown). 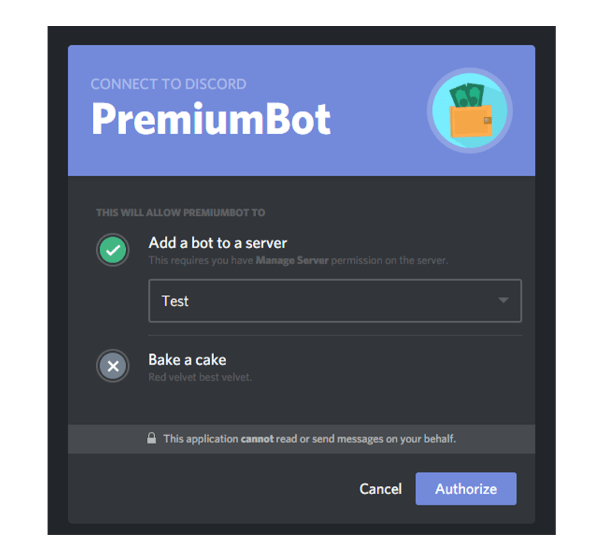
The bot is currently in the testing guild, & We can see that in the users list after pressing Authorize. Although it's not available right now, we'll soon fix that. How to Use the Discord.py Library to Create a Simple Discord Bot The bot's programming will be written in Python using the discord.py package. Python Discord bot development is made simpler with the help of the discord.py API wrapper. How to Setup Discord.py and Make a ReplAny coding editor may be used to create the bot locally on your computer. Repl.it will be used in this lesson, however, since it will make it easier for everyone to follow along. You may use Repl.it, an online IDE, within your web browser. Visit Repl.it first, then. Python should be selected as the language when creating a new Repl. Simply add import discord to main.py's top to install the discord.py library. As you click "run," Repl.it will instantly install this requirement. If you'd rather programme the bot remotely on MacOS, use the following command to install discord.py: It's possible that pip3 must be substituted for pip. The following code should be used in its place if you are using Windows: How to Create Events in Discord for Your BotThe idea of events is central to the discord.py software. An event seems to be something you hear and then react to. As instance, you will be given an event about a communication when it occurs that you may reply to. Create a bot that responds to a certain message. The documentation for discord.py served as the source for this straightforward bot code and its explanation. Later, we'll give the bot additional functionality. Include this code in main.py. (If you'd want, you may rename the file to anything else but not to discord.py.) I'll soon explain what this code performs in detail. You duplicated a token when you formed the bot client on Discord. To hold the token, we will now develop a.env file. The.env file is not required if you are executing your code locally. Simply substitute the token with os.getenv("TOKEN"). Environmental variables are defined in.env files. On Repl.it, the majority of the files you make are accessible to everyone, but.env files are exclusively seen by you. The.env file's contents won't be visible to anybody else browsing a public repl. Therefore, if you are working on Repl.it, only put confidential information in a.env file, such as tokens or keys. Create a file with the extension.env by clicking the "Add file" button. 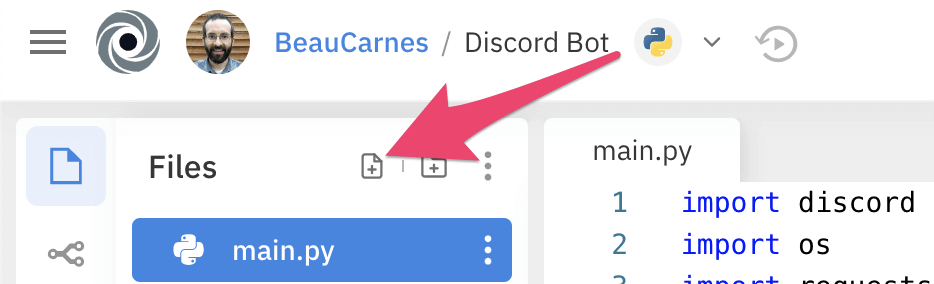
Include your real token from the earlier copy in the file by adding the line that reads: Let's now review the functions performed by each line of code in your Discord bot code. Importing the discord.py library is done in the first line. The import of the OS library is done in the second line, however it is just needed to access the.env file's TOKEN value. This line is not necessary if a.env file is not being used. We then build a user instance. The link to Discord is established here. An event may be registered using the @user.event() decorator. Callbacks are used to complete tasks since this library is asynchronous. A function invoked as a result of another event is known as a callback. Whenever the bot is prepared to begin operation, this code calls the on ready() event. Then, the on message() event is executed when the bot gets a message. Every time a message is received, the on message() event is called; however, if the message is from self, we don't want it to have any effect. Therefore, the function simply returns if the user.client and the Message.author match. The next thing we do is see whether the Message.content contains the string "$hi." In such case, the bot answers to the channel it was deployed in with "Hi!" The last line launches the bot using the login token when it has been configured. The.env file is where the token is obtained. Now that the bot's code is available, all that is left to do is run it. Running the BotNow launch your bot in Repl.it by clicking the run button at the top. In the terminal, enter the following commands to launch the bot if you wrote it locally: Python3 main.py is used on different platforms. Enter "$hii" in your Discord room now. Your bot ought to respond with "Hii!" 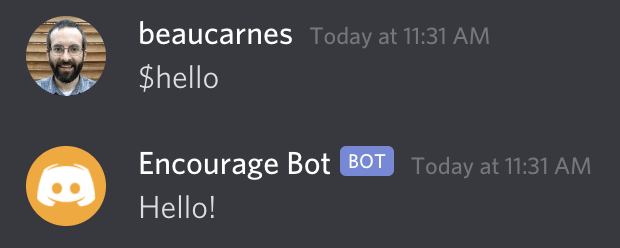
Improvement Ideas for the BotWe'll make improvements to the bot now that it is operational. For a reason, the programme is dubbed Inspiration Bot.Every time someone messages this bot with a sad or depressing term, the bot will reply with a message of inspiration. Anyone may contribute motivational messages for the bot to utilise, and the messages supplied by users are saved in the Repl.it database. When a chatter enters the phrase "$inspire," the bot will additionally deliver a random motivational quotation from an API. The "$inspire" functionality will be the first thing we introduce. How to Include Inspiring Quotes in the BotWe will get motivational sayings via the Zenquotes.io API. More Python modules need to be imported, a get text() method needs to be added, and our bot code has to be updated so that it can use the new function. This is the modified code. I'll describe the new components following the code. The requests module has to be imported immediately. This module enables our code to send an HTTP request to the API in order to get data from it. The json module facilitates working with the JSON formatted data given by the API. The get text() method is rather simple. In order to get data from the API URL, it first utilises the requests module. Unpredictable inspirational quotes are returned by the API. In the event that the present API fails, this method might be readily modified to get quotations from a new API. The answer from the API is then converted to JSON within the function using the json.loads() method. I finally found out how to convert the JSON quotation into the format file I needed after many trial and error. The function returns a string containing the quotation. The code's last changed section is towards the conclusion. Before, it searched for messages that began with "$hi." It now searches for "$inspire." It retrieves the quotation using text = get text() and returns the text rather than returning "Hi!" You may now execute your code and test it out. How to Include Inspirational Messages in the BotNow that the functionality has been developed, when a user submits a message with the term "sad," the bot will answer with positive remarks. How to Modify the Bot to Use Sad Words In order for the bot to reply when it hears sad phrases, we must first generate a Python list of such terms. Following the creation of the client variable, add the next line: sad words is equal to "sad," "miserable," "unhappy," "angry," and "depressed." Feel free to expand the list with more terms. How to Include Inspirational Messages in the BotA selection of inspirational messages will now be added for the bot to answer with. After the sad words list you prepared, add the following list: As previously, feel free to expand the list with more words and phrases. I'm just utilising three things for the time being since users will soon be able to upload other motivational sayings for the bot to utilise. Methods for Replying to MessagesNow that we have constructed the two lists, we must modify our bot to utilise them. Due to the bot's random selection of inspirational messages, import the random module first. Add the word import random to the import declarations at the start of the code. Now that the sad words list has been updated, the on message() function will now examine each message to see whether it contains any of the words on it. The bot will randomly give a message of inspiration whenever a depressing term is discovered. The updated code is provided here: The bot should be tested at this time. Now that you are skilled enough, you can build your own bot. The Repl.it database will then be used to learn advanced functionality and store data, however. How to Allow Messages Uploaded by UsersNow that the bot is fully operational, let's make it able to update it directly from Discord. When the bot notices a depressing term, the user should have the option to submit more upbeat comments. User-submitted messages will be kept in a database that is already present at Repl.it. Every repl includes this database, which is a key-value store. Add from replit import database to the beginning of the code, behind the other import declarations. We'll be able to access the Repl.it database as a result. From the Discord conversation, users may directly upload their own messages for the bot to utilise. Let's construct two helper methods that will add personalized messages here to database and erase them before we add new instructions for the bot. When the get text() method is finished, add the following code: A inspiring message may be sent as an input to the update inspirations() method. It begins by determining if the database has a key named "inspirations." If so, it retrieves the database's list of inspirations, inserts the new one to it, and then saves the revised list under the "inspirations" key. The new inspirational message is inserted as the initial element in the list and a new key with that name is generated if the database doesn't already include "inspirations". The index input to the delete inspirations() method is accepted. It accesses the database's "inspirations" key to get the list of inspirations. The list item at that index is eliminated if there are more entries in the inspirations list than there are index positions. Last but not least, the database's "inspirations" key is used to store the latest update back there. |
 For Videos Join Our Youtube Channel: Join Now
Feedback
- Send your Feedback to [email protected]
Help Others, Please Share


