| |

Angular LifecycleAngular is a dominant and broadly classified client-side platform that has impressed millions of developers. Ever since the inception of the Angular platform, making applications has turned way easier than ever. Angular is extensively used in data visualization and building applications for both mobile and desktop. The seamless potential to leverage data makes angular unique in its class. With the new features being added every year, angular has captured the marketing trends, and each year the lifecycle of Angular keeps evolving at a great pace. Back in 2009, when Google introduced angular, it has limited lifecycle dependencies and features and was initially an initiative to be served on HTML and JavaScript. However, in the latest version, TypeScript has replaced the former JavaScript and other popular scripting languages. In another perspective, Angular has given the freedom to the developers to build applications that run on the web, mobile, and desktop with fewer footprints. Let's now discuss some more aspects of the Angular lifecycle. What is Angular lifecycle?In Angular, each component is channeled through 8 different phases in its lifecycle. To be precise, it is first initialized, and then the root is created and is later presented to its components. It is always checked whenever the components get loaded during the development of the application and are gradually updated. When the component remains unused, the death phase is approached by decimating and expelling it from the DOM. It is interesting to note that Angular can oversee all the lifecycle of its components and directives and can smartly understand the result with the previous data, making the application's integration smooth. Collectively, components make the primary building blocks of the version, and Directives channelize these versions with the build. Another interesting thing about the Angular lifecycle is that each component has its lifecycle, and at every stage, the lifecycle moves from initialization to destruction. Each component goes through 8 stages. The steps can be explained in the following points.
Overview of Lifecycle with HooksAll the events that occur in the component's life are termed "lifecycle hooks" in Angular. Hooks are nothing but simple functions that a developer can call anytime in the Angular application. You can think of hooks as callback methods that raise positive events happening in the lifecycle of a component. As discussed earlier, eight stages greatly determine the lifecycle of Angular. Let's learn about them. Online vs. ConstructorBeing a programmer, it is important to generate your component and introduce it. You always need to keep two options, i.e., either utilize the constructor or use OnInt lifecycle method. Whenever the component is utilized, the OnInit lifecycle method is automatically triggered. Although both Constructor and OnInt methods can be used for the same cause yet, the developer prefers using ngOnInit for declaration or initialization and avoiding using constructors most of the time. InterfaceThe interface is an important asset of hook in the lifecycle methods because the component class of the application must be implemented in the virtual interface. As per recommendation, the method that triggers the implementation, i.e., AfterViewInit, should be suitable for ngAfterViewInit. 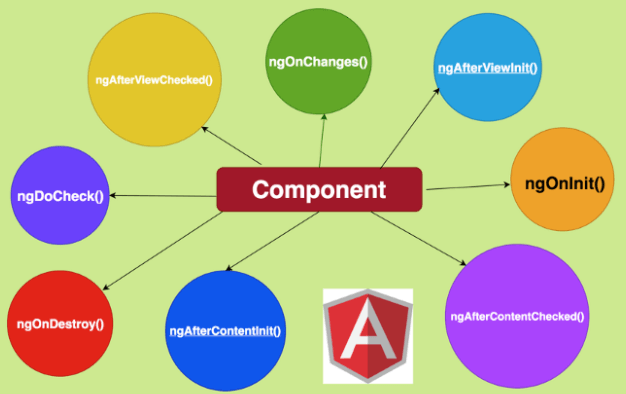
ngOnchangesThis is a callback function used to bound data property variations that occur for a component. In simple terms, you can think of it as an event that gets executed as and when the input controls get renewed inside the component. The changed data is mapped when Angular receives it, and the current and the previous data are encapsulated in a simple change. Therefore, by using these lifecycle hooks, a Parent component can easily communicate to its child components provided the decorator is exposed to @InputDecorator of the child. Even if the Parent component gets off track from the input property, this hook gets automatically summoned to the child component. This helps the developers to worry less about the implementation details. Thus, some of its properties include utilizing all components that have input, invoking when the input is changed, and getting an initial call raised before ngOnInit. Properties of this phase include practical utilization of all the input components, which gets invoked whenever the value gets changed, and raising initial calls before ngOnInit. ngOnInitAfter Angular has completed creating and introducing the callbacks, it gets initialized and displays some data-bound properties. This event takes place only after ngOnChanges event and constructor calling. With this hook, the component's logic is initialized, and all the properties of ongOnInit can be used. Any child belonging to these properties cannot be used before the hook gets triggered. Some of the properties of this phase include component hook initialization. As soon as input is set, the hook gets its call and is added to the default by Angular CLI for all the components. It is important to note that all these actions happen only once. ngDoCheckAfter the hooks are sorted in this phase, there remains a vitality to review the inputs and properties associated with them respective to components and directives. You can easily check your logic here. To be precise, you can put custom checks to view test cases and later implement them into the component. This hook comes in handy after ngOnInit, and the main function of this hook is to execute even if there is no change in the component's property. This hook comes into view if, for any instance, Angular miscarries to detect any changes in the input properties. Some of the properties of this hook include change detection and automatic function calls. ngAfterContentInitThis phase is raised when the ngDoCheck is marked complete. Every component in ngAfterContentInit gets introduced and check for the first time. Usually, this method is implemented as soon as Angular does some content project and the component view. This method is called when the properties get demarked as ContentChild or ContentChildren, ensuring that all of these have been initialized. On the other hand, external child components can be included using the method by placing <ng-content> and </ng-content> tags. Thus, for all the lifecycle components, this hook is called only once. Some properties of this phase may include not initializing the content since it takes place after ngDoCheck. ngAfterContentCheckedThis hook method is designed to investigate changes in the contents using the Angular change detection apparatus. It performs its tasks even if no modifications are made, ensuring that everything is check and is on point. This hook gets its call just after the ngAfterContentInit and is automatically executed after every execution of ngDoCheck. It plays a vital role in child component initialization. Some of the main properties of this method include waiting for ngContentInit to get executed and ensure everything is executed only after ngDoCheck. ngAfterViewInitThis lifecycle method is called right after ngAfterContentChecked and makes use of only the components. This method is similar to the ngAfterContentInit and invokes only after the component and the child view. This method is called only after initialization of view and for only one time. ngAfterViewCheckedThis method is triggered when there is a subsequent check-in, the component check, and the child view. This method is called right after ngAfterViewInit and then for check method using ngAfterContentChecked. Like some other lifecycle methods discussed above, this method is used only for components, and it comes in handy when the child component is waiting for execution. Some of the properties of this method are to get called once the initialization and checking are done, and right after ngAfterContentCheck method, it starts executing. ngOnDestroyThis method is called when Angular destroys all the directives or components. This is the right place to clean up all the constructed logic and unsubscribe them from the observable. This detaches all the event handlers and is solely done to eliminate memory leakage or buffer-related issues. One of the main functions or properties of this hook is to get the call after the components are removed from the DOM. ConclusionThe components in Angular play major parts in application development. Ever since Angular came into the vicinity, it had many dependencies and was quite hard to implement hooks. Still, due to the massive advancements taking place these days, the lifecycle methods of Angular have been divided into various phases you saw in this article. You learned different types of Angular lifecycle methods along with hooks that drive these methods smoothly and subsequently. Since the component is considered the main building block of the application in Angular, it is very important to understand the lifecycle processing methods so that they can be easily implemented in your applications.
Next TopicAngular Unit Testing
|
 For Videos Join Our Youtube Channel: Join Now
Feedback
- Send your Feedback to [email protected]
Help Others, Please Share


