| |

GIMP HDRGIMP is an open-source image manipulation program. It supports HDR photos. The HDR stands for High Dynamic Range. Usually, the images captured with a DSLR camera are HDR photos. Nowadays, smartphones also provide HDR functionality to capture HD photos. We can create and manipulate the HDR photos using GIMP. In this section, we will understand what HDR is and how to create and edit HDR photos using GIMP. What is HDR (High Dynamic Range)The HDR (High Dynamic Range) is a photographic technique to reproduce a greater range of luminosity. It is useful to demonstrate a range of brightness. With the standard photographic technique, we are limited to distinguish within a range of brightness. In simple terms, due to brightness, we can not see each pixel clearly because, in the brighter area, everything appears pure white and pure black. The HDRI ( High Dynamic Range Imaginary) is useful for recording real-world objects (Scenes), which can be very bright scenes, very dark, extreme sunlight, etc. The HDR images are usually created by combining several different narrow exposures related to the same subject. The camera's light sensors are limited to sensitivity lights, but there may be a range of lights and natural effects that camera can differentiate between for fewer conditions. In the daylight or the night, there may be some captures that are more white and darker. So the range of the light levels is known as Dynamic Range. It is about 1 to 100 in normal cameras. But, for the human eye, it can be 1 to millions. In a nutshell, "The Ability to manipulate the camera's light sensitivity range is called HDRI". It is used to create HDR images. Why HDR is usefulThe dynamic brightness range of digital cameras is not so good. It can't patch the level of human vision. The things it is displayed may be darker or brighter than naturally. Using HDR, we can adjust the light levels and provide a natural look to our images. How to Add HDR EffectAdding the HDR effect in GIMP is quite tricky. All we need to apply some tips and tricks. Using some color and blur tools, we can make our image as HD image. We are going to add an HDR effect on an image. We will use the following tools to make the image HD:
Apart from the above tools, other colors tools can also be used. Simply it is not dependent on the tools; we may use any color or blur tool. We are using the above tools only for the example. Let's understand how it works. Follow the below steps: Step1: Open the Image To open an image, select the Open option from the File menu or drag the image into GIMP. Step2: Duplicate the Layers We can duplicate the layers by right-clicking on the layers from the layers window or hitting the "CTRL+SHIFT+D" keys. Make three copies of the current layer. 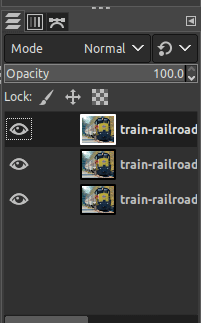
Now, select the topmost layer and set its mode as Overlay and opacity to 100. 
Step3: Desaturate the Image The desaturate option will wash all the colors from the active layer. To desaturate an image, select the Desaturate option from the colors menu. 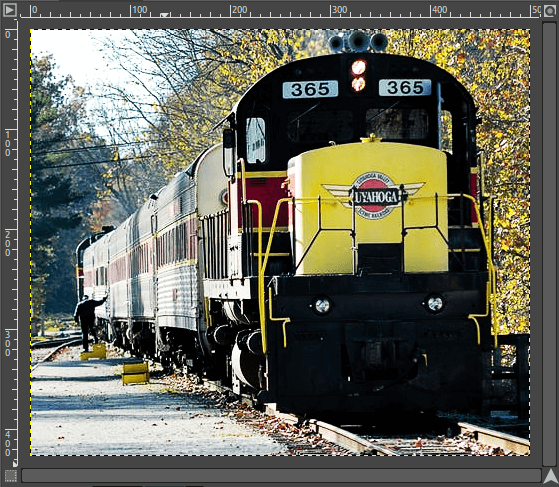
Step4: Invert the Image Colors The invert color tool is used to invert the colors of the image means it will make the brighter area darker and vice-versa. To invert the color of the active layer, select the Invert tool from the Colors menu. 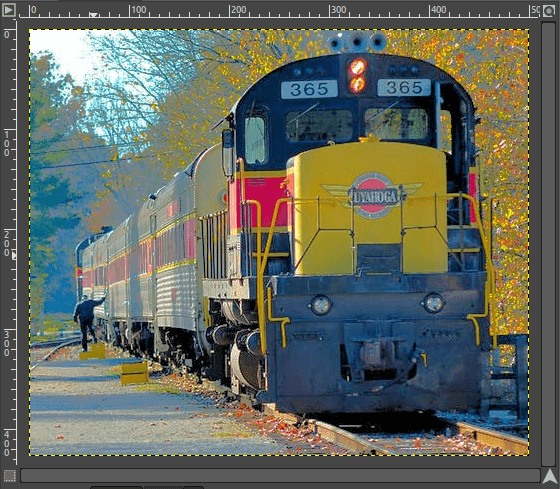
Step5: Select Gaussian Blur Tool for an HD image, it is good to blur the optional objects. To blur the objects, use any of the blur tools that suit the image. We are using the gaussian blur tool. To activate the gaussian blur tool, navigate to the Filters-> Blur-> Gaussian Blur menu. It will open a dialog window to specify the blur level. 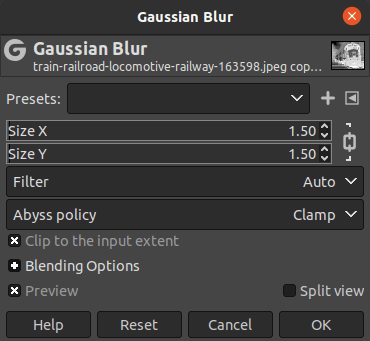
It will blur the image. Now, make this layer secondary by dragging it down to the second layer. Step6: Adjust Layers Now, make the second layer the primary (topmost) layer. To make the second layers as top layer, drag and drop it to the top or select the second layer and click on the below icon in the layers dockable dialog window: 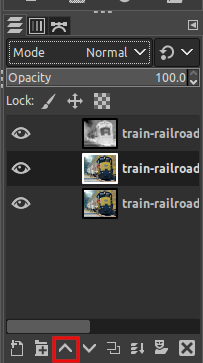
Now, select the topmost layer and select its mode as Overlay. 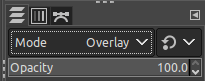
It will apply the HDR effect to our image. Now, our image will look like an HD Image. Step7: Merge Layers The HDR effect is applied to the image, merge all the layers to save it. To merge all the layers, right-click on any of the layers and select the Merge Visible Layers option. It will merge all the visible layers into one and make it a composite layer. Now, we can save this image in any of the required image formats. Step8: Save the Image To save it in XCF format, select the save or save as option. It will save the image in GIMP's default image format; To save it in any other format such as JPG, PNG, GIF, etc., select the Export as an option from the file menu. Below is our created HDR image: 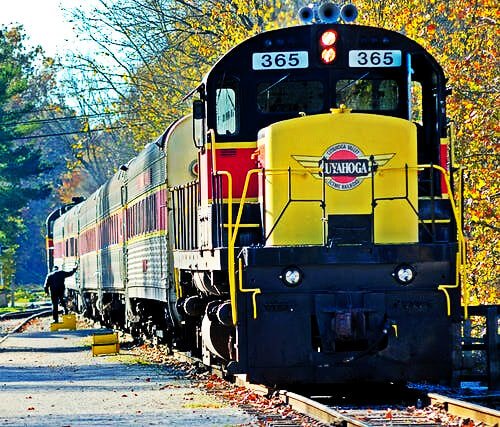
Apart from the above techniques, several techniques may allow us to apply the HDR effect to our image. We can do so by applying the layer mask. Also, there are several external plugins available that allow us to convert the image in HDR format. One of the most used plugin for adding HDR effect to an image is Exposure Blend Plug-in. The Exposure Blend Plug-inThe Exposure blend plugin is one of the finest plugins for GIMP. It extends the GIMP's photo editing features and takes it to the next level. It has vast support for editing tools; We can add an HDR effect to our image using the Exposure blend plugin. Let's see how to download and install it in GIMP. How to Download and Install the Exposure Blend Plug-inTo use this plugin, we have to download and install it in GIMP. The official GIMP plugin registry is now removed from the web, but we can download it from the GIMP archive on GitHub. To download the Exposure blend plugin, follow this link. It will download a zip file extract it. Now, we have to paste extracted files in GIMP's Script folder. We can find this folder by navigating to Edit-> Preferences-> Folders-> Scripts menu. For more detail on how to add a plugin in GIMP, visit gimp plugins. Now refresh Scripts by Navigating Filters-> Script-Fu-> Refresh Scripts menu or restart GIMP. It will extend the functionality of GIMP by adding several menus such as animate, ATG, Comics-o-matic, Contrib, etc. 
Now, we can add the HDR effect using this plugin. How to Use Exposure Blend Plug-inTo use the Exposure Blend Plug-in, navigate to Filters-> Photography-> Exposure Blend option. 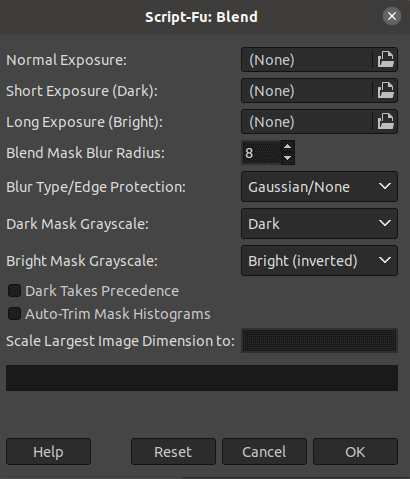
In the Normal Exposure label, click on the file icon and open a file from the file explorer. The Short Exposure and Long Exposure will be used in the same way. Once the files are selected, click on the OK option to open the files. It will open the image with three different layers. The top two layers contain layer masks. By combining these layers, we can see an exclusive photo with a wide dynamic range. If we want to improve it further, we can do this by using some tools like we can reduce the opacity of the top layer and adjust the brightness and colors of the image using color tools. It will open the image as follows: 
If you are satisfied with the default effects, then export it; otherwise, edit it further using other tools.
Next TopicSmoke Effect
|
 For Videos Join Our Youtube Channel: Join Now
Feedback
- Send your Feedback to [email protected]
Help Others, Please Share


