| |

Gimp LayersThe Gimp Layers are a stack of slides. Every layer contains a part of the image. Using layers, we can construct an image having several conceptual parts. The layers are used to manipulate a part of the image without affecting the other part. The bottom layer is the background of the image. It can be filled with the background or foreground color or transparent. All the components of the image come above it. A layer can be hidden or visible. Later, we can merge all the layers to meet our requirements of the image. An image can have any number of layers. There is no restriction on the number of layers. The Layer menu contains various tools for manipulating layers. GIMP Layer MenuThe Layer submenu allows us to work on layers. We can also access the layer submenu by right-clicking on the image. We can perform several vital tasks on layers such as managing transparency, resizing a layer, creating a new layer, delete a layer, and many more. GIMP Layer Menu contains the following sub-menu:
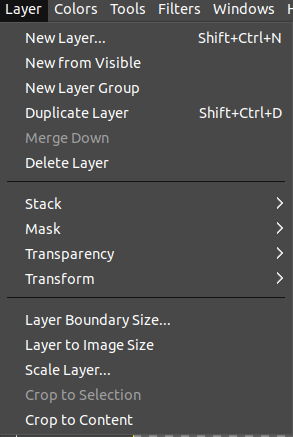
Let's understand each part of the layers in detail: New LayerThe New Layer tool is used to add a new empty layer to the image layer stack. It adds the new layer at the top of the layer stack. It will open a window to define the layer properties such as height, weight, name, etc. 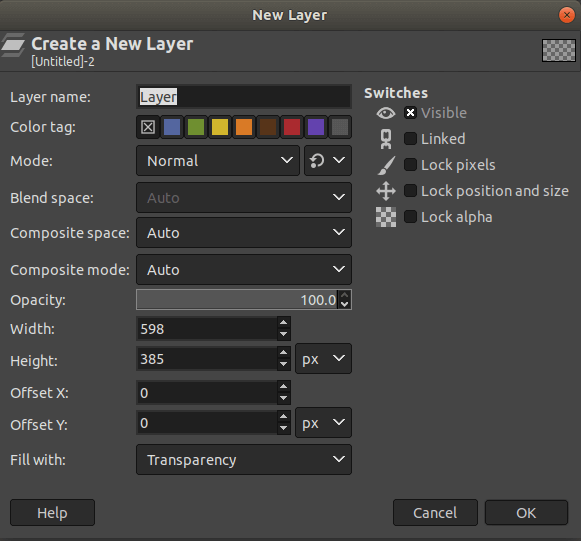
Enter the layer name and other values, then click ok to create a new layer. The layer name does not have any physical significance. The color tag is useful if you have multiple layers. Tag a layer with a different color to identify it among other layers. The color tag can be seen at the eye icon of the layer. New From VisibleThis tool is used to merge the visible layers into a new layer. It will add at the top the layer stack. It is useful if you want to manipulate the result but want to keep the created steps. To use this tool, select it from the layer menu. New Layer GroupThe New Layer Group tool is used to create a new layer group. The layer group is useful for managing the layers. To group layers, select this option from the layer menu. Duplicate LayerThis tool is used to add a new layer to the image, which is identical to the active layer. It will be named the same as the original layer name but appended the copy with its name. The background layer that does not have an alpha channel will be provided one by duplicating. To duplicate a layer, select the duplicate layer option from the layer menu. Merge DownThe Merge Down tool is used to merge the currently active layer with just below layer from the stack. It will observe it's all the properties such as opacity and layer mode. This option is grayed out if there is no down layer; The resulting layer will be in normal mode. Generally, it is used to merge down to create a new layer so that you can track what you are doing and edit it without affecting the original one. It will merge two layers into one without affecting its look. To merge the layer with the below layer, select the merge down option from the layer menu. Delete LayerThe Delete Layer tool is used to delete the active layer. To delete the current layer, select the delete layer option from the layer sub-menu. StackThe Stack tool is used to manage the layers from the layer stack. It provides options for selecting a new layer, changes the position of the layer, and more. If the image has a single layer, many of the stack options will be grayed out. The stack sub-menu provides the following options:

Select Previous Layer: This tool is used to select the layer just above the current layer in the layer stack. It highlights the layer and makes it as active. If there is no selection, this option will be grayed out. Select Next Layer: This tool is used to select the layer just underneath the current layer in the layer stack. It highlights the layer and makes it as active. If there is no selection, this option will be grayed out. Select Top Layer: This tool is used to select the topmost layer in the layer stack. It highlights the layer and makes it as active. If there is no selection, this option will be grayed out. Select Bottom Layer: This tool is used to select the bottom layer in the layer stack. It highlights the layer and makes it as active. If there is no selection, this option will be grayed out. Raise Layers: This tool is used to raise the layer one position in the layer stack. It highlights the layer and makes it as active. If there is no selection, this option will be grayed out. Lower Layer: This tool is used to down layer one position in the layer stack. It highlights the layer and makes it as active. If there is no selection, this option will be grayed out. Layer to Top: This tool is used to raise the active layer to the top of the layer stack. It highlights the layer and makes it as active. If there is no selection, this option will be grayed out. The layer cannot be raised If it is the lowest layer (bottom layer), and it does not have an alpha channel. Layer to Bottom: This tool is used to down the active layer to the bottom of the layer stack. If there is no selection, this option will be grayed out. Reverse Layer Order: This tool is used to reverse the layer order. MaskLayer masks are the essential tool in image manipulations, which is used to modify the layer's opacity (transparency) selectively. The Mask menu contains the following tools:
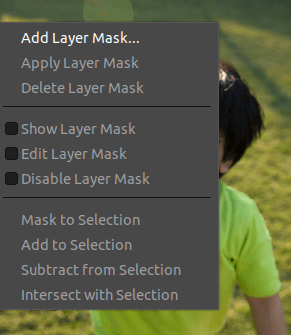
Add Layer Mask: The Add Layer Mask tool is used to add a layer mask to the current layer. It opens a dialog window to set the initial properties of the mask. If the layer already contains a mask, this entry will be grayed out. 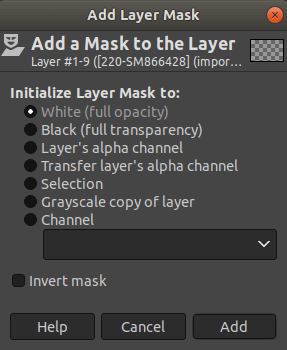
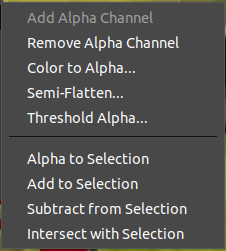
Apply Layer Mask: This tool is used to merge the layer mask with the active layer. The layer properties such as transparency are transferred to the layer's alpha channel, and the mask will be deleted. If there is no layer mask, this option will be insensitive and grayed out. Delete Layer Mask: This tool is used to delete an existing layer mask. If there is no layer mask, this tool will be insensitive and grayed out. Show Layer Mask: It is used to display the existing layer mask. It will turn the image invisible. If there is no layer mask, this tool will be insensitive and grayed out. Edit Layer Mask: This tool allows us to edit the existing layer mask. If there is no layer mask, this tool will be insensitive and grayed out. Disable Layer Mask: This tool is used to disable an applied layer mask. If there is no layer mask, this tool will be insensitive and grayed out. Mask to Selection: This tool is used to convert the active layer's layer mask into a selection. It replaces the current selection that is active in the image. Add to Selection: This tool is used to convert the layer mask of the active layer into a selection that is added to the selection. Subtract from Selection: This tool is used to convert the layer mask of the active layer into a selection, subtracted from the selection. Intersect from Selection: This tool is used to convert the active layer's layer mask into a selection that is intersected from the selection. TransparencyThe transparency tool is used to manage the transparency (alpha channel) of the image. The transparency sub-menu contains the following options:
TransformThe Transform tool is used to transform, such as flip and rotate the active layer of the image. The transform sub-menu contains the following entries:
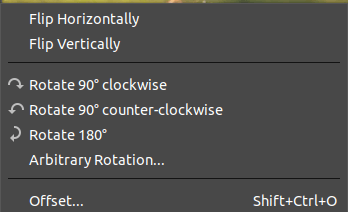
To use these tools, select them from the layer-> Transform sub-menu. Layer Boundary SizeThe Layer Boundary Size tool is used to change the dimension of the layer. It will not scale the image and define the layer's size, offset, transparency, etc. 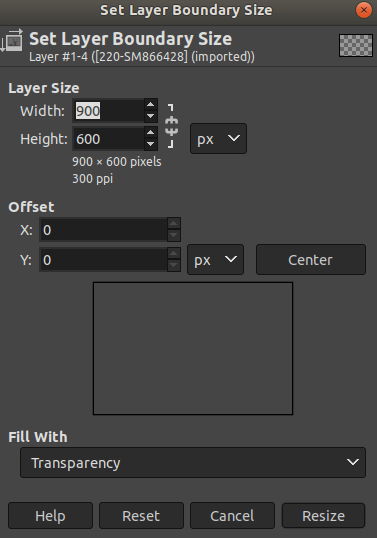
Layer to Image SizeThe Layer to Image Size tool is used to resize the layer boundaries to match the image boundaries. It resizes the image boundaries without affecting the contents of the layer. Scale LayersThe Scale Layer tool is used to resize the layer and its contents. It opens a scale layer dialog to define the scale values. 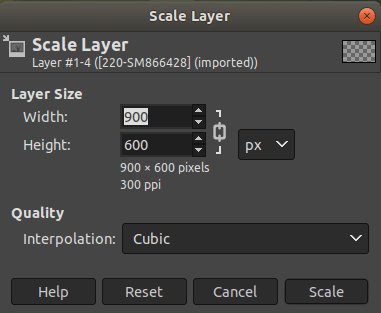
To scale a layer, select the scale layer option from the layer sub-menu. Crop to SelectionThe Crop to Selection tool is used to crop only the active layer to the selection boundary. It removes the strips at the edge whose contents are entirely unselected. It will not crop the partially selected area. If there is no selection, this option will be insensitive and grayed out. Crop to ContentThe Crop to the content tool is used to crop the active layer automatically. It is different from the Crop Tool, which lets us manually crop the specific area. It removes the largest possible area around the outside of the edge, having the same color.
Next TopicGIMP Colors Menu
|
 For Videos Join Our Youtube Channel: Join Now
Feedback
- Send your Feedback to [email protected]
Help Others, Please Share


