| |

Test PlanA test plan is a detailed document which describes software testing areas and activities. It outlines the test strategy, objectives, test schedule, required resources (human resources, software, and hardware), test estimation and test deliverables. The test plan is a base of every software's testing. It is the most crucial activity which ensures availability of all the lists of planned activities in an appropriate sequence. The test plan is a template for conducting software testing activities as a defined process that is fully monitored and controlled by the testing manager. The test plan is prepared by the Test Lead (60%), Test Manager(20%), and by the test engineer(20%). Types of Test PlanThere are three types of the test plan
Master Test PlanMaster Test Plan is a type of test plan that has multiple levels of testing. It includes a complete test strategy. Phase Test PlanA phase test plan is a type of test plan that addresses any one phase of the testing strategy. For example, a list of tools, a list of test cases, etc. Specific Test PlansSpecific test plan designed for major types of testing like security testing, load testing, performance testing, etc. In other words, a specific test plan designed for non-functional testing. How to write a Test PlanMaking a test plan is the most crucial task of the test management process. According to IEEE 829, follow the following seven steps to prepare a test plan.
Test plan components or attributesThe test plan consists of various parts, which help us to derive the entire testing activity. 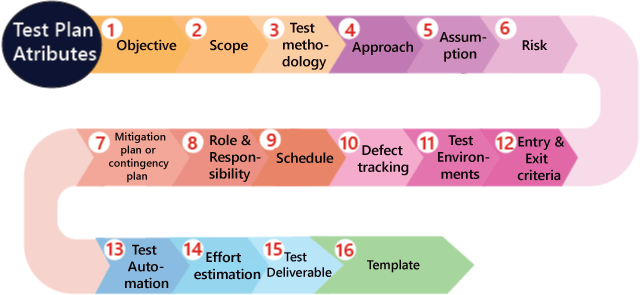
Objectives: It consists of information about modules, features, test data etc., which indicate the aim of the application means the application behavior, goal, etc. Scope: It contains information that needs to be tested with respective of an application. The Scope can be further divided into two parts:
In scope: These are the modules that need to be tested rigorously (in-detail). Out scope: These are the modules, which need not be tested rigorously. For example, Suppose we have a Gmail application to test, where features to be tested such as Compose mail, Sent Items, Inbox, Drafts and the features which not be tested such as Help, and so on which means that in the planning stage, we will decide that which functionality has to be checked or not based on the time limit given in the product. Now how we decide which features not to be tested? We have the following aspects where we can decide which feature not to be tested:
Now, we will not perform functional testing on the S feature because it has already been used in real-time. But we will do the integration testing, and system testing between P, Q, R, and S features because the new features might not work correctly with S feature as we can see in the below image: 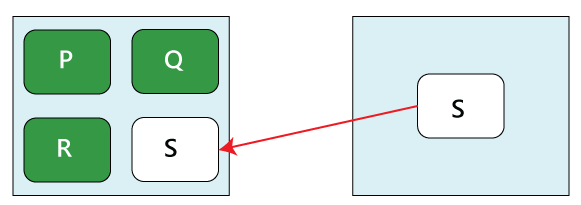
After that, we will write the scope during the test plan as Scope Features to be tested A1, B2, C3, D4, E5 (new features) P, Q, R, S, T Features not to be tested W…..X, Y, Z Therefore, we will check the new features first and then continue with the old features because that might be affected after adding the new features, which means it will also affect the impact areas, so we will do one round of regressing testing for P, Q, R…, T features. Test methodology:It contains information about performing a different kind of testing like Functional testing, Integration testing, and System testing, etc. on the application. In this, we will decide what type of testing; we will perform on the various features based on the application requirement. And here, we should also define that what kind of testing we will use in the testing methodologies so that everyone, like the management, the development team, and the testing team can understand easily because the testing terms are not standard. For example, for standalone application such as Adobe Photoshop, we will perform the following types of testing: Smoke testing→ Functional testing → Integration testing →System testing →Adhoc testing → Compatibility testing → Regression testing→ Globalization testing → Accessibility testing → Usability testing → Reliability testing → Recovery testing → Installation or Uninstallation testing And suppose we have to test the https://www.jeevansathi.com/ application, so we will perform following types of testing:
ApproachThis attribute is used to describe the flow of the application while performing testing and for the future reference. We can understand the flow of the application with the help of below aspects:
By writing the high-level scenariosFor example, suppose we are testing the Gmail application:
We are writing this to describe the approaches which have to be taken for testing the product and only for the critical features where we will write the high-level scenarios. Here, we will not be focusing on covering all the scenarios because it can be decided by the particular test engineer that which features have to be tested or not. By writing the flow graphThe flow graph is written because writing the high-level scenarios are bit time taking process, as we can see in the below image: 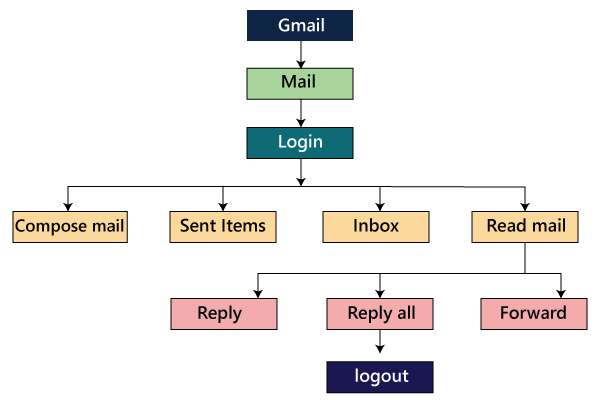
We are creating flow graphs to make the following benefits such as:
The approach can be classified into two parts which are as following:
AssumptionIt contains information about a problem or issue which maybe occurred during the testing process and when we are writing the test plans, the assured assumptions would be made like resources and technologies, etc. RiskThese are the challenges which we need to face to test the application in the current release and if the assumptions will fail then the risks are involved. For example, the effect for an application, release date becomes postponed. Mitigation Plan or Contingency PlanIt is a back-up plan which is prepared to overcome the risks or issues. Let us see one example for assumption, risk, and the contingency plan together because they are co-related to each other. 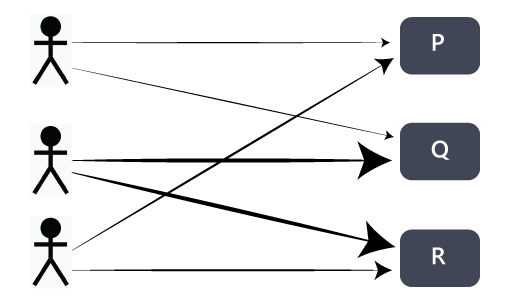
In any product, the assumption we will make is that the all 3 test engineers will be there until the completion of the product and each of them is assigned different modules such as P, Q, and R. In this particular scenario, the risk could be that if the test engineer left the project in the middle of it. Therefore, the contingency plan will be assigned a primary and subordinate owner to each feature. So if the one test engineer will leave, the subordinate owner takes over that specific feature and also helps the new test engineer, so he/she can understand their assigned modules. The assumptions, risk, and mitigation or contingency plan are always precise on the product itself. The various types of risks are as follows:
Role & ResponsibilityIt defines the complete task which needs to be performed by the entire testing team. When a large project comes, then the Test Manager is a person who writes the test plan. If there are 3-4 small projects, then the test manager will assign each project to each Test Lead. And then, the test lead writes the test plan for the project, which he/she is assigned. 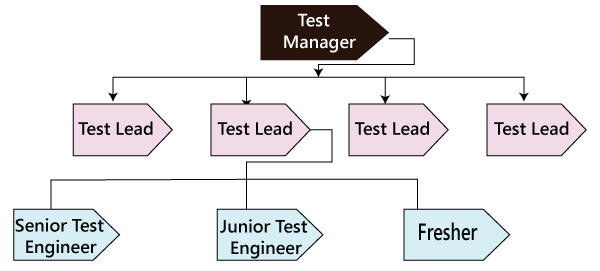
Let see one example where we will understand the roles and responsibility of the Test manager, test lead, and the test engineers. Role: Test Manager Name: Ryan Responsibility:
Role: Test Lead Name: Harvey Responsibility:
Role: Test Engineer 1, Test Engineer 2 and Test Engineer 3 Name: Louis, Jessica, Donna Assign modules: M1, M2, and M3 Responsibility:
ScheduleIt is used to explain the timing to work, which needs to be done or this attribute covers when exactly each testing activity should start and end? And the exact data is also mentioned for every testing activity for the particular date. 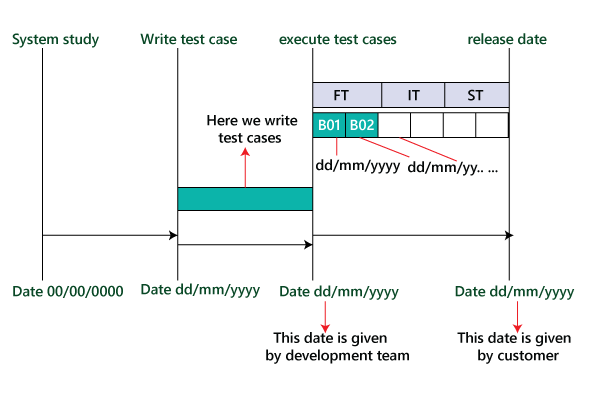
Therefore as we can see in the below image that for the particular activity, there will be a starting date and ending date; for each testing to a specific build, there will be the specified date. For example
Defect trackingIt is generally done with the help of tools because we cannot track the status of each bug manually. And we also comment about how we communicate the bugs which are identified during the testing process and send it back to the development team and how the development team will reply. Here we also mention the priority of the bugs such as high, medium, and low. Following are various aspects of the defect tracking:
Therefore, based on the priority of bugs liike high, medium, and low, we will categorize it as P1, P2, P3, and P4. Test EnvironmentsThese are the environments where we will test the application, and here we have two types of environments, which are of software and hardware configuration. The software configuration means the details about different Operating Systems such as Windows, Linux, UNIX, and Mac and various Browsers like Google Chrome, Firefox, Opera, Internet Explorer, and so on. And the hardware configuration means the information about different sizes of RAM, ROM, and the Processors. For example
Server
Note: The above servers are the serves that are used by the testing team to test the application.Client
Note: The above details provide the various operating systems and browsers in which the testing team will test the application.
Server: Sun StarCat 1500 This particular server can be used by the testing team to test their application. Client: It has the following configuration, which is as follows:
Note: It will provide the configuration of the systems of the test engineers that is the testing team.
The development team will provide the configuration of how to install the software. If the development team will not yet provide the process, then we will write it as Task-Based Development (TBD) in the test plan. Entry and Exit criteriaIt is a necessary condition, which needs to be satisfied before starting and stopping the testing process. Entry CriteriaThe entry criteria contain the following conditions:
Exit CriteriaThe exit criteria contain the following conditions:
Before we start performing functional testing, all the above Entry Criteria should be followed. After we performed functional testing and before we will do integration testing, then the Exit criteria of the functional testing should be followed because the % of exit criteria are decided by the meeting with both development and test manager because their collaboration can achieve the percentage. But if the exit criteria of functional testing are not followed, then we cannot proceed further to integration testing. 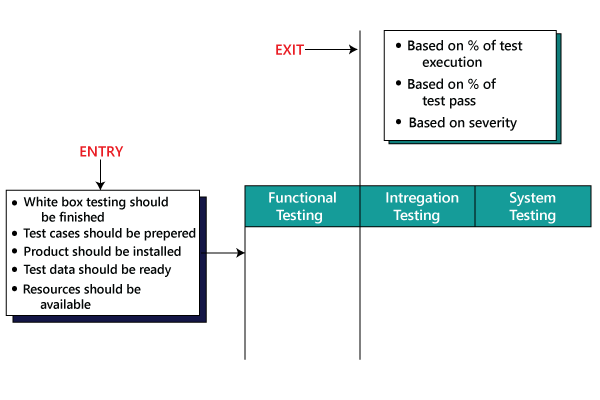
Here based on the severity of the bug's means that the testing team would have decided that to proceed further for the next phases. Test AutomationIn this, we will decide the following:
We automate the test case only after the first release. Here the question arises that on what basis we will decide which features have to be tested? 
In the above image, as we can see that the most commonly used features need to test again and again. Suppose we have to check the Gmail application where the essential features are Compose mail, Sent Items, and Inbox. So we will test these features because while performing manual testing, it takes more time, and it also becomes a monotonous job. Now, how we decide which features are not going to be tested? Suppose the Help feature of the Gmail application is not tested again and again because these features are not regularly used, so we do not need to check it frequently. But if some features are unstable and have lots of bugs, which means that we will not test those features because it has to be tested again and again while doing manual testing. If there is a feature that has to be tested frequently, but we are expecting the requirement change for that feature, so we do not check it because changing the manual test cases is more comfortable as compared to change in the automation test script. Effort estimationIn this, we will plan the effort need to be applied by every team member. Test DeliverableThese are the documents which are the output from the testing team, which we handed over to the customer along with the product. It includes the following:
Graphs and MetricsGraph In this, we will discuss about the types of graphs we will send, and we will also provide a sample of each graph. As we can see, we have five different graphs that show the various aspects of the testing process. Graph1: In this, we will show how many defects have been identified and how many defects have been fixed in every module. 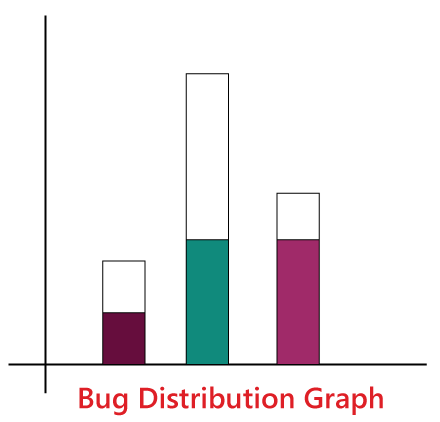
Graph 2: Figure one shows how many critical, major, and minor defects have been identified for every module and how many have been fixed for their respective modules. 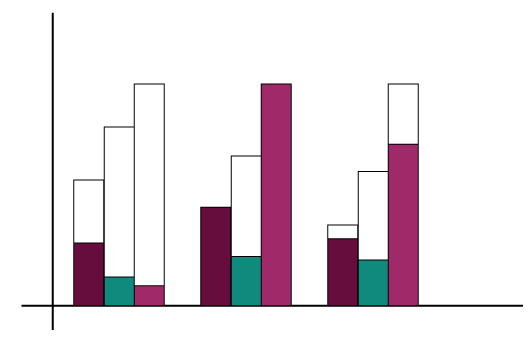
Graph3: In this particular graph, we represent the build wise graph, which means that in every builds how many defects have been identified and fixed for every module. Based on the module, we have determined the bugs. We will add R to show the number of defects in P and Q, and we also add S to show the defects in P, Q, and R. 
Graph4: The test lead will design the Bug Trend analysis graph which is created every month and send it to the Management as well. And it is just like prediction which is done at the end of the product. And here, we can also rate the bug fixes as we can observe that arc has an upward tendency in the below image. 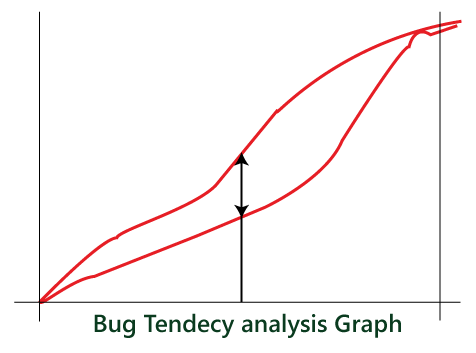
Graph5: The Test Manager has designed this type of graph. This graph is intended to understand the gap in the assessment of bugs and the actual bugs which have been occurred, and this graph also helps to improve the evaluation of bugs in the future. 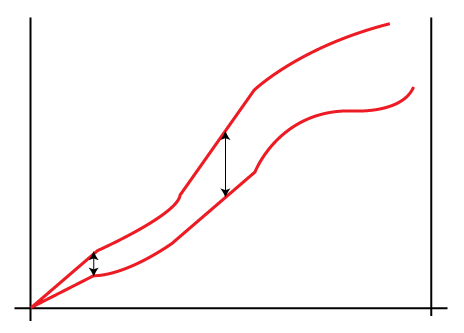
Metrics 
As above, we create the bug distribution graph, which is in the figure 1, and with the help of above mention data, we will design the metrics as well. For example 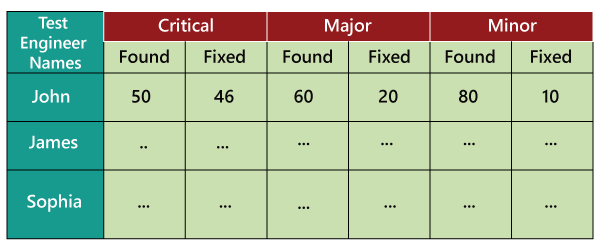
In the above figure, we retain the records of all the test engineers in a particular project and how many defects have been identified and fixed. We can also use this data for future analysis. When a new requirement comes, we can decide whom to provide the challenging feature for testing based on the number of defects they have found earlier according to the above metrics. And we will be in a better situation to know who can handle the problematic features very well and find maximum numbers of defects. Release Note: It is a document that is prepared during the release of the product and signed by the Test Manager. In the below image, we can see that the final product is developed and deployed to the customer, and the latest release name is Beta. 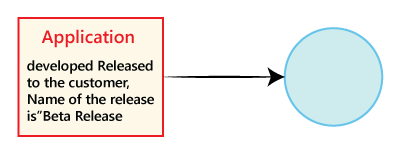
The Release note consists of the following:
For Example Suppose that Beta is the second release of the application after the first release Alpha is released. Some of the defect identified in the first released and that has been fixed in the later released. And here, we will also point out the list of newly added, modified, and deleted features from alpha release to the beta release. 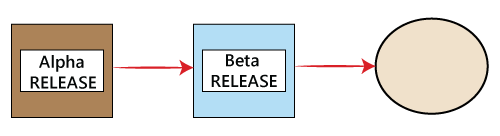
TemplateThis part contains all the templates for the documents that will be used in the product, and all the test engineers will use only these templates in the project to maintain the consistency of the product. Here, we have different types of the template which are used during the entire testing process such as:
Let us see one sample of test plan document Page-1 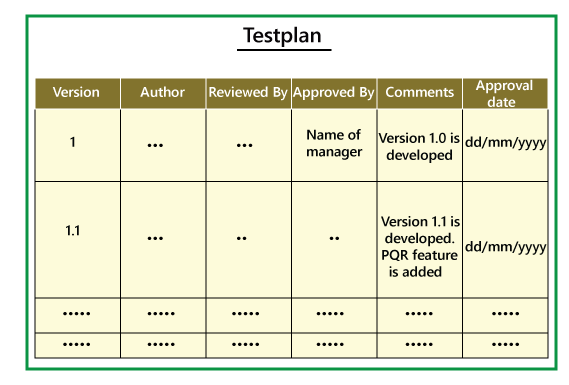
Page3-page18 
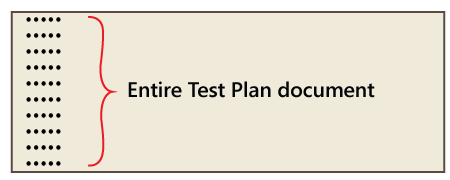
Page-20 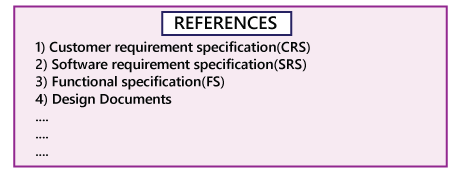
In-Page 1, we primarily fill only the Versions, Author, Comments, and Reviewed By fields, and after the manager approves it, we will mention the details in the Approved By and Approval Date fields. Mostly the test plan is approved by the Test Manager, and the test engineers only reviews it. And when the new features come, we will modify the test plan and do the necessary modification in Version field, and then it will be sent again for further review, update, and approval of the manager. The test plan must be updated whenever any changes have occurred. On page 20, the References specify the details about all the documents which we are going to use to write the test plan document. Note: Who writes the test plan?
Therefore, as we can see from above that in 60% of the product, the test plan is written by the Test Lead. Who reviews the Test Plan?
The Test Engineer review the Test plan for their module perspective and the test manager review the Test plan based on the customer opinion. Who approve the test Plan?
Who writes the test case?
Who review the test case?
Who approves the Test cases?
Test Plan Guidelines
Importance of Test Plan
Next TopicTest case review process
|
 For Videos Join Our Youtube Channel: Join Now
Feedback
- Send your Feedback to [email protected]
Help Others, Please Share


