| |

Create View SQLView in SQLA view is a SQL statement stored in the database with a name linked to it. It can be described as a composition of a table in the form of SQL queries. It can store all table rows or only a few selected rows from the table. The user can create a view in SQL using single or multiple tables. It depends upon the SQL query that is used to create the view. The users create a view so that the data stored in a specific table can be represented as virtual tables that organize the data naturally or intuitively. It also enables the administrator to restrict access to the data so that the user can only view or edit exactly the particular element of the table they want to without changing the rest. It also summarizes the data from multiple tables that can be used to create reports based on the data. Creating ViewsIf the user wants to create a view in the database, then the user can do so by implementing CREATE VIEW statement. The user can use a single or multiple tables to create views. In SQL, the user can also use another view to create one. Before implementing a view in the database, the user must ensure they have all the necessary privileges required to implement it. Mainly the views are created by the database administrator. Syntax to Implement VIEWThe syntax to create a view in SQL is as follows: We have used a single table in the above syntax, but the user can include multiple tables in the SELECT statement using the same syntax used in any other SQL SELECT query. Implementing View in SQLConsider a situation where the user wants to create a view using the Students table. The Students table contains the following records:
Implement the below SQL query to create the above table. Output: 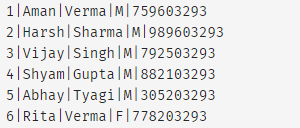
The user wants to display only two columns in the view. These two columns are F_Name and L_Name From the Students table. The query to create a view is as follows: Now, you can use Student_VIEW to implement the query in SQL in a manner that you implement the query on another table. Implementing a Query on ViewThe syntax to query view is similar to query a table. Below is an example of implementing a SELECT query on Student_VIEW. Output: 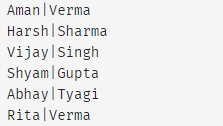
The result returned by the above query will be as follows: WITH CHECK OPTIONIt is an option that can be implemented in SQL to CREATE VIEW in it. Implementing the WITH CHECK OPTION in the SQL ensures that every UPDATE and INSERT query used in the view satisfies all the conditions defined when the view is created. If any UPDATE/ INSERT statement does not meet the conditions, the particular SQL statement will return an Error. Lets us see an example to see the implementation of view using WITH CHECK OPTION. In this scenario, the WITH CHECK OPTION will ensure no NULL value in the Age column in the view. If an insert statement has a NULL value for the age column in the view, it will return an error. Updating a ViewThe user may update the current view under the following scenarios. The SELECT clause may not contain the keyword DISTINCT. The SELECT clause may not contain summary functions. The SELECT clause may not contain set functions. The SELECT clause may not contain set operators. The SELECT clause may not contain an ORDER BY clause. The FROM clause may not contain multiple tables. The WHERE clause may not contain subqueries. The query may not contain GROUP BY or HAVING. Calculated columns may need to be updated. If a view meets all the scenarios mentioned above, then the user can perform an update operation on the view. Let's implement a SQL query to update a value in View. The following statement will update Aman's age. It would modify the base table Student, and the view will display the same result. Now let's try to implement an SQL query on the base table and then implement the SELECT query to retrieve the given result. Inserting Rows into a ViewThe user can insert new records in the view. If the user wants to insert the row, then the user must ensure that the above scenarios are met. The same rule applies to the Update command and the INSERT command. Here, the user cannot add rows in the Student_VIEW as the user has not previously included all the NOT NULL fields while creating the view. If the user sets the fields in the column as NOT NULL, they would be able to insert new records as they can add new records in the table. Deleting Rows into a ViewIt is possible to remove the existing rows from the views as well. The rules to perform deletion on the row is similar to what is applicable when performing an UPDATE or insert operation on the data. Consider a scenario where the user wants to remove all records that age is 22. The given query will delete all records with data value 22 in the age column: Suppose the user implements the above query to remove a row from the base table Student. The modified results will be shown in the Student_VIEW as well. They ultimately delete a row from the base table CUSTOMERS, which would now reflect in the view itself when you implement the above query with the SELECT query to retrieve the table. The result will be as follows: Dropping ViewsWhen the user creates a view, there may be instances where the user would need to delete the view if it is no longer required. The deletion in view is known as dropping the view. The syntax to implement the DROP query for a view is similar to implementing the DROP table command for a table. The below query will remove the Student_VIEW:
Next TopicDCL Commands in SQL
|
 For Videos Join Our Youtube Channel: Join Now
Feedback
- Send your Feedback to [email protected]
Help Others, Please Share


