| |

Flappy Bird Game using PyGame in PythonPython is one of the most popular high-level programming languages. Python offers huge libraries for different fields like Artificial Intelligence (TensorFlow, PyTorch), Machine Learning (Pandas, NumPy, Matplotlib), and Game Development (Pyglet, PyGame). We can also consider Python as the next-generation programming language as it shows its presence actively in every emerging field of Computer Science. In the following tutorial, we will create a game known as Flappy Bird using the PyGame library in the Python programming language. Flappy Bird is an endless game that includes a bird controlled by the player. The objective of this game is to prevent the bird from falling on the ground or colliding with the obstacles like pipes. Every time the bird passes through the pipes, the scores increment by one. The game ends when the bird collides with the pipes or falls on the ground due to gravity. But before we start building this project, let us briefly understand the Python PyGame library. Understanding the PyGame libraryThe PyGame library is a cross-platform set of Python modules utilized to develop video games. PyGame mainly comprises computer graphics and sound libraries designed to be utilized with the Python programming language. Pete Shinners officially wrote this library to replace PySDL. It is suitable to develop client-side applications that can be potentially wrapped in a standalone executable. How to install the PyGame library?The PyGame library can be installed using the PIP installer by typing the following command in a command prompt or terminal. Syntax: Once the installation is complete, we can verify whether the pygame library is installed properly or not by creating a new python program file and importing the pygame module. The following is the snippet of code illustrating the same. File: verify.py Now, let us save the file and run the following command in a command prompt or terminal. Syntax: The library has been installed successfully if the program does not return any importing error. In case any exception is raised, try reinstalling the library and consider checking their official documentation. Prerequisites of the ProjectNow that we have successfully installed the required library, let us briefly look into the project's prerequisites. The following are the modules that we required for the project:
Developing the Flappy Bird Game using PyGameWe will now start developing the Flappy Bird Game in Python. We have created a folder as "Flappy Bird". Inside this folder, we have created a python file as "main.py" where we will write code for the program and another folder as "images" containing all the images we need throughout the project. One can download the resource for the project through the following link: We have divided the complete project code into smaller segments for better understanding. The following are steps we will follow to develop the project: Step 1: Firstly, we will import the required modules. Step 2: We will then create a Scrolling background. Step 3: This step involves adding the Sprite Animation to the Game. Step 4: We will then add some physics to the Game. Step 5: In this step, we will add the scrolling pipes to the Game. Step 6: We will then add a score counter. Step 7: We will last add functions for game over and reset the game. Now, let us understand the implementation of these steps in detail. Importing the necessary ModulesWe will start by importing all the modules required for game development. We will import the pygame module along with the random module. Let us consider the following snippet of code illustrating the same. File: main.py Explanation: In the above snippet of code, we have imported the pygame module. We have then imported everything from the pygame.locals module. At last, we imported the random module. Creating a Scrolling backgroundNow that we have imported all the required modules for the project, it is time for us to create a scrolling background. To accomplish this objective, we will first initialize the pygame window. We will set the size of the screen along with the title to display. We will also define some necessary functions to perform the scrolling. We will then load some images from the directory to display the background and base and perform the functionality. Let us consider the following snippet of code illustrating the same. File: main.py Explanation: In the above snippet of code, we have used the init() function to initialize the pygame window. We have then created an object of the Clock() class of the pygame.time module and defined a variable to store the game's FPS. We have then defined the width and height and used the set_mode() function of the pygame.display module to set the size of the screen. We have then set the title of the application using the set_caption() function of the pygame.display module. We have then declared and initialized some of the game variables specifically to perform scrolling. We have then used the load() function of the pygame.image module to load the images to display the background and base. We have then set the game_run variable value to True and used the while loop to run the game. Within this loop, we have used the tick() function to set the game clock to the FPS we defined earlier. We have then drawn the background using the blit() function. We have then drawn the base using the blit() function and set it to scroll by subtracting the scrolling speed from the base scroll value, and if the absolute value of the base scroll is greater than 70 pixels, set the base scroll value back to 0. We have then used the for-loop to iterate through the events of the game and set the game_run variable value to False if the event type is the QUIT constant of the pygame module. We then used the update() function to update the events in the game. At last, we used the quit() function to quit the game. Creating the sprite animation of the birdWe will now create the sprite animation of the bird using the Sprite() class to display the bird. Within this class, we will import the required sprite bird images from the directory and place the imported images one after another to perform the animation. Let us consider the following snippet of code demonstrating the same. File: main.py Explanation: In the above snippet of code, we have created a class as FlappyBird using the pygame's Sprite() class to display the bird. We have defined an initializing function to initialize some variables within this function. We have created an empty list and set the index and counter value to 0. We then used the for-loop to iterate through the bird images that we have loaded to the program using the load() function of the pygame.image module. We have then used the append() function to add these imported images to the list we created earlier. We have then set the initial image to be displayed when the game starts. We have then created a rectangle for the placement of the bird on the screen using the get_rect() function and set its coordinates to the coordinates of the bird pixels. We have then defined another function to handle the animation. Within this function, we have updated the counter variable by incrementing its value by 1 and defined another variable to display the sprite cooldown. We then set the counter value back to 0 if the counter value exceeds the cooldown value. We have then updated the index value by incrementing it by 1 and set it back to 0 if the value gets greater than the number of elements in the image list. We have then updated the current image from the image list as per the index value. We have then created an object of the Group() class of the pygame.sprite module. At last, we have instantiated the FlappyBird() class and used the add() function to add this instance to the object of the Group() class. Now that we have successfully created the Sprite() class to display the bird, it is time to draw the bird on the screen over the background and call the necessary functions to implement its animation. Let us consider the following snippet of code illustrating the same. File: main.py Explanation: In the above snippet of code, we have updated the while loop by adding the statements to draw the bird and implement the animation. We have used the draw() function with the Group() class object consisting of the bird to display it on the main screen. We have then called the update() function to animate the bird. Adding Physics to the GameWe will now add some physics to the game. This will help the bird to fall due to gravity and jump on the mouse click. We will also try adding some adjustments to the bird sprite itself so that it will appear more appealing. We will start by declaring and initializing some game variables. These variables will consist of the Boolean values indicating if the flying of the bird and game over. Let us consider the following snippet of code illustrating the same. File: main.py Explanation: In the above snippet of code, we have declared some game variables and initialized them with False. We will now update the FlappyBird() class. These updates include the implementation of the bird's velocity, checking if the mouse key is pressed, and the rotation of the bird. Let us consider the following snippet of code demonstrating the same. File: main.py Explanation: In the above snippet of code, we have updated the FlappyBird() class by adding some variables indicating the initial velocity of the bird and the Boolean value describing the state of the mouse key. Inside the update() function of the class, we have included the code to implement the functioning of the free fall and the jump on every mouse click. In order to accomplish the functioning of the free fall, we have created a checkpoint to see if the bird is flying and added some statements like incrementing the bird's velocity by 0.5 and setting the final velocity to 8.5 if the bird reaches the velocity of 8.5 or above. We have also checked if the position of the bird image rectangle is less than 576 and incremented its value by the velocity. Similarly, to accomplish the jump on every mouse click, we have created a checkpoint to see if the game is not over, with the help of the if-else conditional statement. We then checked if the mouse got pressed and the initial pressed value was False and set the pressed value to True, and velocity equals -10 to move the bird upward. We then checked if the mouse got released and set the pressed value back to False. We have then used the rotate() function of the pygame.transform module to rotate the bird at a certain angle so it appears to be moving. If the game is over, we have again used the rotate() function to rotate the bird to -90 to make it look dead. Now that we have made the required adjustments to the FlappyBird() Sprite class, it is also time for us to update the game loop. We will include a checkpoint over the game if the bird has hit the ground. We will also add a statement to pause the scroll of the base if the game is over. Moreover, we will also add a statement to state the game once the user clicks on the screen. Let us now consider the following snippet of code demonstrating the same. Note: The while loop will get updated whenever we add something new to the game until the game becomes fully functional. So, replacing the previous while loop with the following is recommended.File: main.py Explanation: In the above code snippet, we have updated the while loop by adding an if-conditional statement to check if the bird has not hit the ground. In case it does, the game will be over, and the bird will no more fly. Similarly, we have added the if-conditional statement to check if the game is not over and set the base to scroll. We added another if-conditional statement inside the for-loop iterating through the events to check for the mouse click, a bird not flying, and the game not over, and se the bird flying to start the game. Adding Scrolling Pipes to the GameNow that we have added the background, the base, and the bird to the game, it is time for us to add the scrolling pipes. We will start by declaring and initializing some game variables to store the values, like the gap between the pipes and the frequency of the pipes. We will create a Sprite() class to display the pipes and update the game loop. Let us consider the following snippet of code illustrating the same. File: main.py Explanation: In the above code snippet, we have declared some game variables like pipeGap, pipeFrequency, and lastPipe and initialized them with some values, respectively. We will now create a class using the pygame's Sprite() class to display the pipes. This class will frequently generate the different pipes in the game. Let us consider the following snippet of code illustrating the same. File: main.py Explanation: In the above code snippet, we have created a class of the pygame's Sprite() class. Within this class, we have defined an initializing function to declare some required variables and load the image of the pipe from the directory. We then created a rectangle to place the imported pipe image. We have then placed at top and bottom facing each other. We have then defined a function to handle the pipes' animation and memory. Within this function, we have set the pipe to scroll using the same scrolling speed we used for the base. We have also used the kill() function to release the memory once the pipe leaves the screen. At last, we have created an object of the Group() class to store the pipes. Now that we have created the Sprite() class to display the pipes, we will update our game loop to see the implementation of the pipes in-game. Let us consider the following snippet of code illustrating the same. Note: The while loop will get updated whenever we add something new to the game until the game becomes fully functional. So, replacing the previous while loop with the following is recommended.File: main.py Explanation: In the above snippet of code, we have updated the while loop by adding the pipes to the game. We have used the draw() method to draw the pipes on the game screen. We then used the groupcollide() function to check for any collision between the bird and the pipe and over the game. We have then generated new pipes with variations in height. We have then added these pipes to the floor and ceiling. Creating a Score CounterWe will now add a score counter to the game. This score counter will reward the player with 1 score whenever the bird passes through the pipe successfully. For this mechanism to work, we will create a flag to check if the bird has passed the pipe and counter to store the score. We will set the initial value of the flag to False and the counter to 0. We will then check if the bird has passed the left side of the pipe but not the right side and set the flag value to True. Once the bird has passed the right side of the pipe, we will set the flag value back to False and increment the counter value by 1. This process will continue every time the bird passes through the pipe. 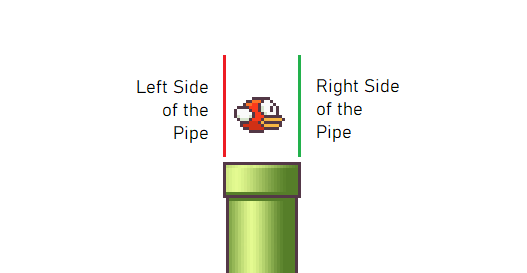
Let us now understand the same using the following snippet of code. File: main.py Explanation: In the above snippet of code, we have defined some variables to store the font style and color. We have then declared some game variables to store the score and flag value and initialized them with 0 and False, respectively. We will now define a function to draw the text as an image on the screen, as Pygame does not over the flexibility to add text directly to the application. This function will accept multiple parameters like the text to display, font style, font color, and the coordinates where this text will be displayed. We will use the render() function to render the required text as an image. We will then use the blit() function to display the image on the screen. File: main.py Explanation: In the above snippet of code, we have defined a function as drawText(), which accepts the text, font style, text color, and x- and y-coordinates as its parameters. Within this function, we have used the render() function to render the text as an image. We then used the blit() function to display the rendered image on the screen. We will now update the game loop once again to add the configuration of the score counter to the game. Let us consider the following snippet of code illustrating the same. Note: The while loop will get updated whenever we add something new to the game until the game becomes fully functional. So, replacing the previous while loop with the following is recommended.File: main.py Explanation: In the above snippet of code, we have updated the while loop once again by adding the score counter. For this, we have checked if the bird is over the pipe and passed the left side of it but not the right side and set the flag value to True. We have then checked if the flag is True, and the bird has passed the right side of the pipe and incremented the score by 1 and set the flag back to False. We have then called the drawText() function to display the calculated score on the screen. Adding Functions to Game Over and Restart the GameWe will now add some functions to display the game over the screen and restart the game. We can accomplish this goal by importing the image needed to be displayed once the game is over. We will then define a class in order to display the image as the button and function to interact with it. So, let us start by importing the required image. The following is the snippet of code illustrating the same. File: main.py Explanation: In the above code snippet, we used the load() function of the pygame.image module to import the required image from the directory. We will now define a class to display the button. Let us consider the following snippet of code illustrating the same. File: main.py Explanation: In the above code snippet, we have defined a class as Button(). Within this class, we have defined an initializing function to initialize some variables to work with the imported image. We have then defined a function as the draw() to draw the image on the screen. We have defined a flag and primarily initialized its value with False. We then retrieved the mouse position using the get_pos() function of the pygame.mouse module. We have then checked if the mouse has clicked over the button and set the flag to True. We then used the blit() function to draw the imported image on the screen and returned the flag. At last, we have instantiated the Button() class. We will now define a function to reset the game. This function will set the bird's position back to its initial state, setting the scores back to 0, and remove the pipes from the screen. Let us consider the following snippet of code illustrating the same. File: main.py Explanation: In the above snippet of code, we have defined a function as resetGame(). Within this function, we have called the empty() function to remove all the sprites in the pipeGroup group. We have then set the coordinates for the bird placement. We have also set the player score to 0 and returned it. We will now update the game loop once again to see the implementation of the Button() class and resetGame() function. Let us consider the following snippet of code illustrating the same. Note: The while loop will get updated whenever we add something new to the game until the game becomes fully functional. So, replacing the previous while loop with the following is recommended.File: main.py Explanation: In the above snippet of code, we have checked if the game is over, and the button is displayed. We then set the gameOver flag value back to False, called the resetGame() function, and used the playerScore variable to store the initial value of the score, i.e., 0. Now that the project code is finally completed, it is time for us to see the result. We will save the project file and use the following command in a command shell or terminal to run the program. Syntax: But we get to it; let us briefly see the complete project code of the "Flappy Bird using Pygame". The Complete Project CodeWe will now see the complete snippet of code of the "Flappy Bird using Pygame in Python" project. File: main.py Output: Image 1: Flappy Bird Game 
Image 2: Game is Running 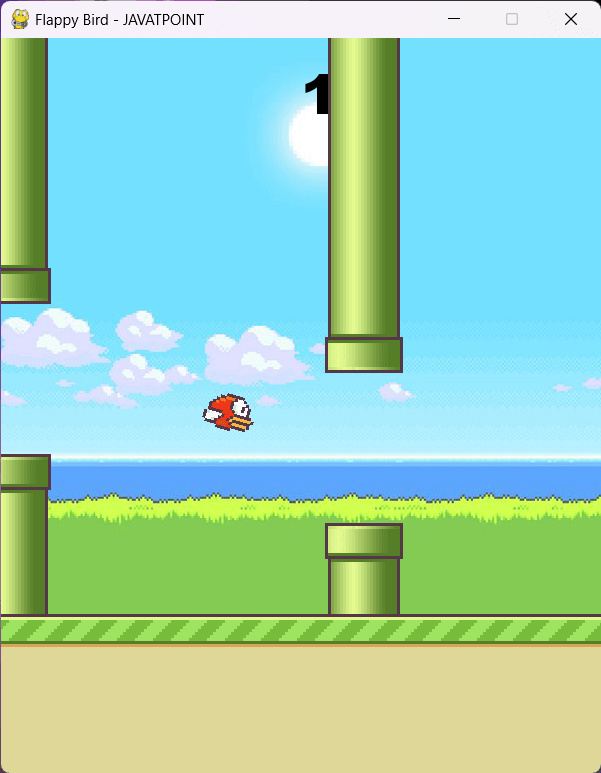
Image 3: Game is Over 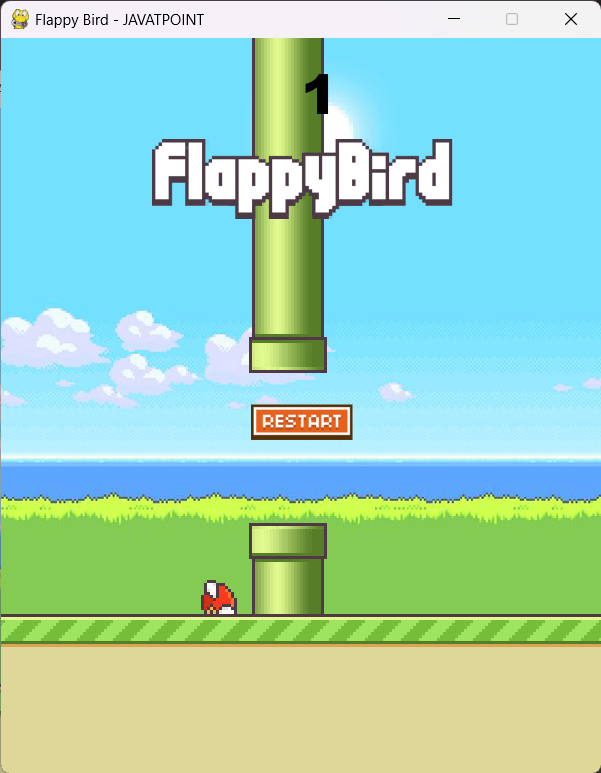
|
 For Videos Join Our Youtube Channel: Join Now
Feedback
- Send your Feedback to [email protected]
Help Others, Please Share


