| |

Python pyautogui Library | Automation Testing UsingWe humans get bored when we do the same work multiple times. And we always look for the way that can overcome it. So a solution has come before us: we can create something that can do this kind of task with a single click. Automation plays a huge role in our lives, and it allows us to do one more task during the process. Python provides many useful and advanced libraries that make a Python programmer's life easier. The pyautogui library is one of the extensive collections of the useful methods. In this tutorial, we will learn about the pyautogui library and implement into the code by using its features. So, without further delay, let's briefly introduce the pyautogui Library. What is the pyautogui Library?Python pyautogui library is an automation library that allows mouse and keyboard control. Or we can say that it facilitates us to automate the movement of the mouse and keyboard to establish the interaction with the other application using the Python script. It provides many features, and a few are given below.
Installation of pyautogui LibraryWindows Operating System It is third-party library so we need to install in it before using it. We can install it using the pip command. You can create a virtual environment or install it globally. Open the command prompt and type the following command. Mac Operating System Linux Operating System Once the installation is completed, we are good to explore its properties. Pyautogui Basic FunctionsIn this section, we will cover some basic functions of the pyautogui library. First, create a new file and import the pyautogui library.
Example - Output: The Screen Width is: 1366 The Screen Height is: 768
Example - Output: X Cordinate is: 839 Y Cordinate is: 635
Example - Output: True False We have provided the 0 to 1500 which is beyond the screen's dimension that's why it returned the False. Basic Mouse FunctionsThis section will cover how to automate the mouse using the pyautogui library. Below are some commonly used mouse manipulation methods like moving the cursor from one point to another and automatically clicking buttons. Let's see the following methods. The moveTo() Method -It moves the mouse to the XY coordinate. It takes the three parameters - X, Y coordinates, and duration (set the duration in the given duration). The cursor moves to the mentioned coordinates according to the given time duration when running the above function. The duration is time in seconds. We passed the ten seconds means the cursor will take ten seconds to locate the coordinates. While using this method, the following error can be encountered. Note - Possible ErrorIf such error occurred, it means that your computer's fail-safe is enabled. To overcome this error, we need to disable the fail-safe. So include the below line at the start of the your code. The moveRel() FunctionThe moveRel() function allows us to move the cursor relative to the current mouse position. Suppose the cursor is located at (100, 100) on the screen, and we call the moveRel() function with the parameter (100, 100, 3) the new position will be the (300, 300). The above line will move the cursor 100 points to the right and 100 to the left in the 3 seconds. The click() FunctionThe click() method works same as the mouse's click button. Below is the syntax of the click() method. The syntax is given below. Parameters -
We can use it as below. The following functions can also be used to move mouse. This library also allows us to take more control over mouse clicks by specifying when to press the mouse down, and when to release it up. The mouseDown and mouseUp methods help us to do that. Below is the example. Example - The scroll() FunctionThe scroll() is one of the most important function, as its name suggest that it is used to scroll in up and down direction. The syntax is given below. Syntax - The positive value is used to define amount_to_scroll parameter to scroll up, and to scroll down, we need to specify a negative value. Below is the example. So, we have discussed almost every function to control the mouse. Using these method, we can perform any operations same as we do with the physical mouse. In the next section, we will cover how to cover the keyboard using various functions. There are many functions available but we will discuss some important ones. Common Keyboard OperationsThe pyautogui library provides the facility to press the keyboard keys using the Python script. Let's run the following to code to check the available keys. Output:
['\t', '\n', '\r', ' ', '!', '"', '#', '$', '%', '&', "'", '(', ')', '*', '+', ',', '-', '.', '/', '0', '1', '2', '3', '4', '5', '6', '7', '8', '9', ':', ';', '<', '=', '>', '?', '@', '[', '\\', ']', '^', '_', '`', 'a', 'b', 'c', 'd', 'e', 'f', 'g', 'h', 'i', 'j', 'k', 'l', 'm', 'n', 'o', 'p', 'q', 'r', 's', 't', 'u', 'v', 'w', 'x', 'y', 'z', '{', '|', '}', '~', 'accept', 'add', 'alt', 'altleft', 'altright', 'apps', 'backspace', 'browserback', 'browserfavorites', 'browserforward', 'browserhome', 'browserrefresh', 'browsersearch', 'browserstop', 'capslock', 'clear', 'convert', 'ctrl', 'ctrlleft', 'ctrlright', 'decimal', 'del', 'delete', 'divide', 'down', 'end', 'enter', 'esc', 'escape', 'execute', 'f1', 'f10', 'f11', 'f12', 'f13', 'f14', 'f15', 'f16', 'f17', 'f18', 'f19', 'f2', 'f20', 'f21', 'f22', 'f23', 'f24', 'f3', 'f4', 'f5', 'f6', 'f7', 'f8', 'f9', 'final', 'fn', 'hanguel', 'hangul', 'hanja', 'help', 'home', 'insert', 'junja', 'kana', 'kanji', 'launchapp1', 'launchapp2', 'launchmail', 'launchmediaselect', 'left', 'modechange', 'multiply', 'nexttrack', 'nonconvert', 'num0', 'num1', 'num2', 'num3', 'num4', 'num5', 'num6', 'num7', 'num8', 'num9', 'numlock', 'pagedown', 'pageup', 'pause', 'pgdn', 'pgup', 'playpause', 'prevtrack', 'print', 'printscreen', 'prntscrn', 'prtsc', 'prtscr', 'return', 'right', 'scrolllock', 'select', 'separator', 'shift', 'shiftleft', 'shiftright', 'sleep', 'space', 'stop', 'subtract', 'tab', 'up', 'volumedown', 'volumemute', 'volumeup', 'win', 'winleft', 'winright', 'yen', 'command', 'option', 'optionleft', 'optionright']
The typewrite() FunctionThe typewrite() function is used to write the something in a text field. The syntax is given below. Syntax - The text parameter is a text to be provided and interval is a time in seconds between each key stroke. Below is the example. Example - The Sachin Kumar will be written in the text field and take the pause of 2 second between each key press. We can pass the sequence of the keys that we want to press. To do so, we can use the following code. The above code will enter the text Sachin following by the removal of the trailing e. The hotkey() FunctionMost of the time, we use the keys in the pairs of keys to perform specific tasks like control + C for the copy text. But we cannot pass as the ['ctrl' + c] to the typewrite() function. It can press the button one after one but not simultaneously same as we press C while holding the Control key to copy something. To do so, we use the hotkey() function that helps us press two or more keys simultaneously. To do so, we use the hotkey() function that helps us to press two or more keys at same time. Let's see the following example. Example - The screenshot() FunctionThe screenshot() function is used to take the screenshot of the screen at any instance. The syntax is given below. Syntax - It will store a PIL object containing the image in a variable. We can also store the screenshot at the desired path as below. Message Box FunctionsThese functions are used to pause/delay the program until the user clicks on OK or something and is also used to display a message to the user. The alert() FunctionIt is used to display message box with the some text message and OK button. Let's see the following example. Example - Output: 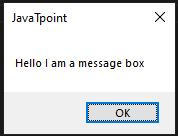
When we click on the OK button, it returns button text. 'OK' The confirm() FunctionThis method is used to display the multiple options or we can say that OK and Cancel buttons. Number and text can be customized. It returns the text of the button clicked on. Let's see the below example. Example - Output: 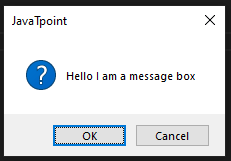
'Cancel' We can also add more buttons as we need. We just need to pass it into the buttons list. 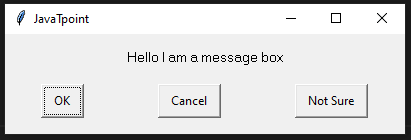
'Not Sure' The prompt() FunctionIt is used to display the message box with the text input and OK and Cancel Buttons and returns the text entered. Let's see the following example. Example - Output: 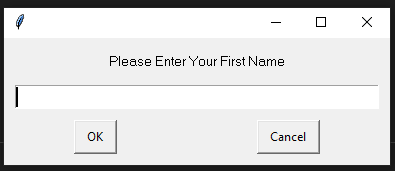
The alert() FunctionAs its name suggests, it is used to display an alert message to the screen. Let's see the following example. Example - Output: 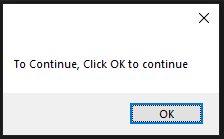
The password() FunctionIt displays the message box with text input and typed characters shows as *. Let's see the following example. Example - Output: 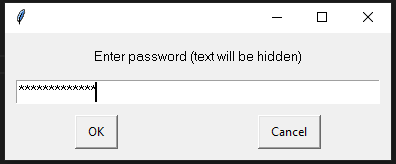
Some Example of Pyautogui LibraryExample - 1: In the below code, we automates the opening chrome using the pyautogui library. Copy the below code and run it into your IDE. Code - Example - 2: When we execute the above code, it opens the windows where we can select any file that to be opened. Finally, we select the file, terminal prints the selected file name and open it after the given number of seconds. ConclusionIn this tutorial, we have covered the pyautogui Library and its important method. These methods help us to create automation in Python. We have also discussed its installation in the different operating systems. You can use this library to do automate your regular tasks.
Next TopicHow to Draw the Mandelbrot Set in Python
|
 For Videos Join Our Youtube Channel: Join Now
Feedback
- Send your Feedback to [email protected]
Help Others, Please Share


