| |

Python with Qt Designer: Quicker GUI Application DevelopmentYou have two major options for building a GUI for your PyQt windows and dialogues: either utilize Qt Designer or manually design the GUI in plain Python code. While the second method gives you complete control over your application's code, the first path can significantly increase productivity. Most GUI apps have a primary window and multiple dialogue boxes. Qt Designer is the application for you if you're trying to make these graphical components in an effective and user-friendly manner. You'll discover how to develop your GUIs using Qt Designer in this tutorial effectively. Introduction to Qt DesignerOverview of Qt Designer With Qt Designer's WYSIWYG (what-you-see-is-what-you-get) user interface, you can quickly and easily develop GUIs for your PyQt applications. This application allows you to build GUIs by dragging and dropping QWidget components into a blank form. After that, you may use several layout tools to arrange them into a logical Interface. Moreover, Qt Designer enables you to link signals and slots, construct menus and toolbars, examine your GUIs in various styles and resolutions, and do much more. Platform and programming language independence are features of Qt Designer. It produces. ui files rather than code in any specific programming language. These files are XML documents that provide comprehensive instructions on how to create Qt-based GUIs. How to Install and Launch Qt DesignerDepending on your current platform, there are a few different ways to download and install Qt Designer. Whether you use Windows or Linux, you can carry out the following commands from your terminal or command line: In this case, you set up a virtual Python environment, turn it on, and install PyQT5 and PyQT5-tools. Although pyqt5-tools installs a collection of Qt tools, including Qt Designer, pyqt5 installs PyQt and a copy of the necessary Qt libraries. After obtaining the Qt installer for your current platform from the official download site, you can proceed. In this case, you must establish a Qt account to complete the installation. Launch the program if you have already installed Qt Designer using one of the methods previously covered. The following two windows ought to appear on your screen: 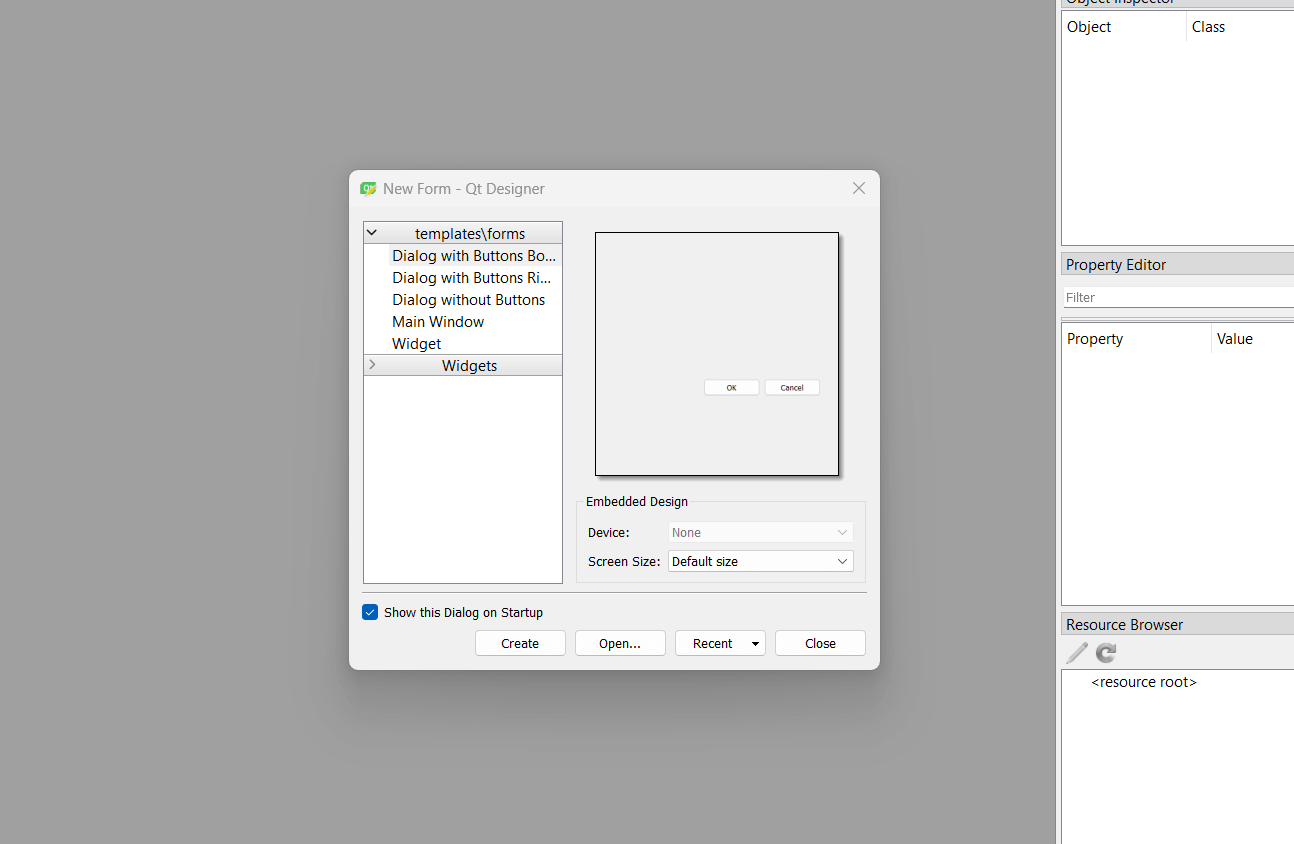
The window in the background is Qt Designer's main window. The New Form dialogue window for Qt Designer is visible in the foreground. You'll learn the fundamentals of how to use these Qt Designer interface elements in the following two parts. Using the New Form Dialog in Qt DesignerThe main window of Qt Designer and the New Form dialogue is displayed when the program is launched. You have a choice of five accessible GUI templates in this dialogue. These templates offer opportunities for building custom widgets, main windows, and dialogues. When Qt Designer is launched, the New Form dialogue always occupies the focus by default. If it doesn't, you can select New from the toolbar of Qt Designer. The main menu's File New option and the keyboard shortcut Ctrl+N are other options. To start a new form, select the template you want to use from the New Form dialogue box, then click Create. To create a new, blank form using a Qt Designer template, select the needed template from the New Form menu, click Create, or press Alt+R on your keyboard. Remember that the first two dialogue templates each feature a set of predefined buttons. These are common buttons that are part of a QDialogButtonBox. This class handles the placement or hierarchy of buttons automatically on various platforms. For instance, Linux and macOS require that buttons be displayed in the same order if you utilize the Cancel and OK buttons. In Windows, however, the button order is reversed, with OK appearing first and then Cancel. You will automatically get this problem resolved with QDialogButtonBox. Working With the Main Window of Qt DesignerThe main window of Qt Designer has a menu bar with options for managing and saving forms, editing forms and switching edit modes, laying out and previewing forms, as well as configuring the application and accessing its help files: 
Moreover, the main window has a toolbar with frequently used settings. Most of these features will be useful when updating and organizing your forms. Moreover, the following choices can be found on the main menu, particularly in the File, Edit, and Form menus: 
The main window of Qt Designer additionally has a few dock windows that offer a variety of functions and tools:
You can utilize the layout managers, spacers, standard widgets, and other items in the Widget Box to design a GUI for your dialogue boxes and windows: 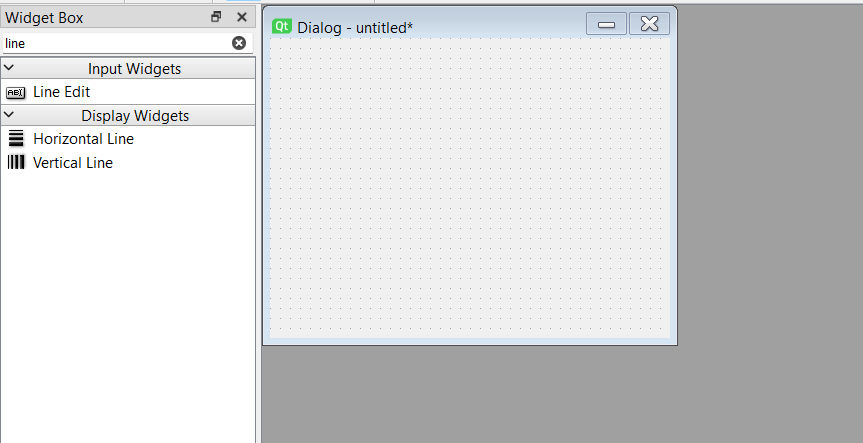
The Widget Box at the top of the window has a filter option. You can quickly access an object or widget by typing its name. The items are arranged into groups based on their intended uses. By clicking the handle next to its label, each Object member in a category can be made visible or invisible. You can drag and drop elements from the Widget Box onto your forms as you create them to develop the user interface (GUI). The Widget Box at the bottom of the window also has a Scratchpad section. You can categorize commonly used items in a different section within this one. Drag and drop any current widget on a form back into the Widget Box to add it to the Scratchpad category. When you right-click a widget in the Scratchpad category, you can remove it by choosing Remove from the context menu. All the objects on the active form are displayed in a tree view by the Object Inspector. The Object Inspector additionally has a filter box at the top to locate objects in the tree. The name and other characteristics of the form and its widgets can be changed using the Object Inspector. Each widget can be right-clicked to open a context menu with more choices: 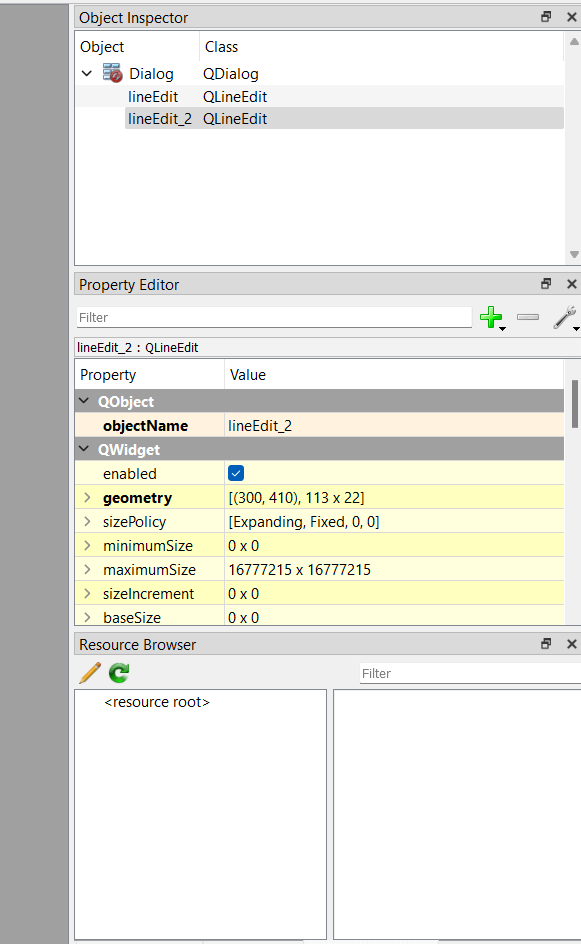
You may control the widgets on your form using the Object Inspector. They can be given a new name, changed some of their properties, removed the form, and more. With the tree view of the Object Inspector, it is possible to see the parent-child relationship between the widgets and objects in their present configuration. Another dock window that can be found in Qt Designer's main window is the Property Editor. The properties and values of the active Object are displayed in a two-column table in this window. The Property Editor, as its name suggests, allows you to change the value of an object's properties: 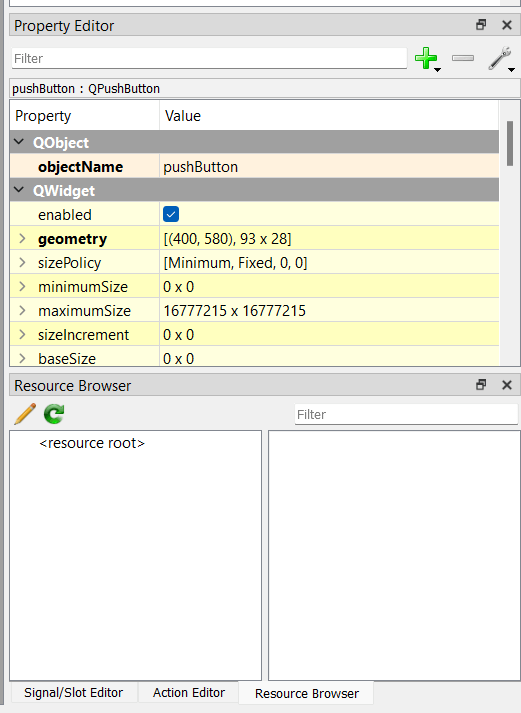
The Property Editor simplifies accessing and modifying the Active Object's name, size, font, icon, and other attributes. Whichever item you choose on your form will affect the properties provided by the editor. The properties are displayed in order of class hierarchy. For instance, the Property Editor displays the properties of QWidget first, then QAbstractButton, and lastly, the properties of QPushButton itself if you choose a QPushButton on the form. Remember that the editor's rows display various colors to distinguish the underlying class visually. Last but not least, there are three dock windows, which typically show up as tabs in the bottom-right corner:
GUI Development: Qt Designer vs. Hand-Written CodeYou can create the GUI of a window or dialogue using PyQt in one of two ways: Manually writing the GUI in pure Python code or using Qt Designer. Both choices offer advantages and disadvantages. Choosing when to employ one over the other might be challenging at times. The user-friendly graphical Interface offered by Qt Designer makes it simple to develop GUIs quickly. As a developer, this can increase productivity and shorten development cycles. On the other hand, hand-coding your GUIs might give you a lot more control over them. With this approach, you won't need any tools besides your code editor or integrated development environment (IDE), which can be useful for adding new components and features in some development environments. Using Python and Qt Designer to Create Main WindowsYou can create main window-style and dialog-style programs using PyQt. A main window featuring a status bar, a central widget, a menu bar, and one or more toolbars is prevalent in main window-style programs. They may also contain several dialogues separate from the primary window. Using the preconfigured Main Window template in Qt Designer, you can easily construct the Interface of your main windows. You'll have the resources necessary to carry out the following tasks once you've generated a form using that template:
Forms created by Qt Designer are saved as. ui files. All the data you will need to recreate the GUI in your applications later is contained in these XML files. Go to File > Save and type the main window to save your forms. Choose a directory to save the File using the Save Form As popup, then click Save. Using Ctrl+S on your keyboard also brings up the Save Form As window. Stay in Qt Designer so you may continue adding menus and toolbars to the newly formed main window. The Main Menu's creationThe top of the form has an empty navigation bar thanks to the Main Window template for Qt Designer. To add menus to the menu bar, utilize the menu editor. The application's options can be quickly accessed through pull-down menus. Reopen your freshly built main window in Qt Designer. You'll notice a navigation bar with the placeholder text Type Here at the top of the form. You can type the name of your first menu on this placeholder text by double-clicking or pressing Enter. Press Enter to confirm the menu name. Imagine that you wish to design your text editor. Usually, applications of this type have a File menu that includes at least some of the following choices:
Here is how to make this menu using Qt Designer: 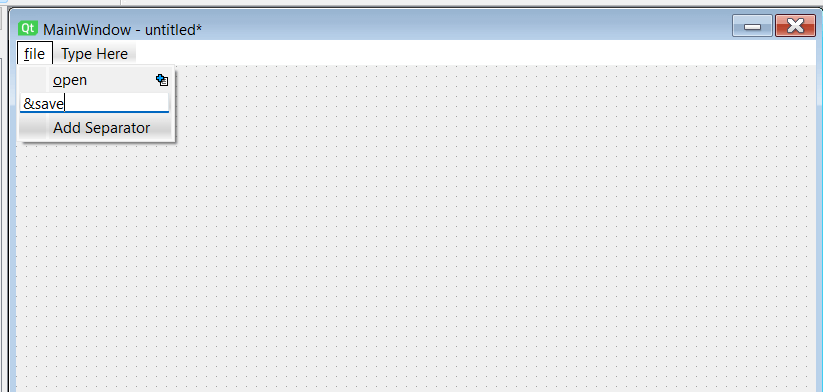
The menu editor in Qt Designer makes adding menus to the menu bar simple. An ampersand (and) can be used as a keyboard shortcut when typing the name of a menu item or menu option. For example, suppose you add a character before the letter F in the File menu. In that case, you can access that menu by pressing Alt F. Similarly, if you add a hyphen before the letter N in the New menu after starting the File menu. Press N to open the New option. You may also add separators to your menus using the Menu Editor. This is a useful method for logically grouping and visually separating menu options. Double-click the Add Separator option in the Menu Editor at the end of the active menu to add a separator. By right-clicking an existing separator and choosing Remove Separator from the context menu, you can delete it. Moreover, you can create new separators using this menu. You can drag a separator to the desired position in a menu and drop it there if you need to change it to a different location. The location of the separator will be shown with a red line. A submenu can be added to a specific menu option. Click the icon next to the menu item you wish to link the submenu, just as you did with the Open Recent option in the example above. Go to Form Preview, or press Ctrl+R on your keyboard to run a preview of your form. Qt Designer offers an Action Editor to create, personalize, and manage actions. You create an action when you add a menu choice to a specific menu. Whenever you create a menu that resembles the File menu in your example text editor, a new QMenu object is automatically added to your menu bar. You can utilize the following helpful settings in the tool to customize your actions: 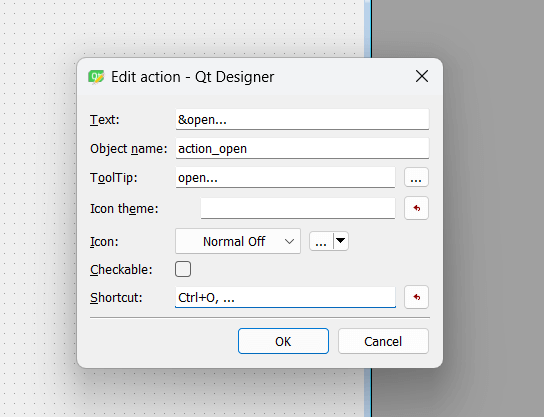
The following options can be adjusted, changed, or set using the Action Editor:
A common convention for naming options that don't execute an instant action but instead open a popup window for completing additional actions is to use the final ellipsis (...) in the text of your menu selections. Creating a ToolbarQt Designer allows you to add as many toolbars as you require to the GUI of your main window. Right-click the form and choose Add Tool Bar from the context menu to accomplish this. Doing this adds a blank toolbar to the window's top. Instead, you can choose Add Tool Bar to Other Area to specify the toolbar area where you wish to add a certain toolbar in advance. 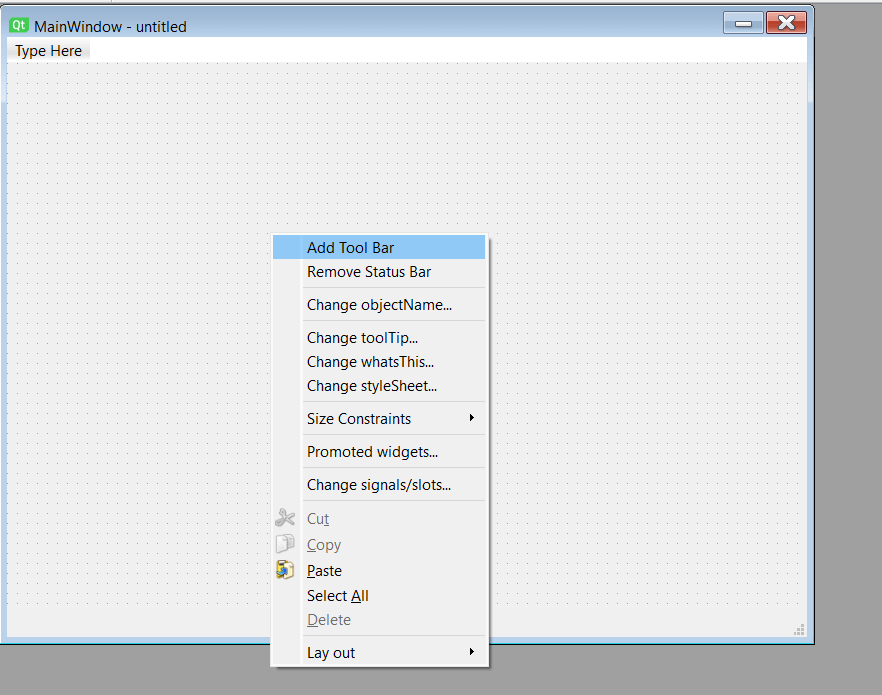
You can add buttons to your toolbars after they are set up. Instead of individual toolbar buttons from the Widget Box, you utilize actions to accomplish this. Use the Action Editor to add actions to your toolbars: 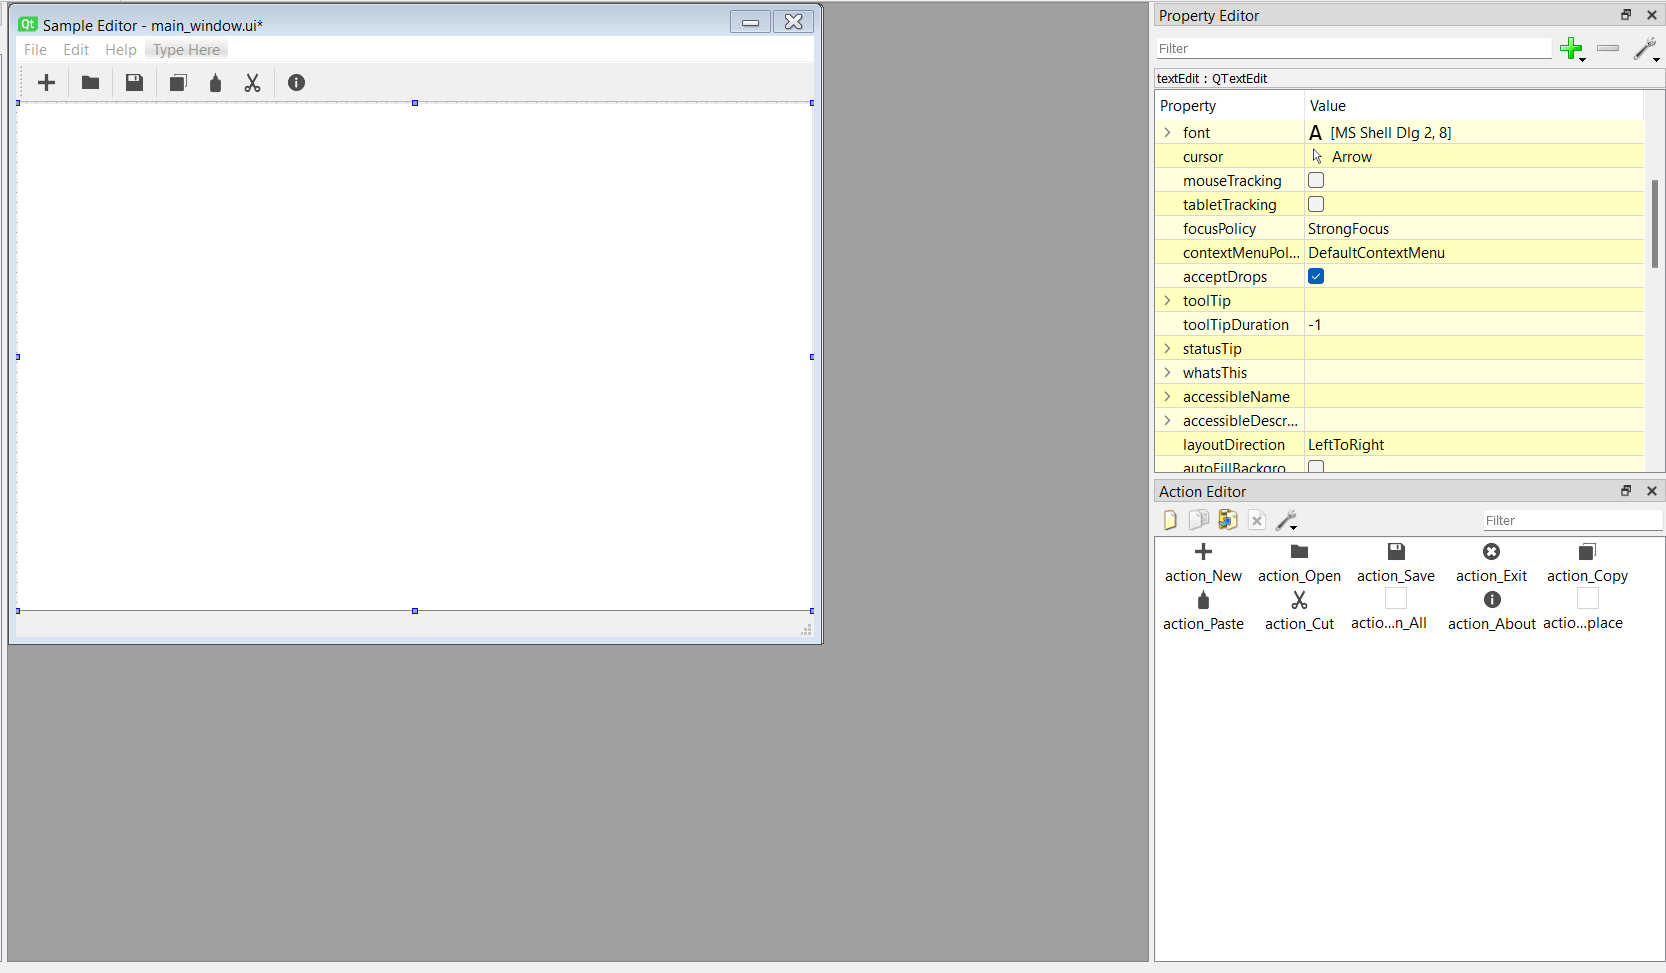
Because actions can be shared between toolbar buttons and menu options, you can reuse the actions you made while populating your menus in the section before. Click on an action in the Action Editor, then drag and drop it into the toolbar to populate it. Remember that you may add separators to the toolbar by right-clicking it to add visual separation between the tool buttons. Setting Up One Central WidgetFor creating the Main Window template, Qt Designer uses QMainWindow. You can create a menu bar, one or more toolbars, one or more dock widgets, a status bar, and a central widget using the basic layout provided by this class. A QWidget object is the main widget on the Main Window template by default in Qt Designer. Using a basic QWidget object as the main widget on a main window's GUI is a good idea since you can layer either a single widget or many widgets on top of it in a logical arrangement. For instance, you could use a single widget in your sample text editor to give users a place to type, copy, paste, and edit text. You can accomplish this by using a QTextEdit object and adding a vertical (or horizontal) layout as the layout for the main widget: 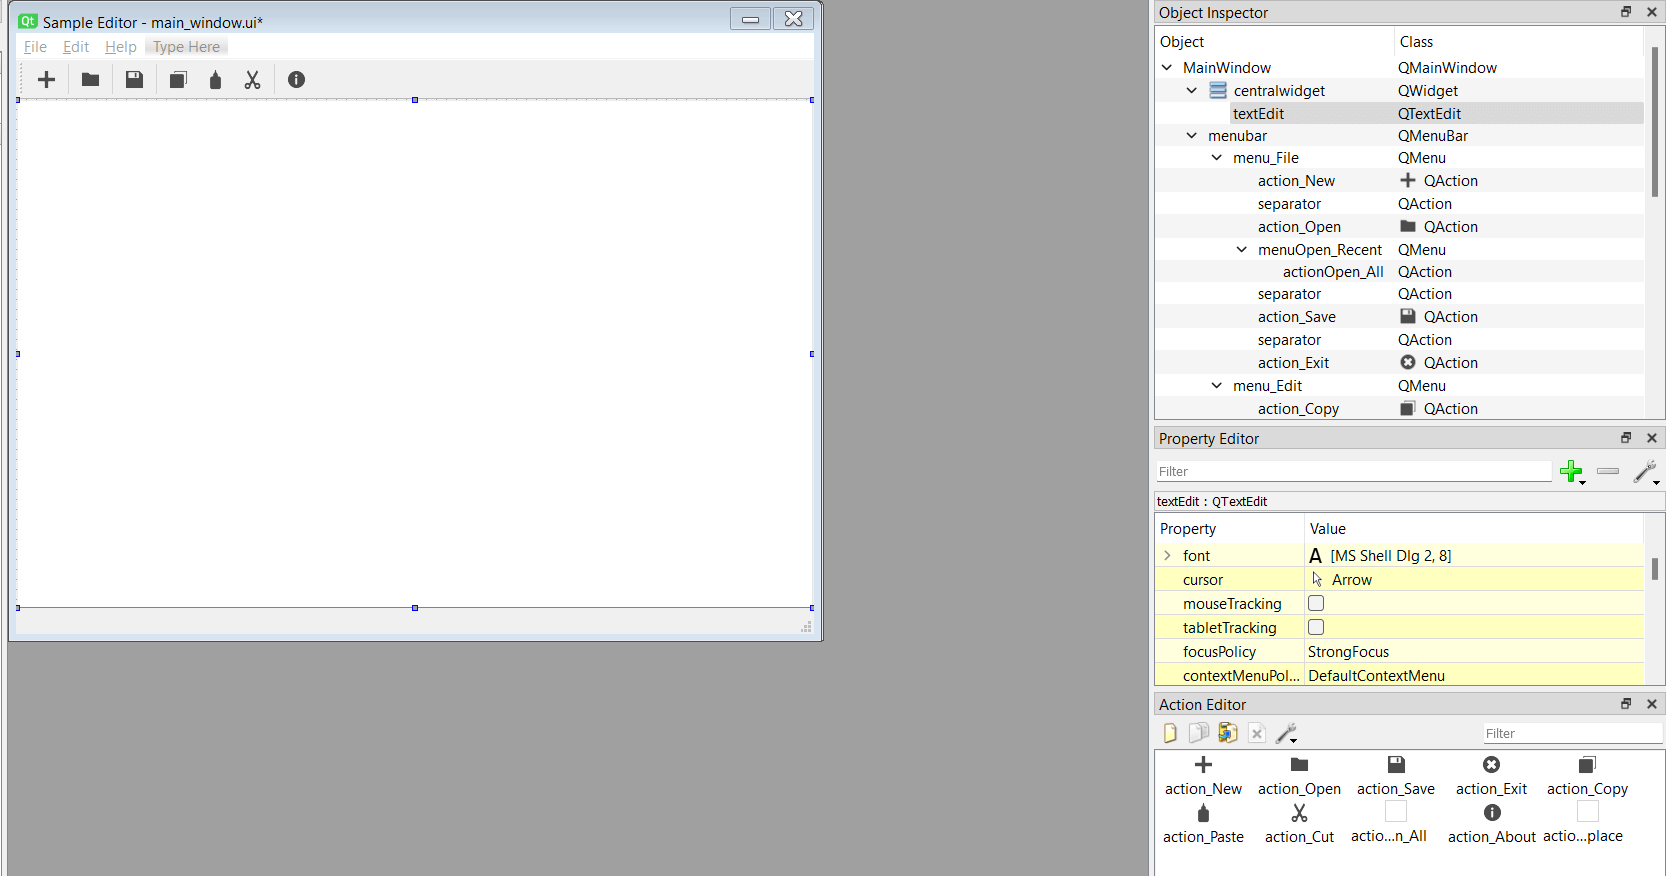
In this illustration, you drag a QTextEdit onto the form first. After that, you click the form to choose your main widget. By selecting Lay Out Vertically from the Qt Designer toolbar, you can apply a vertical layout to your main widget. You use the Object Inspector to adjust the layout's margins from 9 pixels to 1 pixel since the spacing surrounding the QTextEdit doesn't look correct. With Qt Designer, you can rapidly organize your widgets using a variety of layout managers. The main toolbar's layout-related Area is arguably the easiest way to arrange your GUIs in Qt Designer. Compound Central Widget LayoutEmploying several widgets in a specific arrangement as your center widget may be necessary when designing your main windows. As the QWidget object is the default central widget for the Main Window template in Qt Designer, you can use this to construct your unique arrangement of widgets and then set it as the top-level layout of that central widget. As seen in the section above, you can arrange your widgets using layout managers in Qt Designer. You can create a compound widget layout for your main window's GUI by carrying out the subsequent steps:
The recommended practice is to drag all the widgets and spacers into the form first, then repeatedly choose related widgets and spacers to apply layouts to them. You may also drag layouts onto a form and widgets onto the layouts. Consider creating a calculator application as an example. To display the operations and their results, your form must have a QLineEdit object at the top. For the numbers and operations underneath the line edit, you need a few QPushButton objects. This opens a window that looks like this: 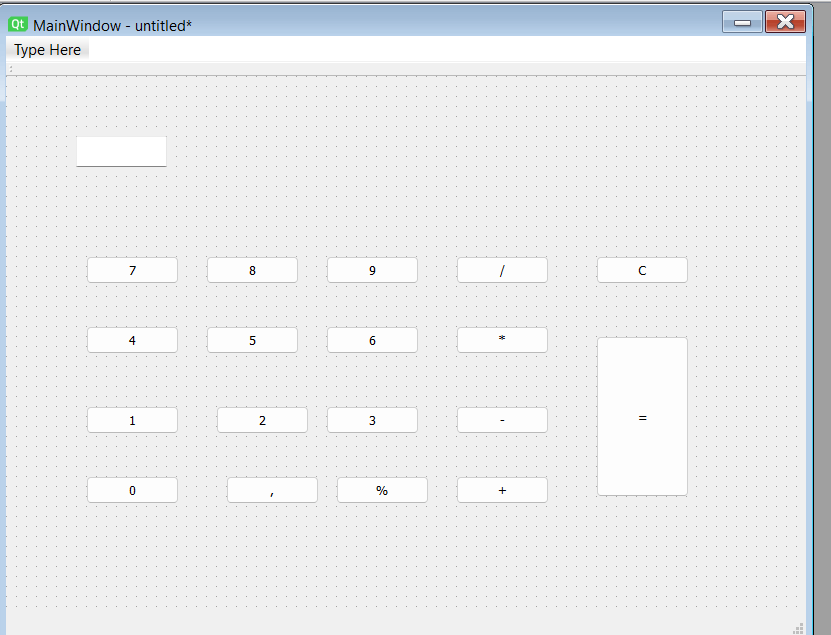
This has a calculator-like appearance, but the user interface is chaotic and disorganized. Use a vertical box layout for the calculator's top-level layout and a grid style for the buttons to create a more aesthetically pleasing calculator GUI: 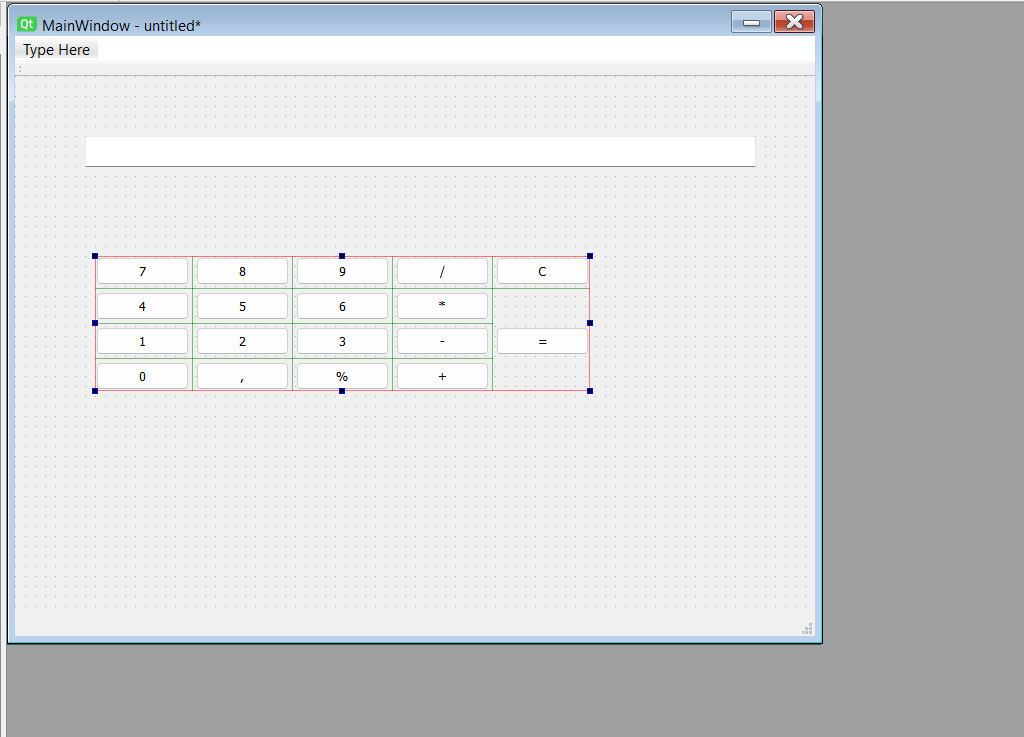
Python and Qt Designer for Dialog CreationLittle dialogues are frequently used to communicate with users by displaying error warnings or general information about a specific action or to provide additional features, like a preferences dialogue. Moreover, dialogues can be used to request information from the user or request confirmation for an upcoming action. You may use PyQt's extensive collection of built-in dialogue in your applications right now. They only require importation from PyQt5.QtWidgets. You can utilize any of these built-in dialogues right away in your code. Most offer class methods to create particular dialogues based on your needs. PyQt offers the QDialog class in addition to these dialogues. Although Qt Designer is a faster option, you can use this class to design your dialogues in code easily. In the next sections, you'll discover how to use Qt Designer and its dialogue templates to design, layout, and personalize your dialogues. Establishing a Dialog GUIChoose the right template from the New Form dialogue to create a custom dialogue with Qt Designer. Please drag & drop the necessary widgets onto the form, properly arrange them, and then save the form as a.ui File for later use in your application. Returning to your example text editor, imagine you wish to include a dialogue box for Search and Replace that looks like this: 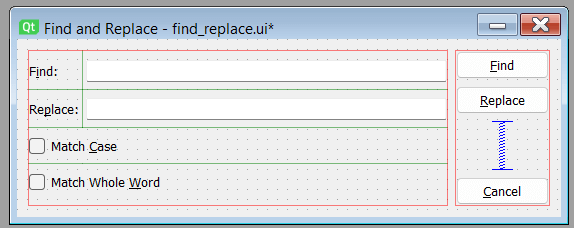
Here, you first build a blank dialogue using the Dialog without Buttons template, and then in the Object Inspector, you change the window's title to Locate and Replace. Then, you drag and drop two QLabel objects onto the form using the Widget Box. These labels request the user's terms to search for and replace them. The corresponding QLineEdit objects close to the labels will be filled with those words. The following step involves dropping three QPushButton objects onto the form. Users can search for and replace words in their open documents using these buttons. To provide options for Match Case and Match Entire Word, you add two QCheckBox objects. When you've finished adding all the widgets, make sure to organize them in the form so that they match the objectives you've set for your final dialogue Linking Slots and SignalsYou have been using Qt Designer in its default mode, Modify Widgets, until now. You can add widgets to your forms, update the widget's properties, arrange the widgets on the form, and do other things in this mode. By selecting the necessary buttons in the toolbar's mode-related part of Qt Designer, which appears as follows: 
It would help if you switched to the Edit Signals/Slots mode to edit your widgets and forms' built-in signals and slots. Events in PyQt are user actions on widgets and forms, like a key press or a click. The current widget sends out a signal whenever an event takes place. You can carry out operations in response to events using this technique. Slots, which are methods or functions, are these operations' names. Selecting one of the signals the widget emits in response to an event and connecting it to the chosen slot will cause the slot to be executed in response to the event. Most widgets, including dialogue boxes and windows, have built-in signals sent out whenever a specific event takes place on the widget. Moreover, widgets have built-in slots that let you carry out predefined tasks. Using Qt Designer, you must select the signal-provider widget with your mouse and then drag and drop it over the slot-provider widget to create a signal-and-slot connection between the two widgets. This opens the Configure Connection dialogue in Qt Designer. Return to the Find and Replace dialogue and select the Edit Signals/Slots mode in Qt Designer. Then move the Cancel button onto the form by dragging it there: 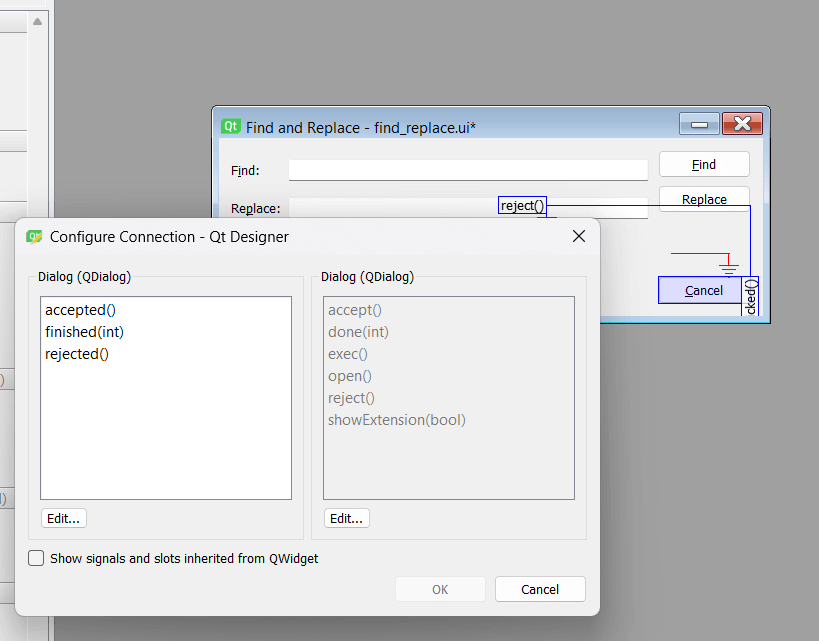
The link is represented and made clear as an active arrow from the slot-provider widget to the signal-provider widget. Moreover, you'll notice the signal's name and the slot you just joined. In this instance, you linked the dialog's reject() slot to the Cancel button's clicked() signal. The dialogue will now close if you click Cancel, ignoring your action. Double-click an arrow or one of the labels to edit a connection. This brings up the Configure Connection dialogue, where you can modify the connection's signal or slot to suit your requirements. Windows and Dialogs Integration in an ApplicationYou have so far learned how to use Qt Designer to construct a GUI for your main windows and dialogue boxes. You'll discover in this section how to include such GUIs into your Python code and create a functional application. With PyQt, there are primarily two ways to accomplish that:
The first method uses pyuic5, a utility provided with the PyQt installation that enables you to convert a.ui File's content into Python code. Because it works so well, this strategy is frequently used. It has one problem: you must generate the code again each time you change the GUI with Qt Designer. The second method uses uic.loadUi() to load a.ui File's contents into your application dynamically. This method works well when working with modest GUIs that don't require a lot of loading time. Installing Windows and Dialog BoxesSetting up your windows and dialogues for use in a real application is now necessary (in this case, a sample text editor). You ought to have at least two.ui files if you followed this tutorial:
Make a new directory called sample editor/ right away. Make a new directory inside this one named ui/ and move yours.ui files into it. Also, copy the resources/ directory containing the menu options icons and toolbar buttons to the sample editor/ui/ directory. Open your preferred IDE or code editor and create a new file called app.py in the sample editor/ directory. To it, add the following code: This Python script creates a simple text editor application using the PyQt5 framework. The application allows the user to perform basic text editing functions like opening and saving files, finding and replacing text, and exiting the application. The script imports the following modules:
The script defines two classes: Window and FindReplaceDialog.
Finally, the script checks if it is being run as the main program (if __name__ == "__main__") and creates an instance of QApplication, Window, shows the window using the show method and starts the application event loop by calling app. exec(). When the user closes the application window or exits the application using the action_Exit action, the event loop terminates, and the script exits. After you launch this program, the following window will appear on your screen: 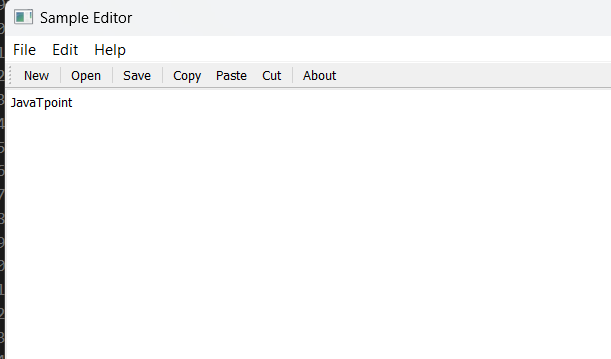
Conclusion:You have produced a prototype text editor with bare-bones features with Qt Designer. You should be aware that only forty-four lines of Python code were required to create this program, significantly reducing the number of lines required to create manually e an analogous application's GUI from scratch menu. Using Qt Designer, you can quickly and easily construct your GUIs by dragging and dropping all the necessary widgets onto an empty form. These graphical user interfaces are kept as .ui files, which you may convert into Python code and utilize in your programs.
Next TopicSubsets in Python
|
 For Videos Join Our Youtube Channel: Join Now
Feedback
- Send your Feedback to [email protected]
Help Others, Please Share


