| |

Kafka Tutorial in PythonIn the following tutorial, we will discuss Apache Kafka along with its use in the Python programming language. Understanding the Apache KafkaApache Kafka is an open-source stream platform that was originally designed by LinkedIn. Later, it was handed over to Apache Foundation and open-sourced in 2011. As per the definition from Wikipedia: Apache Kafka is an open-source platform developed by the Apache Software Foundation used for processing streams. It is written in Java and Scala. The goal of the project is to offer a high-throughput, unified, low-latency platform in order to handle real-time data feeds. The storage layer of the Apache Kafka is fundamentally a "massively scalable pub/sub message queue designed as a distributed transaction log," that makes it extremely valuable for enterprise infrastructures in order to process streaming data. Moreover, Kafka connects to external systems (for importing and exporting data) through Kafka Connect and offers Kafka Streams, a library for Java stream processing. 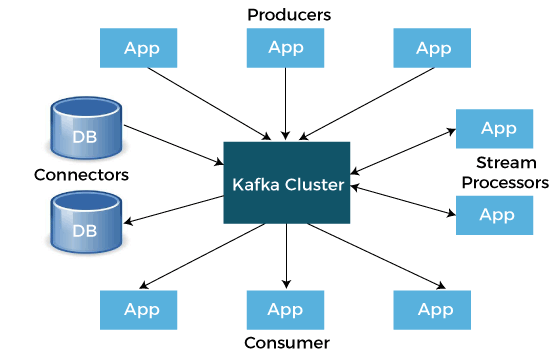
We can think of it as a giant commit log where we can store the data in order of its happening. The users of this log can just access and utilize it as per their needs. Some Use Cases of Apache KafkaWe can use Apache Kafka in different places. Let us consider some use cases of Kafka that could help us to figure out its usage:
Understanding the Concepts of KafkaLet us discuss the core concepts of Kafka. 
Now, let us consider a simple example, there is a go-down or a warehouse of a restaurant where all the raw material is stored, such as vegetables, rice, flour, and a lot more. The restaurant serves various kinds of dishes like Indian, Italian, Chinese and many more. The cooks of each cuisine can refer to the warehouse to select the required objects and make dishes. There may be a chance that all cooks from different cuisine use the same stuff made up of raw materials. This can be any secret ingredient that is utilized in every kind of dish. In the following case, the warehouse acts as a broker, the merchants of the goods are the producers, the goods and the secret ingredient created by cooks are topics, and cooks are consumers. How to access Kafka in Python?There are various libraries available in the Python programming language to use Kafka. Some of these libraries are described below:
Installing the DependenciesWe will use Kafka-Python for this project. So, we can install it manually using the pip installer as shown below: Syntax: Now, let us start building the project. Project CodeIn the following example, we will create a producer that produces numbers ranging from 1 to 500 and send them to the Kafka broker. Later a consumer will read that data from the broker and keep them in a MongoDB collection. One of the benefits of utilizing Kafka is that in case a consumer breaks down, another or fixed consumer will continue reading where the earlier one left. This is a good method to confirm that all the data is fed into the database without missing data or duplicates. In the following example, let us create a new Python program file named produce.py and begin with importing some required libraries and modules. File: produce.py Explanation: In the above snippet of code, we have imported the required libraries and modules. Now, let us initialize a new Kafka producer. Note the following parameters:
Let us consider the following snippet of code for the same. File: produce.py Explanation: In the above snippet of code, we have initialized the Kafka producer using the KafkaProducer() function, where we have used the parameters described above. Now, we have to generate numbers ranging from 1 to 500. We can perform this using a for-loop where we use every number as a value in a dictionary with one key: num. This key is used as a key of the data only, not as the key of the topic. Within the same loop, we will also send the data to a broker. We can perform this by calling the send method on the producer and detailing the topic and the data. Note: The value serializer will automatically transform and encode the data.We can take five seconds of a break in order to conclude the iteration. In case we have to confirm whether the broker received the message, it is advised to include a callback. File: produce.py Explanation: In the above snippet of code, we have used the for-loop to iterate the number ranging from one to 500. We have also added the interval of five seconds between each iteration. If somebody wants to test the code, it is recommended to create a new topic and send the data to that newly generated topic. This method will avoid any case of duplicate values and possible confusion in the testnum topic when we will be testing the producer and consumer together. Consuming the DataBefore we get started with the coding part of the consumer, let us create a new Python program file and name it consume.py. We will import some of the modules such as json.loads, MongoClient and KafkaConsumer. Since PyMongo is out of the scope of this tutorial, we won't be digging any deeper into its code. Moreover, somebody can also replace the mongo code with any other code as per needs. We can code this in order to enter the data into another database, code to process the data, or anything else one can think of. Let us consider the following snippet of code, to begin with. File: consume.py Explanation: In the above snippet of code, we have imported the required modules from their respective libraries. Let us create the Kafka Consumer. We will use the KafkaConsumer() function for this work; so let's have a closer look at the parameters used in this function.
Let us consider the following snippet of code for the same. File: consume.py Explanation: In the above snippet of code, we have used the KafkaConsumer() function to generate the Kafka Consumer. We have also added the parameters within the function that we studied earlier. Now, let us consider the following snippet of code to connect to the testnum collection (This collection is similar to a table in a relational database) of the MongoDB database. File: consume.py Explanation: In the above snippet of code, we have defined a variable as my_client that uses the MongoClient() function specified with the host and port. We have then defined another variable as my_collection that uses the my_client variable to access the data in the testnum topic. This data can be extracted from the consumer by looping through it (here, the consumer can be considered as an iterable). The consumer will keep listening until the broker does not respond anymore. We can access the message value using the value attribute. Here, we overwrite the message with the message value. The next line inserts the data into the database collection. The last line will print a confirmation that the message was added to our collection. Note: It is possible to insert callbacks to all the actions in this loop.File: consume.py Explanation: In the above snippet of code, we have used the for-loop to iterate through the consumer in order to extract the data. Now in order to test the code, one can execute the produce.py file first and then consume.py. |
 For Videos Join Our Youtube Channel: Join Now
Feedback
- Send your Feedback to [email protected]
Help Others, Please Share


