| |

Push Notifications in iOSPush Notifications are the easiest way for app developers to interact with their users. Push notifications allow developers to perform small tasks when the user taps on the notification. We can trigger a push notification to the device even if it is in the background. In this tutorial, we will configure the iOS application to receive push notifications. Generally, push notifications are the messages that are triggered by Apple Push Notification Service (APNs). The App can receive push notifications, even if it is not running or the device is not active. Push notifications can be used to perform the following actions within the application.
Prerequisites To send push notifications to the iOS App, we need the following setup.
Sending and receiving Push NotificationsLet's start configuring our iOS project to receive the push notifications. In this process, we will do configurations in XCode and Apple developer account. Later, we will send simulated push notifications to test the application. For this tutorial, we will use XCode 12.0.1 Consider the following steps to configure the XCode project. 1. Create a new iOS project in XCode 12 and provide an App Id registered with the apple developer account. However, we can change the bundle identifier (App Id) later on in XCode. To change the Bundle Identifier in XCode, select the XCode target and change the Bundle Identifier in the General section as shown in the following image. 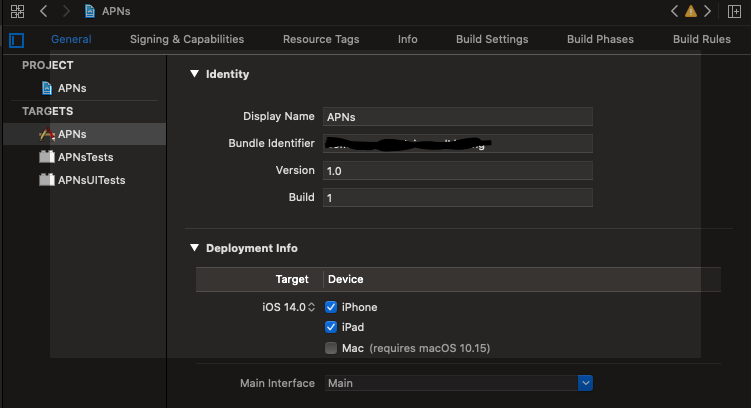
2. We need to register the same App Id with the Apple Developer account and enable the push notification entitlement. To create the App Id in Apple Developer Account, navigate to identifiers in Certificate, Identifiers and Profile section and click the + icon. This will prompt the following window. 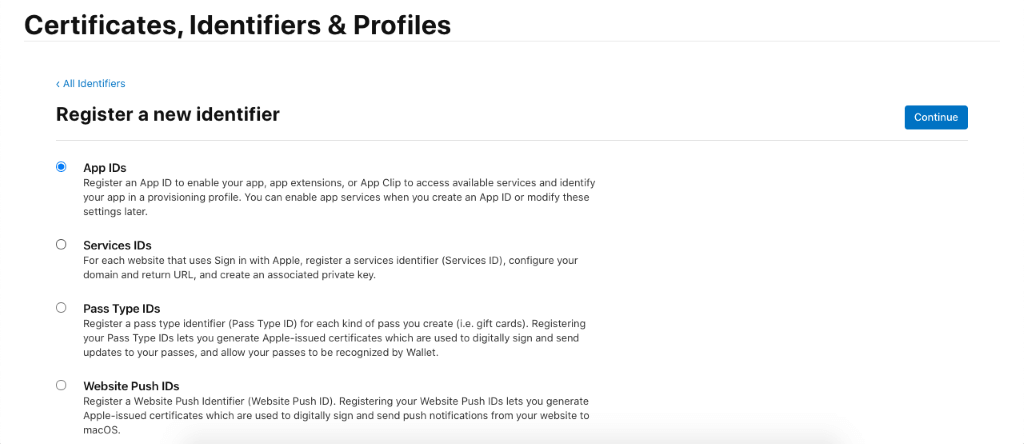
In the above window, select App Ids and click continue. The next window will prompt us to select the target for which App Id is being created (App or App Clip). Select App and continue. The next window will prompt us to enter the general information like App Id name (Reverse domain name of the organization, including app name) and description. Provide the information and click continue. This will generate our bundle identifier. Now, we need to add the Push notification capability to the application. We need to provide the capability in XCode as well as the developer account. To add the XCode capability, go to project target -> signing and capabilities and click the + icon. This will prompt us to select the capability that we need to add. Consider the following image. 
To add the capability in the Developer account, go to identifiers in Certificate, Identifiers, and Profile Section. Select the App Id that we have created for our application to edit. Consider the following image to add the capability to the app id. 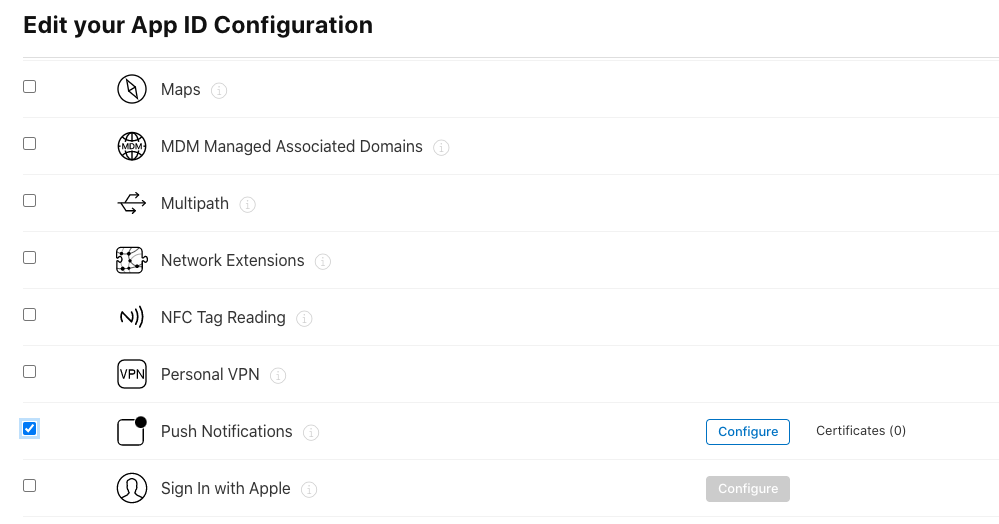
After adding the push notification capability to the XCode project, the project should look like the following image. 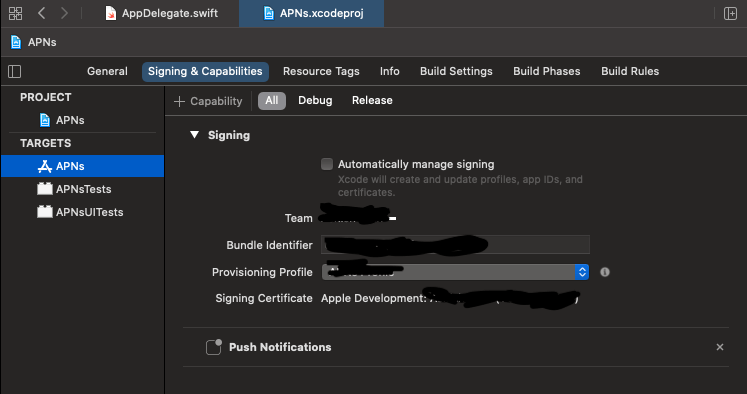
Now, we will implement the methods that are required to receive the push notification in the iOS App. Asking for User PermissionWe must take permission from the user to show the notifications. For this purpose, import the UserNotifications at the top of AppDelegate. We need to add the following method to the AppDelegate and call it from the application(_:didFinishLaunchingWithOptions). The UserNotificationCenter is used to handle the notification related activities. The requestAuthorization(options:completionHandler: ) is used to request the authorization from the user to show notifications. There is the various combination of UNAuthorizationOptions that can be passed in the completion handler given as follows.
The application(_:didFinishLaunchingWithOptions) will contain the following code. Now, when we build and run our application. It will prompt us for the permissions as shown in the below image. 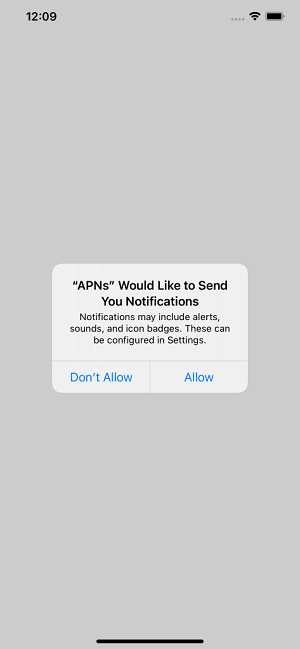
The user must tap Allow to grant the permission of showing push notifications to the application. The user may not allow the application, in that case, we must add the following method in the AppDelegate. Now, we must replace the code of registerForPushNotifications() method with the following. Register with APNsWe must register our application with APNs to get the push notifications. Replace the code of getNotificationSettings () method with the following code, which will verify the authorizationStatus. If the status is .authorized, we must call the UIApplication.shared.registerForRemoteNotifications() method to register with APNs. Get device token We need to provide our device token to the server, which sends the push notification to the application. It works as an address of the application at the server end. To get the device token, we need to add the following code to get the device token. The above method is called when the call to registerForRemoteNotifications() succeeds. The device token is a device identifier which is provided by APNs to uniquely identify the device. However, if the call to registerForRemoteNotifications() fails, the iOS calls the following method, which we need to add into the AppDelegate. We can retrieve the device token only if we are running the application on a real device. We will get a Failed to register message printed on the console since we are running on a simulator for now. Sending Push Notification to the App Now, we are done with the required settings in the Apple Developer Account and XCode application. Our application is good to receive a push notification. To test the App, we need to send the simulated push notification to the App. For this purpose, create a file as push.apn, passed to XCode to test push notification. Save the following JSON txt in the push.apn file. Now, build and run the application. To simulate the push notification, we must know the device identifier of the simulator on which we are running our application. For this purpose, go to XCode -> window -> Devices and Simulators as shown in the following image. 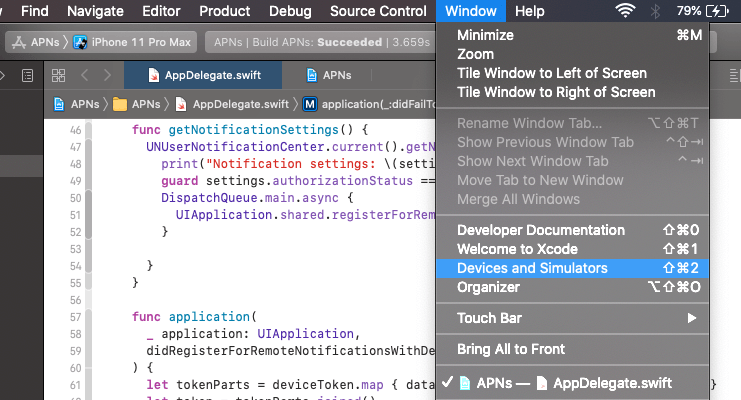
Now, select the simulator among the simulators list and copy the device identifier. We will need to provide the device identifier and bundle identifier in the following command. Here, we must make sure that in the terminal, we are in the directory in which we have saved the push.apn file. We must replace the device identifier with the one which we have just copied from XCode and the bundle identifier with the one which we have provided in XCode and the apple developer account. We will receive the push notification in the simulator once we run this command, as shown in the following image. 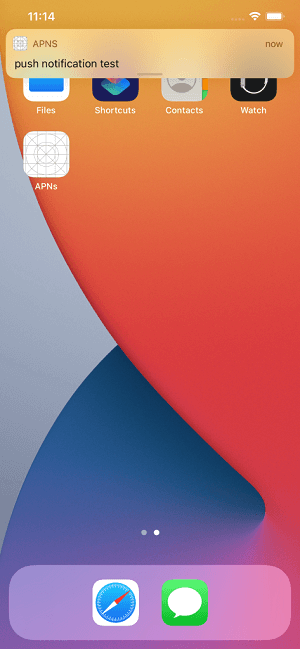
Push Notification Body Let's look at the body of the notification that we have sent to the simulator. The payload for the Push notification is given above. It is a JSON dictionary that contains a single item, aps, which itself is a dictionary. Here, the dictionary aps contains three fields, I.e., alert, sound, and link_url. However, 8 built-in keys can be added to aps dictionary given as follows.
We can also add the custom data to the notification payload. However, it should not exceed 4096 bytes. Push Notifications handlingThe iOS calls different methods of AppDelegate (when the user taps on the notification) depending upon the state of our application. We need to set the UNUserNotificationCenterDelegate in AppDelegate and implement the delegate methods, i.e., willPresent and didRecieve. Add the following line of code to the application(_ application: UIApplication, didFinishLaunchingWithOptions launchOptions: [UIApplication.LaunchOptionsKey: Any]?) method. Now, as we are done with setting the delegate, we can implement the delegate methods. Add the following code at the end of AppDelegate. The first delegate method, i.e., willPresent, is called when the notification comes to the application. However, when the user taps on the notification, then the second delegate method, i.e., didRecieve, is called. We can check the current state of the application in the didRecieve delegate method and perform actions based on the current state of the application. For this purpose, replace the code of didRecieve with the following code. However, If the application is not running and the notifications come, then the application(_:didFinishLaunchingWithOptions: ) method in AppDelegate is called. Meanwhile, let's configure our application APNS by adding a UITabBarController with two-tab bar items as Home and Notifications. Let's add a webview to the home and try navigating to notifications when the user taps on the notification. Now, let's test the push notifications in the application and trying retrieving the data. Run the application and send the simulated push notification again using the terminal. Keep the application in the foreground and see whether the push notification is coming or not. It should look like the following image. 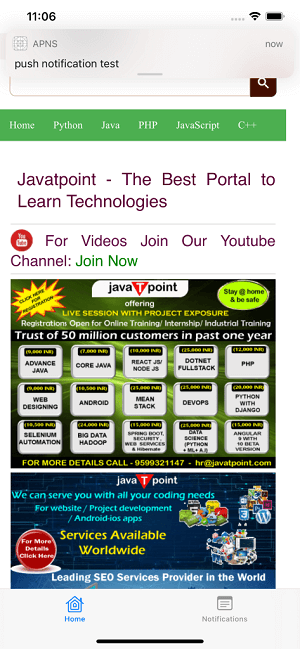
Now, add a breakpoint to the didReceive delegate method and try printing the notification content in the console. We should get the following result printed in the console. However, we can pass this data and display the notifications in the Notifications Tab. Also, if the application is not running then, we should also add the notification handling code to the didFinishLaunchingWithOptions(: ) method in AppDelegate.
Next TopicSign-in with Apple using swift
|
 For Videos Join Our Youtube Channel: Join Now
Feedback
- Send your Feedback to [email protected]
Help Others, Please Share


