Justify in MS Word
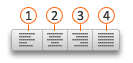
MS Word allows users to align the text to the sheet's margins. There are four types of alignment in MS Word:
- Left Alignment: The shortcut to implement left alignment is Ctrl+L. This allows the user to align the text to the left margins of the page.
- Center Alignment: The shortcut to implement center alignment is Ctrl+E. This allows the user to align the text to the center of the page.
- Right Alignment: The shortcut to implement right alignment is Ctrl+R. This allows the user to align the text to the right margins of the page.
- Justify Alignment: The shortcut to implement Justify alignment is Ctrl+J. This allows the user to align the text to both the margins of the page.
Note: MS Word ensures that the edges of the text lines are the same length by filling up the spaces between the words in the text or paragraph.
Implement Justify in the Text in MS Word
There are three ways to change the alignment of the text in MS Access. The first method uses the Justify Text-alignment button on the Home tab. The second method is by using the shortcut that is CTRL+J to change the alignment to Justify. You can also use the context menu to implement Justify to text.
Justify Text Alignment Using Justify Text Button
In this module, we will implement the Justify the text using the Justify text alignment in the Paragraph group in the Home tab.

- Open the MS Word
- The first step is to open the document in MS Word. If you are using a new document, it will open a blank document. Then you can begin by clicking on Justify text button from the Home tab. Any text that you type after that will be automatically justified. But if the document is already prepared, and you want to modify the text alignment follow the given steps below:
- Select the Text.
- If the document is already prepared, select the part of the text or the entire text you want to be aligned equally to both margins. Click on justify in the paragraph group on the Home tab.
- The text will be justified in MS Word.
Justify Text Alignment Using Shortcut Key
This is the easiest way to implement Justify using the shortcut keys. You are required to press two keys to justify content in MS Word.
- Open the MS Word
- The first step is to open the document in MS Word. If you are using a new document, it will open a blank document. Then you can begin by pressing CTRL+J. Any text that you type after that will be automatically justified. But if the document is already prepared, and you want to modify the text alignment follow the given steps below:
- Select the Text
- The best way to change the alignment of the text is by making sure that the text is selected for which you want to modify the alignment. After selecting the paragraph, press the keys CTRL and J together, and the selected content will be Justified.
Justifying the Text Using Context Menu
In MS Word, the context Menu provides the user with a list of the most frequently used text formatting tools that can be used by the user without moving the cursor to the Home tab. The user can choose from this list by right-clicking anywhere on the page of the document.
- Open the MS Word
- The first step is to open the document in MS Word. If you are using a new document, it will open a blank document. Then you can begin by right-clicking on the page and selecting the Justify button from the paragraph formatting group. Any text that you type after that will be automatically justified. But if the document is already prepared, and you want to modify the text alignment follow the given steps below:
- Select the Text.
- If the document is already prepared, select the part of the text or the entire text to be justified.
- Open the Context menu.
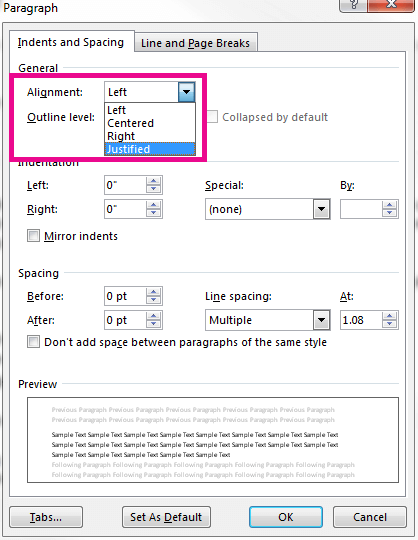
- With the text selected, right-click on it and select the paragraph.
- This will display the Paragraph dialogue box in the middle of your screen. On the dialogue box, under Indents and Spacing, click the Alignment drop-down menu and select Justified.
- Click the OK button to save or Cancel to revert changes.
|

 For Videos Join Our Youtube Channel: Join Now


