Arduino Tutorial
Arduino is a project, open-source hardware, and software platform used to design and build electronic devices. It designs and manufactures microcontroller kits and single-board interfaces for building electronics projects. The Arduino boards were initially created to help the students with the non-technical background. The designs of Arduino boards use a variety of controllers and microprocessors. The Arduino board consists of sets of analog and digital I/O (Input / Output) pins, which are further interfaced to breadboard, expansion boards, and other circuits. Such boards feature the model, Universal Serial Bus (USB), and serial communication interfaces, which are used for loading programs from the computers. It also provides an IDE (Integrated Development Environment) project, which is based on the Processing Language to upload the code to the physical board. The projects are authorized under the GPL and LGPL. The GPL is named as GNU General Public License. The licensed LGPL is named as GNU Lesser General Public License. It allows the use of Arduino boards, it's software distribution, and can be manufactured by anyone. It is also available in the form of self practicing kits. The Arduino is used for various purposes, such as:
What is Arduino?Arduino is a software as well as hardware platform that helps in making electronic projects. It is an open source platform and has a variety of controllers and microprocessors. There are various types of Arduino boards used for various purposes. The Arduino is a single circuit board, which consists of different interfaces or parts. The board consists of the set of digital and analog pins that are used to connect various devices and components, which we want to use for the functioning of the electronic devices. Most of the Arduino consists of 14 digital I/O pins. The analog pins in Arduino are mostly useful for fine-grained control. The pins in the Arduino board are arranged in a specific pattern. The other devices on the Arduino board are USB port, small components (voltage regulator or oscillator), microcontroller, power connector, etc. FeaturesThe features of Arduino are listed below:
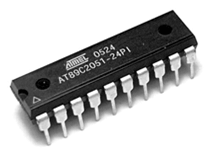
HistoryThe project began in the Interaction Design Institute in Ivrea, Italy. Under the supervision of Casey Reas and Massimo Banzi, the Hernando Bar in 2003 created the Wiring (a development platform). It was considered as the master thesis project at IDII. The Wiring platform includes the PCB (Printed Circuit Board). The PCB is operated with the ATmega168 Microcontroller. The ATmega168 Microcontroller was an IDE. It was based on the library and processing functions, which are used to easily program the microcontroller. In 2005, Massimo Banzi, David Cuartielles, David Mellis, and another IDII student supported the ATmega168 to the Wiring platform. They further named the project as Arduino. The project of Arduino was started in 2005 for students in Ivrea, Italy. It aimed to provide an easy and low-cost method for hobbyists and professionals to interact with the environment using the actuators and the sensors. The beginner devices were simple motion detectors, robots, and thermostats. In mid-2011, the estimated production of Arduino commercially was 300,000. In 2013, the Arduino boards in use were about 700,000. Around April 2017, Massimo Banzi introduced the foundation of Arduino as the "new beginning for Arduino". In July 2017, Musto continued to pull many Open Source licenses and the code from the websites of the Arduino. In October 2017, Arduino introduced its collaboration with the ARM Holdings. The Arduino continues to work with architectures and technology vendors. MicrocontrollerThe most essential part of the Arduino is the Microcontroller, which is shown below: 
Electronic devices around UsWe have many electronic devices around us. Most of the appliance consists of the microcontroller for its functioning. Let's discuss some of the examples.
ProjectsLet's consider a simple project of LED blink. We need a software to install our sketch or code to the Arduino board. The LED will blink after the successful uploading of code. The software is called as Arduino IDE (Integrated Development Environment). There are various projects created with the help of the Arduino. Some of the projects are listed below:
Some projects require a list of components. So, for easy convenience and hands-on projects, the Arduino kits are available easily in market. Arduino KitsWe can easily start with our electronics projects using the complete kit. It also helps us to create hand-on and engaging projects. Some of the popular Arduino kits are listed below:
Arduino IDEThe IDE makes the traditional projects even easier and simpler. The USB cable is used to load the program or sketch on the specific Arduino board. 
The IDE application is suitable for Windows, Mac OS X, and Linux. It supports the programming language C and C++. We need to connect the Genuino and Arduino board with the IDE to upload the sketch written in the Arduino IDE software. Many other companies including Sparkfun Electronics, also make their own boards that are compatible with Arduino IDE. Arduino BoardsThere are variety of Arduino board used for different purposes. The board varies in I/O pins, size, etc. The various components present on the Arduino boards are Microcontroller, Digital Input/Output pins, USB Interface and Connector, Analog Pins, Reset Button, Power button, LED's, Crystal Oscillator, and Voltage Regulator. Some components may differ depending on the type of board. Let's discuss some of the popular Arduino boards.
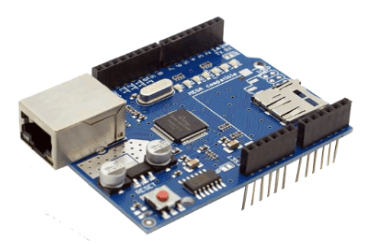
Shields
PrerequisiteThe requirement to learn Arduino is the basic knowledge of C and C++ programming language. A basic understanding of circuits, Microcontrollers, and Electronics is also essential. AudienceThe Arduino is intended for use by students, engineers, and hobbyists. The basic knowledge of electronic components and programming is required before beginning with the Arduino Tutorials. ProblemWe assure you that you will not find any problem with this Arduino Tutorial. But if there is any mistake, please post the problem in the contact form.
Next TopicArduino Download
|
 For Videos Join Our Youtube Channel: Join Now
Feedback
- Send your Feedback to [email protected]
Help Others, Please Share


