| |

Arduino DelayHere, Arduino Delay specifies the delay( ) function used in the Arduino programming. Let's discuss the delay( ) function in detail. delay( ) functionThe delay( ) function pauses the program or task for a specified duration of time. The time is specified inside the open and closed parentheses in milliseconds. Where, 1 second = 1000 milliseconds Example 1: delay(500) Here, the specified time is 0.5 seconds. It is shown below: 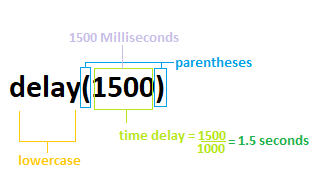
The program waits for a specified duration before proceeding onto the next line of the code. The delay( ) function allows the unsigned long data type in the code. We can create many sketches using the short and long delays depending on the requirements in the project. It does not disable any interrupts. But, the delay( ) function has some drawbacks. The Drawback of using delay( ) in the sketchThe delay( ) cease (stops) the other activities, such as manipulation of pins on the board, mathematical calculations, reading of other sensors during the delay function. The programmers usually avoid delay( ) of more than 10 seconds in the sketch. Let's understand the delay() function with the help of two examples. Example 1: Consider the below code. Example 2: Consider the below code: In the output, the word Welcome will appear followed by the word to delay 1 second later. After 0.5 seconds, another line will be printed. Output: Welcome to delay Welcome to delay . . . . The output will be printed repeatedly.
Next TopicArduino If statement
|
 For Videos Join Our Youtube Channel: Join Now
Feedback
- Send your Feedback to [email protected]
Help Others, Please Share


