Arduino Shields
What is Arduino Shields?
Arduino shields are the boards, which are plugged over the Arduino board to expand its functionalities. There are different varieties of shields used for various tasks, such as Arduino motor shields, Arduino communication shields, etc.
Shield is defined as the hardware device that can be mounted over the board to increase the capabilities of the projects. It also makes our work easy. For example, Ethernet shields are used to connect the Arduino board to the Internet.
The pin position of the shields is similar to the Arduino boards. We can also connect the modules and sensors to the shields with the help of the connection cable.
Arduino motor shields help us to control the motors with the Arduino board.
Why do we need Shields?
The advantages of using Arduino shields are listed below:
- It adds new functionalities to the Arduino projects.
- The shields can be attached and detached easily from the Arduino board. It does not require any complex wiring.
- It is easy to connect the shields by mounting them over the Arduino board.
- The hardware components on the shields can be easily implemented.
Types of Shields
The popular Arduino shields are listed below:
- Ethernet shield
- Xbee Shield
- Proto shield
- Relay shield
- Motor shield
- LCD shield
- Bluetooth shield
- Capacitive Touchpad Shield
Let's discuss the shields that are listed above:
Ethernet shield
- The Ethernet shields are used to connect the Arduino board to the Internet. We need to mount the shield on the top of the specified Arduino board.
- The USB port will play the usual role to upload sketches on the board.
- The latest version of Ethernet shields consists of a micro SD card slot. The micro SD card slot can be interfaced with the help of the SD card library.
The Ethernet shield is shown below:
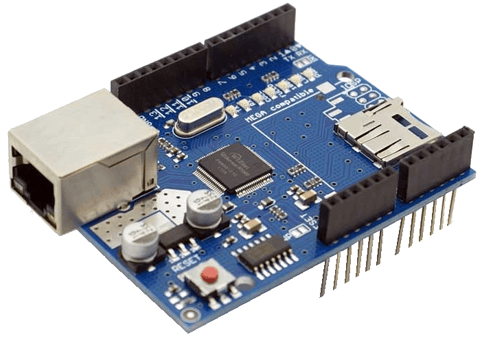
- We can also connect another shield on the top of the Ethernet shield. It means that we can also mount two shields on the top of the Arduino board.
Xbee Shield
- We can communicate wirelessly with the Arduino board by using the Xbee Shield with Zigbee.
- It reduces the hassle of the cable, which makes Xbee a wireless communication model.
- The Xbee wireless module allows us to communicate outdoor upto 300 feet and indoor upto 100 feet.
- The Xbee shield is shown below:

- It can also be used with different models of Xbee.
Proto shield
- Proto shields are designed for custom circuits.
- We can solder electronic circuits directly on the shield.
- The shield consists of two LED pads, two power lines, and SPI signal pads.
- The IOREF (Input Output voltage REFerence) and GND (Ground) are the two power lines on the board.
The proto shield is shown below:
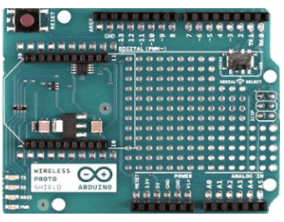
- We can also solder the SMD (Surface Mount Device) ICs on the prototyping area. A maximum of 24 pins can be integrated onto the SMD area.
Relay shield
- The Arduino digital I/O pins cannot bear the high current due to its voltage and current limits. The relay shield is used to overcome such situation. It provides a solution for controlling the devices carrying high current and voltage.
- The shield consists of four relays and four LED indicators.
- It also provides NO/NC interfaces and a shield form factor for the simple connection to the Arduino board.
- The LED indicators depicts the ON/OFF condition of each relay.
- The relay used in the structure is of high quality.
- The NO (Normally Open), NC (Normally Closed), and COM pins are present on each relay.
- The relay shield is shown below:
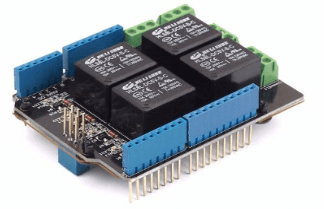
- The applications of the Relay shield include remote control, etc.
Motor shield
- The motor shield helps us to control the motor using the Arduino board.
- It controls the direction and working speed of the motor. We can power the motor shield either by the external power supply through the input terminal or directly by the Arduino.
- We can also measure the absorption current of each motor with the help of the motor shield.
- The motor shield is based on the L298 chip that can drive a step motor or two DC motors. L298 chip is a full bridge IC. It also consists of the heat sinker, which increases the performance of the motor shield.
- It can drive inductive loads, such as solenoids, etc.
- The operating voltage is from 5V to 12V.
The Motor shield is shown below:
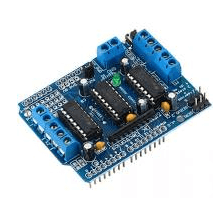
- The applications of the motor shield are intelligent vehicles, micro-robots, etc.
LCD shield
- The keypad of LCD (Liquid Crystal Display) shield includes five buttons called as up, down, left, right, and select.
- There are 6 push buttons present on the shield that can be used as a custom menu control panel.
- It consists of the 1602 white characters, which are displayed on the blue backlight LCD.
- The LED present on the board indicates the power ON.
- The five keys present on the board helps us to make the selection on menus and from board to our project.
The LCD shield is shown below:
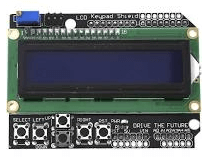
- The LCD shield is popularly designed for the classic boards such as Duemilanove, UNO, etc.
Bluetooth shield
- The Bluetooth shield can be used as a wireless module for transparent serial communication.
- It includes a serial Bluetooth module. D0 and D1 are the serial hardware ports in the Bluetooth shield, which can be used to communicate with the two serial ports (from D0 to D7) of the Arduino board.
- We can install Groves through the two serial ports of the Bluetooth shield called a Grove connector. One Grove connector is digital, while the other is analog.
The Bluetooth shield is shown below:
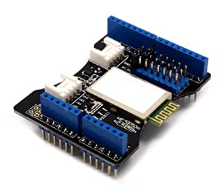
- The communication distance of the Bluetooth shield is upto 10m at home without any obstacle in between.
Capacitive Touchpad shield
- It has a touchpad interface that allows to integrate the Arduino board with the touch shield.
- The Capacitive touchpad shield consists of 12 sensitive touch buttons, which includes 3 electrode connections and 9 capacitive touch pads.
- The capacitive shield is shown below:
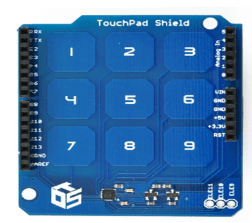
- The board can work with the logic level of 3.3V or 5V.
- We can establish a connection to the Arduino project by touching the shield.
|

 For Videos Join Our Youtube Channel: Join Now


