| |

Arduino ArrayWhat are Arrays?The arrays are defined as the data structures that allow multiple values to be grouped together in a simple way. This is an easily access method. The array is normally built from the data types like integer, reals, characters, and boolean. It refers to a named list of finite number (n) of similar data elements. The set of consecutive numbers usually represent the elements in the array, which are 0, 1, 2, 3, 4, 5, 6,.......n. For example, if the name of an array of 5 elements is AR, the elements will be referenced as shown below: Arrays in ArduinoThe array in Arduino is declared with the integer data type. It is also defined as the collection of variables, which is acquired with an index number. The array is represented as: 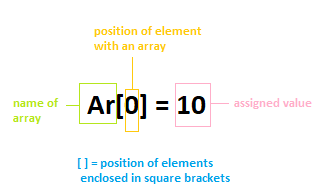
We can specify any name according to our choice. The array name is the individual name of an element. Array DeclarationThere are different methods to declare an array in Arduino, which are listed below:
For example,
For example,
Features of Array
For example,
int myarray[5 ] = { 1, 4, 6, 7 } ; can be written as int myarray[8 ] = { 1, 4, 6, 7 } ; But, it cannot be written as int myarray[ 2] = { 1, 4, 6, 7 } ; Let's understand with an example. Consider the below code in Arduino IDE. Let's specify the array as: int myarray[5 ] = { 1, 4, 6, 7 } ; The code will successfully compile, as shown below: 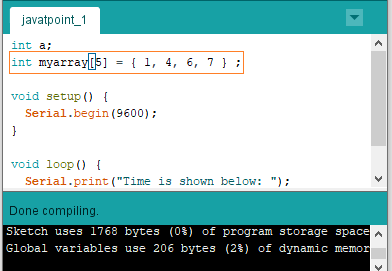
Now, if we specify the array as: int myarray[ 2] = { 1, 4, 6, 7 } ; The code will display errors, as shown below: 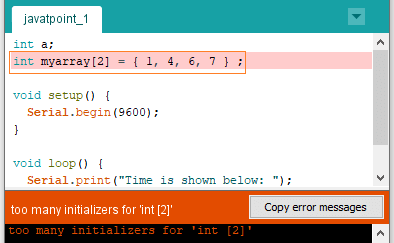
For example, Let's specify the array as char abc[8 ] = " Arduino"; 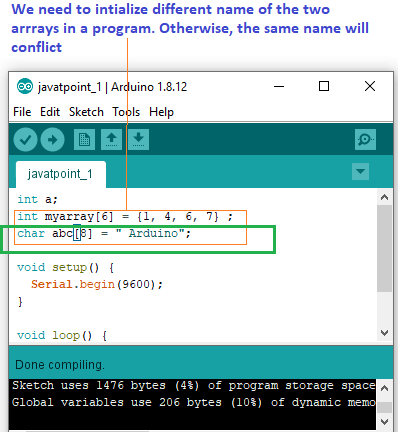
Access of array in ArduinoThe array in Arduino has zero index. It means that the first element of the array is indexed as 0. For example, Example 1: Let's take an array (ARarduino) of 6 elements. The elements of the array are shown below: ARarduino[0], ARarduino[1], ARarduino[2], ARarduino[3], ARarduino[4], and ARarduino[5]. The last element of the array is ARarduino[5]. The last element of the array will be n-1, where n is the declared size of an array. Consider the below code. Arithmetic operations on ArrayLet's understand the operations carried on the array. Example 1: Sum We can also calculate the sum of elements within an array. Let's consider an array (AR) with 4 elements. The elements are: AR[0], AR[1], AR[2], and AR[3]. To calculate the sum of the first two elements: The sum of values assigned to the elements within an array will be printed. Example 2: Division We will divide the value assigned to the element AR[4] with 2. The resulting value will be assigned to the variable 'z.' Consider the below code: The result will be printed. We need to be careful while assigning value to the array. The index number greater than the size of the array may yield invalid data. Such data is saved to random memory locations, which can cause the program malfunction or a difficult bug to find. Note: C++ does not check the legally bound size of the declared array, while JAVA and BASIC do check.The syntax to assign a value to an array is specified as: The syntax to retrieve a value from an array is specified as: Example of project: We will also discuss a project to light LED using arrays in the Basic projects -> Blinking various LEDs using Arrays. Loop ArraysWe can also use arrays inside the loop. For each element of an array, the loop counter acts as an index element for that array. Let's understand with an example. In this example, the element over the serial port will be printed. The code is given below: Code ExamplesLet's understand arrays with some examples. Example 1: Printing the sum of all elementsConsider the below code: Output Sum of total elements of an array: 150 In the above code, we have used the const variable. The compiler reserves the memory in Arduino. We need to use the const integer greater than zero. For detail- go to the URL Arduino Variables. Example 1: Average of the elements of an arrayConsider the below code: Output Average of the elements of the array: 40
Next TopicArduino Delay
|
 For Videos Join Our Youtube Channel: Join Now
Feedback
- Send your Feedback to [email protected]
Help Others, Please Share


