| |

Install Kubectl on UbuntuIntroduction to KubectlKubernetes offers a command-line tool to communicate with the control plane of the Kubernetes cluster with the help of the Kubernetes API. The tool is called kubectl. Kubectl finds a file that is known as config in the directory, i.e., $HOME/.kube for configuration. We can define other files of kubeconfig by setting the --kubeconfig flag or KUBECONFIG environment variable. From the point of view of a user, kubectl is our cockpit for controlling Kubernetes. It permits us to perform all possible operations of Kubernetes. From the point of view of a technical user, kubectl is the client for the Kubernetes API. The API is the actual user interface of Kubernetes. Kubernetes is completely controlled by this API. It means that all Kubernetes operations are disclosed as an API endpoint and could be run by an HTTP request to the endpoint. The primary aim of kubectl is to consequently implement HTTP requests for the Kubernetes API. Introduction to KubernetesKubernetes is a free container orchestration system to automate software deployment, management, and scaling. Originally, it was developed by Google and is now managed by the Cloud Native Computing Foundation. The title Kubernetes comes from Greek, meaning 'pilot' or 'helmsman'. Often, Kubernetes is called K8s, the result of the right letters between the s and the K. Concepts of KubernetesKubernetes specifies a group of primitives (building blocks) that collectively offer mechanisms that scale, maintain, and deploy applications that are based on custom metrics, memory, and CPU. Kubernetes is extensible and loosely coupled to meet several workloads. The containers, extensions, and internal components that execute on Kubernetes depend on the Kubernetes API. Kubernetes follows the replica/primary architecture. The elements of Kubernetes can be categorized into those that maintain an individual node and the components of the control panel. Control panelThe master node of Kubernetes manages the cluster's Kubernetes control panel, handling its workload and regulating communication around the system. The control panel of Kubernetes is composed of several components, all its processes, that can execute both on multiple masters of an individual master node. Several Kubernetes control panel components are below:
NodesA node is also called a minion or a worker. It is a machine in which containers are deployed. In the cluster, all nodes must execute a container runtime, like containerd, and the following components:
Why do we need kubectl?Our Kubernetes platform is a composed system with worker and master nodes. One way to negotiate with it is by its API server. The server is the primary component of the control plane of Kubernetes, and it represents an HTTP REST API that allows communication between every external component, cluster, and user. The API is treated as the primary user interface and frontend for our Kubernetes platform. Managing, querying, and updating the state of the objects and resources on our Kubernetes platform are each done with the Kubernetes API using interactions with client libraries, kubectl, or by directly building REST requests. Kubectl is one of the most general ways to build HTTP requests on the Kubernetes API, and it is used to execute Kubernetes operations, set up containerized applications, check and maintain resources in our cluster, view the system logs, and perform monitoring operations. Kubectl AuthenticationTwo common techniques are available to authenticate with kubectl in production or regular environments. The two techniques are bearer tokens (OIDC tokens and service account tokens) and client certificates (Enterprise PKI Certs and Self-Signed Kubernetes Certs).
Common use cases of kubectlKubectl can generally be used to start up or perform every Kubernetes operation. But there are a few mostly used functionalities to query and manage the health of our Kubernetes cluster. Describing and listing resources is one of the functionalities. We need to inspect the state of the resources and remember the count of resources running actively at a time point as more resources are produced.
Kubernetes StateKubernetes actively checks the health of the objects, whether pods, deployments, and containers. The control panel of Kubernetes contains records of the state and configuration of every Kubernetes object of the cluster. On the other hand, the controller manager looks at the differences between the actual state and desired state and operates to improve them.
Debugging the state of our objects is important if operating in a team. Resources built by another user could restrict the performance of our resources. Our built resources can be stuck on Waiting, Pending, or fail due to the assets required for its establishment are in use currently in space-limited clusters. We can use the kubectl debug and kubectl logs to understand the state of our object and dig into several failure reasons. Kubectl ConfigKubectl is a CLI (command line interface) to interact with Kubernetes. We can use it for managing Kubernetes resources, including deployments, services, and pods. The config file of kubectl is a configuration file that saves every information crucial for interacting with the Kubernetes cluster. It includes the below information:
Syntax of kubectlWe can use the below syntax to run the commands of kubectl from our terminal: Explanation: Command- It describes the operation that we wish to implement on multiple resources. For instance, create, describe, delete, get, etc. TYPE- It describes the type of the resource. These types of resources are case-insensitive and we can define the abbreviated, singular, or plural forms. For instance, the below commands generate the same result: NAME- It describes the resource name. The names of the resource are case-sensitive. Details for every resource are shown if a name is missing. For instance, kubectl get pods. We can define all resources by name and type or define multiple files when implementing an operation on one or more resources:
For example, kubectl get pod/example-pod1 replicationcontroller/example-rc1
For group resources when they're all of the similar types: For example, kubectl get pod example-pod1 example-pod2 flags- It describes optional flags. For instance, we can use the --server or -s flags for specifying the port and address of the Kubernetes API server. Note: Flags override the related environment variables and default values that we define from the command line.Namespace overrides and in-cluster authenticationFirst of all, kubectl will by default determine if it's running in a pod, and hence in a cluster. It begins by inspecting the environment variables, i.e., KUBERNETES_SERVICE_PORT and KUBERNETES_SERVICE_HOST, and the presence of a service account token file over /var/run/secrets/kubernetes.io.serviceaccount/token. In-cluster authentication is pretended if each three is found. For maintaining backward compatibility, when the environment variable, i.e., POD_NAMESPACE is set at the time of in-cluster authentication, then it would override the namespace (default) from a service account token. The tools or manifests depending on the defaulting of the namespace will be impacted by it. POD_NAMESPACE environment variable. On namespace resources, cli operations will default to the value of a variable if the environment variable is set. How kubectl managed tokens of ServiceAccountIf:
We do not specify any namespace explicitly on the command line of kubectl Then, kubectl pretends it's running in our cluster. The tool, i.e., kubectl finds a namespace of the ServiceAccount (it is similar to the pad namespace) and operates against the namespace. It is distinct from what's outside happens to the cluster. The command of kubectl operates against the namespace (default) if kubectl outside runs a cluster and we don't define a namespace. Operations of kubectlThe following are some operations of kubectl along with their syntax and description: 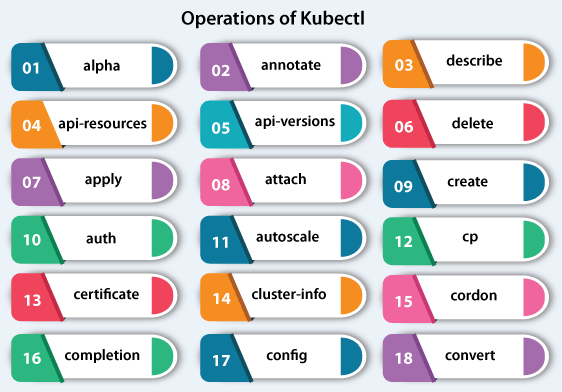
alpha- It lists the present commands that are related to the features of alpha that are not activated by default in the Kubernetes cluster. Syntax: annotate- It updates or adds the annotations of multiple resources. Syntax: api-resources- It lists the resources of API that are present. Syntax: api-versions- It lists the versions of API that are present. Syntax: apply- It applies the change of a configuration to a resource using a stdin or file. Syntax: attach- It attaches to an active container either to interact with the stdin (container) or view the final stream. Syntax: auth- Inspect authorization. Syntax: autoscale- It automatically scales the group of pods that are handled by a replication controller. Syntax: certificate- Change certificate resources. Syntax: cluster-info- It shows the information of the endpoint about the services and master in the cluster. Syntax: completion- Final code of shell completion for the described shell (zsh or bash). Syntax: config- It changes kubeconfig files. Syntax: convert- It transforms config files between distinct API versions. Both JSON and YAML formats are accepted. Important: It needs a plugin, i.e., kubectl-convert to be installed. Syntax: cordon- It marks the node as unscheduled. Syntax: cp- It copies directories and files from and to containers. Syntax: create- It create multiple resources from a stdin or file. Syntax: delete- It deletes resources either through a stdin, file, or specifying label names, selectors, resources, or resource selectors. Syntax: describe- It shows the detailed state of multiple resources. Syntax: diff- Diff file or stdin against live configuration. Syntax: Install kubectl on UbuntuKubectl is a tool that is open-source and essential in container orchestration. Kubernetes operates by managing and orchestrating clusters at scale around several cloud environments or on-premise servers. Clusters are a group of hosts meant to run containerized services and applications. A cluster requires a minimum of two different nodes to operate- one worker node and a master node. We have an option for expanding the cluster with as various worker nodes as needed keeping scalability in mind. In Kubernetes, a node refers to the server. A server is a master node that handles the cluster state. The worker nodes are the servers that execute the workloads- typically, these are containerized services and applications. PrerequisitesWe will need to arrange two servers, executing on the Ubuntu system. For Kubernetes, the minimum requirement of the system is 2 CPUs and 2 GB RAM for the best performance. One server will be a master node, then another one will be a worker node.
Enable snaps and install kubectlA snap is the applications packaged with each of their dependency to execute on every famous Linux distro from an individual build. Automatically, they gracefully update and rollback. Snaps are installable and discoverable from the Snap Store and the app store along with millions of audiences. Enable snapdIf we are running Focal Fossa (Ubuntu 20.04), Bionic Beaver (Ubuntu 18.04), and Xenial Xerus (Ubuntu 16.04), we don't require to do anything. A snap is installed and ready to proceed. For Ubuntu versions between Wily Werewolf (Ubuntu 15.10) and Trusty Tahr (Ubuntu 14.04 LTS), as well as flavors of Ubuntu that by default do not include snap, snap could be installed using the Ubuntu Software Center by finding for snapd. Snapd could be alternatively installed with the help of the command-line: 
Either back in and log out, or restart our system, to ensure the paths of snap are correctly updated. Installing kubectlWe can simply run the following command for installing kubectl: 
Uninstalling KubectlWe can remove or uninstall kubectl by using the following command in the terminal window: 
Next TopicTLP Ubuntu
|
 For Videos Join Our Youtube Channel: Join Now
Feedback
- Send your Feedback to [email protected]
Help Others, Please Share


