| |

Unetbootin UbuntuUnetbootin stands for Universal Netboot Installer. It can be described as a cross-platform utility that can make live USB systems and load a range of system utilities or install several distributions of Linux and other OSes without a CD. Unetbootin does not erase a file because it does not have the ability for formatting our external hard drive or USB flash drive devices. The primary request of Unetbootin is that is the easiest selection of software for several applications that might seem difficult to beginners. Modes of Unetbootin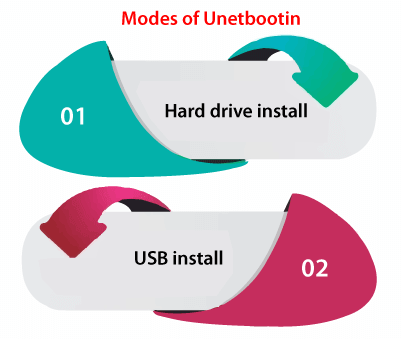
Hard drive installHard drive installation mode implements a "frugal" install or network installation without any CD, the same as that implemented by the Win32-Loader. Some distinguishing features of Unetbootin are its support for a wide range of Linux distros, its portability, its capability for loading custom disk image (also ISO image) files, and its support for both Linux and Windows. Unetbootin installs into a partition, not inside a disk image the same as the Win32-Loader and Unlike Wubi. Thus, making a dual-boot setup between Windows and Linux. USB installUSB installation mode establishes bootable USB Hard Disk Drives and bootable USB flash drives. It is the creator of Live USB.
Note: More than one install on a similar device is not supported.Making a standard and full hard disk install if we can't utilize a Live USB Let's first differentiate between two isolated kinds of distributions:
These distributions tend to be minor distributions like DSL, Puppy Linux, SliTaz, and Parted Magic. Some distributions, such as PCLinuxOS, also contain an option, i.e., copy2ram boot that will enable them to behave like this. The netboot installers of Debian and Ubuntu also run from RAM entirely (but the standard server, desktop, and alternate installers don't). Re-partitioning with Parted MagicWe need to first start Unetbootin and use the install mode, i.e., Hard Disk for installing Parted Magic. Restart and choose the option, i.e., Unetbootin boot for booting into the Parted Magic. Then, we need to run the partitioner using Parted Magic and shrink our Windows partition (resize instead of removing our Windows partition even if we do not wish to dual-boot because we will require something for Unetbootin to execute from; we can remove it later). We will now have some space for Linux; leave it as it is because almost all user-friendly installers (like Fedora and Ubuntu's) will automatically make partitions appropriately in the space. Creating a frugal install of our installerWe need to boot back into the Windows systems and again run Unetbootin. It will prompt us for uninstalling Parted Magic and say yes. Then, start Unetbootin, using the install mode, i.e., Hard Disk again, and send the ISO file we want to install (like Ubuntu Desktop ISO). Again, reboot and choose the option, i.e., Unetbootin boot for booting into the live environment of our frugal install. Performing the real install with the live environmentNow that we are booted into our live environment, run the installer (on Fedora and Ubuntu, it is an icon over the desktop). Go from the steps as usual, but if we get to the partitioning stage, ensure that it is using the space that we set for Linux previously instead of trying to resize the partitions. Cleaning upNow that we have a standard and full install, we can remove the frugal install we used for launching the installer from; only boot Windows and delete Unetbootin. What can we use Unetbootin for?With CD-ROM and CD drives continuing to depart from everyday life, installing an operating system quickly through a USB drive is without any doubt the easiest approach. It is however also possible to house a fully functional operating system over a USB drive that is based on the principles of a Live-CD.
Geza Kovacs introduced the Unetbootin concept in April 2017. Quickly, it became a must-have result for Linux users and computer technicians everywhere. We however should consider that it'll permit the commercial OS installation (including Windows with others) which is efficiently illegal, given the user has not paid for their license. Hence, Unetbootin makes it feasible for creating legitimate toolkits by having a complete variety of functional operating systems (for trying an attempt of software repair without data loss) or systems anticipated to be installed. The age of the CD is gone. Everything is now provided by a small USB drive that is providing increased storage space amounts. It is indeed fair to say that Unetbootin permits us to install the freeware Windows version. Discovering several operating systemsOne of the best benefits of using Unetbootin is that it permits to automatically install the bootable drives along with a completely functional Linux System despite its simplicity, once known as a handy Live-CDs of the time. We will get a great range of potential versions of the Linux releases for choosing from, that Unetbootin will download for us. The support of integrated Linux versions is quite impressive. The complete list contains: 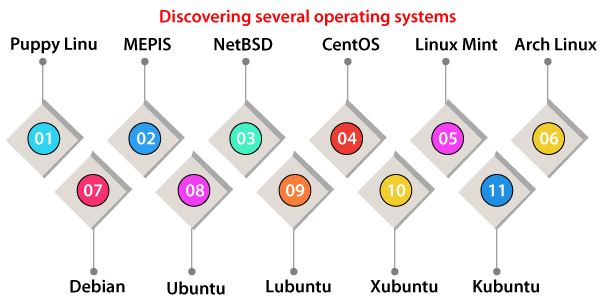
For computer experts and those seeking a solution to troubleshooting Unetbootin permits us to load the repair system utilities containing:
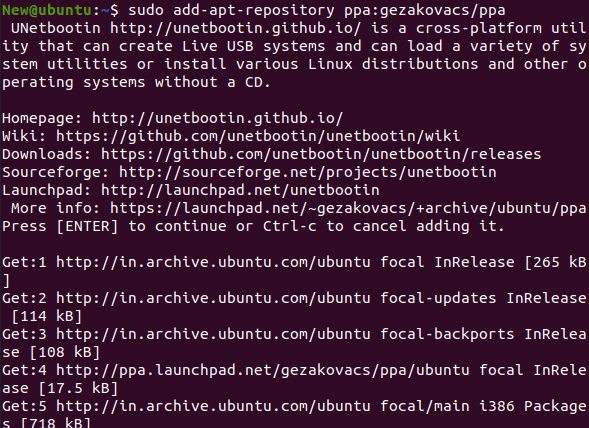
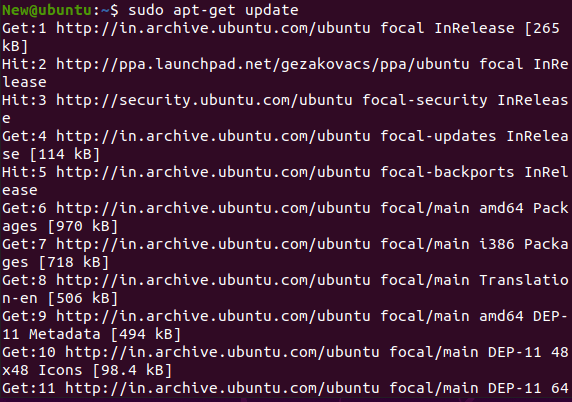
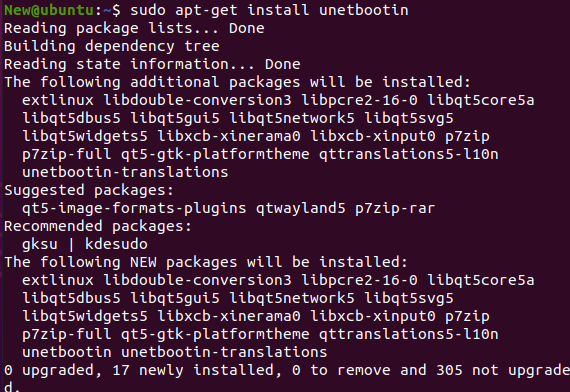
Note: A few computer software for troubleshooting still uses CDs, while Unetbootin prefers a simpler approach with a USB drive use. The only disadvantage of a USB drive is that we cannot install more than one system.As such, we will need to make a small set of bootable USB drives for ensuring that we are set for the consequences. Installing Unetbootin on UbuntuUnetbootin has been present for Ubuntu for a very long time and it has been the must-have app to flash the USB drive with an ISO image. First, we need to download an iso file and flash it using the other applications. We can do the exact thing with Unetbootin but the primary aspect is very spicy. We can select the Linux distribution version as we want and Unetbootin will download the ISO image automatically into a USB drive for us. In this article, we will explain the same way we can download in install Unetbootin on the Ubuntu desktop. Installation ProcessOn Ubuntu, the installation process of Unetbootin is very straightforward. First, we need to add the Unetbootin PPA and then begin installing it. Here are some steps for installing Unetbootin in Ubuntu:
Working of UnetbootinThe functioning of Unetbootin is divided into 3 parts: download, extract files, and install the bootloader. 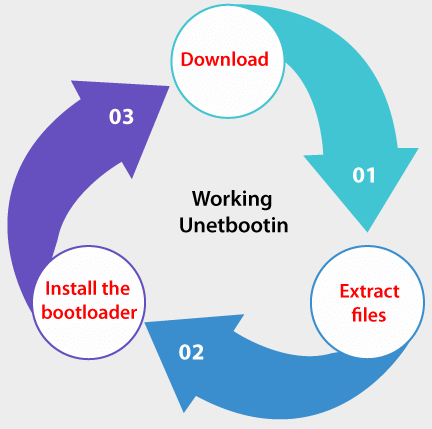
DownloadUnetbootin supports FTP and HTTPS as the sources of the download. A redirector URL is usually used, or a regexp is used over directory listings on the mirror sites for ensuring that the latest version of the distribution is downloaded. Download resuming has not been yet done. Extract filesWhat appears at the time of this part differs relying on the type of the disk image (floppy disk or ISO file image). Floppy disk files The describe the IMG file is copied to the /ubninit directory and memdisk is copied to the /ubnkern directory. Memdisk will load this IMG file into memory and start from it upon bootup. ISO files 7-zip is used for extracting files using the ISO file to the objective drive. Heuristics, based on the name and size of the file, are then used for locating initrd and kernel files. These are positioned in the /ubninit and /ubnkern directories. Boot configuration files (such as menu.lst, extlinux.conf, isolinux.cfg, and syslinux.cfg) are then read for determining the boot options that require to be used and addresses of other initrd and kernel files. Install the BootloaderWhat appears at the time of this part differs relying on whether Frugal (Hard Disk) install mode or USB drive install mode is used. Frugal (Hard Disk) install mode Unetbootin changes boot.ini on Windows or applies bcdedit for adding an option of boot menu titled Unetbootin. It loads a bootloader, i.e., GRUB4DOS which is installed at the /ubnldr.mbr and /ubnldr directories, and it, in turn, reads the entries of the boot menu from the /unetbtin/menu.lst directory. The installation file, i.e., .exe is copied to the /unetbtin.exe directory and it is included in autorun under the next boot up. It will uninstall Unetbootin by removing the extracted files when run and deleting the boot menu entry of Unetbootin. The grub.cfg and menu.lst directories are changed for adding the Unetbootin entry on Linux. The available config file has been backed up to the grub.cfg.bak and menu.lst.bak directories. When Unetbootin is again executed, the uninstaller is executed. It will remove the extracted files and restore the boot configuration files that are previously backed up. USB drive install mode Unetbootin produces a correct syslinux config file in the /syslinux.cfg directory for the mode of the Live USB creation, and makes our USB drive bootable with syslinux. If extlinux has been installed and the USB drive is ext3 or ext2 on Linux then extlinux is used rather; the config file has been installed in the /extlinux.conf directory. Also, the partition to which it is installed is marked as active.
Next TopicVirtualBox Full Screen Ubuntu
|
 For Videos Join Our Youtube Channel: Join Now
Feedback
- Send your Feedback to [email protected]
Help Others, Please Share


