| |
Python Tutorial
Python OOPs
Python MySQL
Python MongoDB
Python SQLite
Python Questions
Plotly
Python Tkinter (GUI)
Python Web Blocker
Python MCQ
Related Tutorials
Python Programs

APSchedular Python ExampleYou can schedule your Python code to run later, either once or often, using the Advanced Python Scheduler (APScheduler) Python package. You have the flexibility to add new tasks and remove old ones on demand. Your jobs will endure scheduler restarts and keep their status if you put them in a database. All the tasks that were supposed to be completed while the scheduler was down will be completed once it is restarted. One of APScheduler's key benefits is that it can be used on several platforms and can take the place of the Windows Task Scheduler or the cron daemon. Furthermore, it is being developed at the time of writing. APScheduler Provides These Three Standard Timekeeping Methods:
Setup:The installation procedure is really basic and easy to follow. Because apscheduler is a built-in package, you should already have it. Let's give it a shot, and if the package isn't already installed, let's install it. Run the following command after activating your virtual environment: If there isn't any output, don't get alarmed; it simply implies the package wasn't installed. Installing it is simple if we carry out the following: Basic API:In order to make this lesson brief and straightforward, I'll simply cover two of the four major components of APScheduler:
The key element you'll utilize to add or remove jobs is the scheduler. Most use cases won't require more than one scheduler. Depending on the programming environment, many scheduler types are incorporated into the modules. For Example: BlockingScheduler, AsyncIOScheduler, TornadoScheduler, QtScheduler, etc. For this lesson, we'll use the BackgroundScheduler because we wanted the task to execute in the background of a Flask server. The trigger component, which houses the scheduling logic, comes next. Each time you add a job to the scheduler; you must define the trigger that specifies when it should be run next. There is three built-in triggers in APScheduler:
Later on, We'll use both the interval and cron triggers to show how they differ from one another. Let's look at how to write three lines of code to construct our own task-scheduling jobs. First Line: ImportDepending on the scheduler we plan to utilize, we must import the required component. We'll import the BackgroundScheduler in this instance. Second Line: SchedulerThe daemon parameter should be set to True when creating a BackgroundScheduler. By doing this, we can kill the thread when we quit the Flask program. Third Line: Add a jobThe add_job function will be used to add a job to the scheduler. There are three main configuration able parameters.
Take a look at the following line of code, which updates the scheduler's list of available jobs every five seconds. Line Four: Start the Scheduler:After finishing the settings, use the following line to launch the scheduler: You should be able to see the following output if you execute the code in a Python shell: 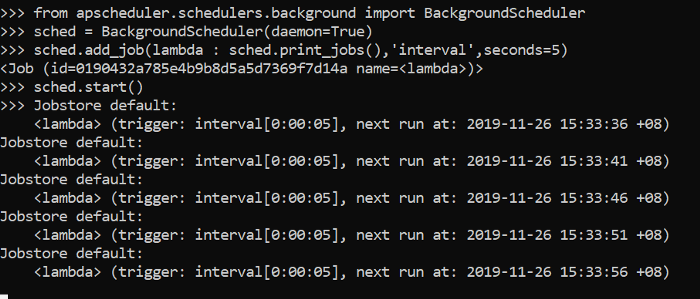
If you pressed Ctrl-C to cancel the KeyboardInterrupt, the scheduler will keep running until you press Ctrl-Z to leave Python Shell or use the shutdown function. Integration with Flask The APScheduler may be simply integrated into Flask without any problems. Create a new Python file called test.py to test it out. Import Job Function: Instead of using an anonymous function this time, we'll utilise a real function. In the newly formed sensor function, enter the following code. The count variable is only being used as an example to show how many jobs we have planned thus far. Scheduler: With the exception of using a cron trigger rather than an interval, we'll define the scheduler in the same manner as in the previous phases. Instead, we'll specify the minute option so that the operation runs once every minute. The asterisk symbol is applied in this situation. If you give it a value of 5, it will be invoked once every hour at the five-minute point. The args argument can be used to pass in parameters when adding a function that has them. It will accept a tuple or list. Say that the previous function we used had two arguments. The add job function can be called as follows: Flask The remaining task is to define the required function that runs the Flask server. Move the directory to the test.py file's location in the console after opening it. Run the command line: The sensor function can be readily changed to carry out the duty you desire. Examples comprise:
A variety of use cases can be accomplished with just a few lines of code. Trigger Examples:You will be given a few examples in this part to show you how to customize the trigger according to your requirements. Interval:Some of the most helpful configuration options include the following:
The following code will cause it to run once every two hours: To guarantee that the jobs only execute between the start and finish timestamps, you can use the start and end arguments. Cron:To guarantee that the jobs only execute between the start and finish timestamps, you can use the start and end arguments. Because it provides more setup choices, the cron trigger is significantly more involved.
The parameters, unlike the interval trigger, don't have as at the end and take input in the form of either a string or an int. The following expressions are acceptable for use in the string input fields from year to the second. Schedule the job to run at "2 a.m., 3 a.m., 4 a.m., and 5 a.m." on every third Friday of "February, March, April, November, and December": Schedule to run the task on the last Sunday of every month: Schedule to run the task on every hour: Combine Triggers:Depending on your use cases, AndTrigger and OrTrigger can be used to combine the triggers if a situation calls for it. Schedule the job to run every three hours (just on Monday and Tuesday): ConclusionInstalling the APScheduler module was our first step. Then, the scheduler and trigger, two of the module's fundamental parts, were thoroughly examined. We also put the scheduler's four-line Python Shell implementation to the test. The following step is to include it into a basic Flask server. Instead of using an anonymous function, we used a real function. Following that, we learned about a few examples of configuring the trigger component's arguments. We may also mix the interval and cron triggers using AndTrigger and OrTrigger.
Next TopicOserror Python
|
 For Videos Join Our Youtube Channel: Join Now
Feedback
- Send your Feedback to [email protected]
Help Others, Please Share


