| |
Python Tutorial
Python OOPs
Python MySQL
Python MongoDB
Python SQLite
Python Questions
Plotly
Python Tkinter (GUI)
Python Web Blocker
Python MCQ
Related Tutorials
Python Programs

Object Recognition using PythonObject Recognition is a technology that lies under the broader domain of Computer Vision. This technology is capable of identifying objects that exist in images and videos and tracking them. Object Recognition also known as Object Detection, has various applications like face recognition, vehicle recognition, pedestrian counting, self-driving vehicles, security systems, and a lot more. The two significant objectives of object recognition involve:
In the following tutorial, we will understand how to perform Object Recognition in the Python programming language using the ImageAI library. We will create a basic object recognition model using the ImageAI library in Python by the end of this tutorial. So, let's get begun. Deep Learning for Object RecognitionTechniques of Deep learning have been shown state of the art for different problems related to Object Recognition. Some of the generally used approaches of deep learning for object recognition are as follows:
However, in this tutorial, we will understand what ImageAI is and how we can use it in performing Object Recognition. Understanding the ImageAI libraryPython offers a library built to empower programmers and developers for building applications and systems with self-contained deep learning and Computer Vision capabilities with the help of some lines of simple coding script. ImageAI consists of Python implementation of nearly all state-of-the-art deep learning algorithms such as RetinaNet, YOLOv3, and TinyYOLOv3. ImageAI makes use of several APIs that work offline - it has object detection, video detection, and object tracking APIs that can be called without accessing the Internet. ImageAI uses a pre-trained model and can easily be customized. The ObjectDetection class of the ImageAI library consists of methods in order to perform object detection on any image or set of images with the help of pre-trained models. With ImageAI, we can detect and recognize eighty distinct types of common, everyday objects. Setting up the EnvironmentIn this section of the tutorial, we will consider working through the installation of required libraries, including ImageAI. In order to utilize ImageAI, we have to install some dependencies. The initial step is to have Python installed on the system. We can download and install Python 3 from Python's official website: https://www.python.org/. Once we have installed Python on the system successfully, we have to install the following dependencies with the help of the pip installer:
The installation command for the same is shown below: Syntax: Now we have to download the TinyYOLOv3 model file containing the classification method that we will use for object recognition. The link for the same can be found below: https://github.com/OlafenwaMoses/ImageAI/releases/download/1.0/yolo-tiny.h5 Performing Object Recognition using ImageAIIn this section, we will discuss how we can utilize the ImageAI library in Python. The procedure of performing Object Recognition is divided into several steps for better understanding and clarity. Step 1The initial step is to create the necessary folders. For this tutorial, we will need the folders as shown below:
Once we created the necessary folder, the Object Recognition folder should have the following sub-folders: Step 2For the second step, we will open the preferred text editor, which is Visual Studio Code, in this case, to write a Python script and create a new file recognizer.py Step 3Now, let us begin importing ObjectDetection class from the ImageAI library. The syntax for the same is shown below: File: recognizer.py Step 4Now that the required ImageAI library is imported and the ObjectDetection class, the next thing is to create an instance of the class ObjectDetection. Let us consider the following snippet of code for the same. File: recognizer.py Step 5Let us specify the path from the model, input image, and output image using the following snippet of code. File: recognizer.py Step 6Once, we instantiated the ObjectDetection class we can now call different functions from the class. The class consists of the following functions in order to call pre-trained models:
For this tutorial's purpose, we will utilize the pre-trained TinyYOLOv3 model, and thus, we will be using the setModelTypeAsTinyYOLOv3() function in order to load the model. Let us consider the following snippet of code for the same: File: recognizer.py Step 7Now, we will be going to call the function setModelPath(). This function will accept a string that consists of the path to the pre-trained model. Let us consider the following snippet of code for the same: File: recognizer.py Step 8In this step, we will call the loadModel() function from the recognizer instance. This function will load the model from the path specified above with the help of the setModelPath() class method. Let us consider the following snippet of code for the same. File: recognizer.py Step 9We have to call the detectObjectsFromImage() function with the help of the recognizer object that we created earlier. This function accepts two parameters: input_image and output_image_path. The input_image parameter is the path where the image we recognise is situated, whereas the output_image_path parameter is the path storing the image with detected objects. This function will return a diction containing the names and percentage probabilities of every object detected in the image. The syntax for the same is shown below: File: recognizer.py Step 10At last, we can access the dictionary elements by iterating through each element present in the dictionary. The syntax for the same is shown below: File: recognizer.py Complete Python script for Object Recognition modelLet us consider the following script for the Object Recognition model. File: recognizer.py Output: car : 88.85036110877991 car : 85.83406209945679 bus : 70.04978060722351 car : 80.88288903236389 car : 55.334705114364624 person : 61.084866523742676 car : 68.46083402633667 person : 56.165677309036255 person : 71.58655524253845 car : 59.49597954750061 person : 55.276620388031006 person : 69.08922791481018 person : 59.92640256881714 car : 82.73208141326904 person : 54.69227433204651 person : 67.25137233734131 car : 68.9003050327301 person : 77.32996344566345 person : 53.02640199661255 person : 81.33729696273804 person : 83.60849618911743 person : 50.34937262535095 Actual Image: 
Image after Object Recognition: 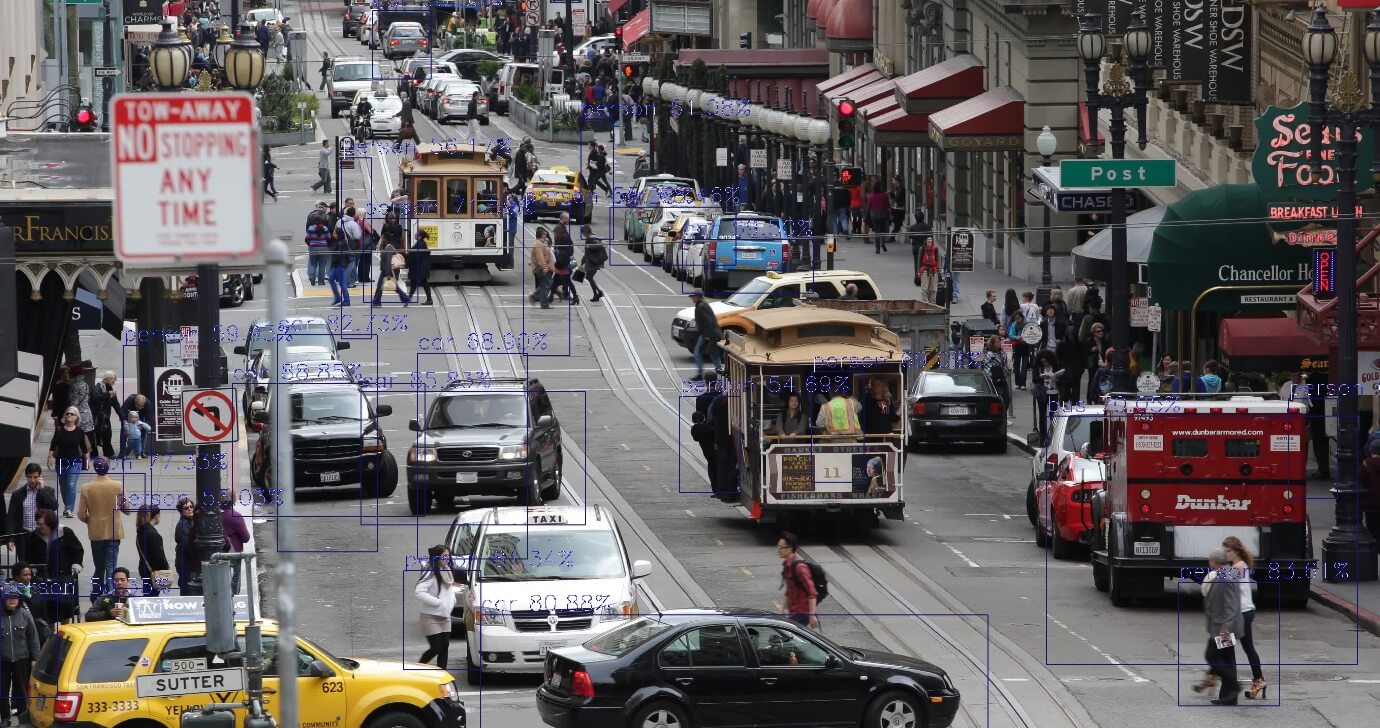
At last, we can observe that ImageAI has successfully identified cars and persons in the image.
Next TopicPython VLC module
|
 For Videos Join Our Youtube Channel: Join Now
Feedback
- Send your Feedback to [email protected]
Help Others, Please Share


