| |
Python Tutorial
Python OOPs
Python MySQL
Python MongoDB
Python SQLite
Python Questions
Plotly
Python Tkinter (GUI)
Python Web Blocker
Python MCQ
Related Tutorials
Python Programs

Python Nmap ModuleWe all know about what ports are and how they are associated with URLs, but many of us may not have ever heard about the port scanner. Basically, the port scanner is an application that is designed for probing a host or server connected with the particular port, and it is used for servers and hosts of open ports. From the last line, we can also conclude that we cannot use port scanner applications on closed ports without their special permission, and it is illegal to perform scanning of closed ports without permission. Port scanners are usually used by administrative officials to verify the security policies of their own networks to check how these networks will identify attackers or various threats. Note: Open ports are the ports that do not require special permission from the host to inspect their server or port using a port scanner.Python is a diversified programming language which means we can see applications of Python language in almost every field and task associated with technology. Therefore, a question that will surely come to our mind is that is it possible that we can build a port scanner using Python and one more question, which is can we build a port scanner by ourselves. We can build our own port scanner application, and we can do this even using a Python program. Yes, it is absolutely true that we can build a port scanner application using a Python program, and we can even scan multiple ports using the application we built. Python provides us with modules that we can use in a Python program to build port scanners. One of such modules that we can find in Python is the nmap-python module, and it is used to build port scanners. We are going to learn about the Nmap module in this article, and we will build our own port scanner by using this module in a Python program. Nmap Module in PythonNmap Module, whose actual name is nmap-python Module, is an open-source Python module that helps us achieve the task of port scanning by creating a port scanner using the Python program. By using this Nmap Module in a Python program, we can build a port scanner, and when we run the program, the port scanner will automatically inspect the port ranges we defined inside the program. Nmap: A free and open-source network scanning tool that is used to create port scanners for performing inspection of multiple ports is known as Nmap. Nmap Module: InstallationPython Nmap Module is not an inbuilt module in Python, and if we want to create a port scanner using this module in Python, we have first to install it in our system. There are multiple ways through which we can install this Nmap Module in our system, but we will prefer to use the pip installer to achieve this task. Therefore, we will use the pip installer from the command prompt terminal to install the Nmap Module in our device so that we can import it into a Python program. We will use the following pip installer command in the command prompt terminal of our device so that we can install Nmap Module in our system: After writing the command in the shell as we did, we have to press the enter key to start the installation process and have to wait for a while until the installation process is complete. 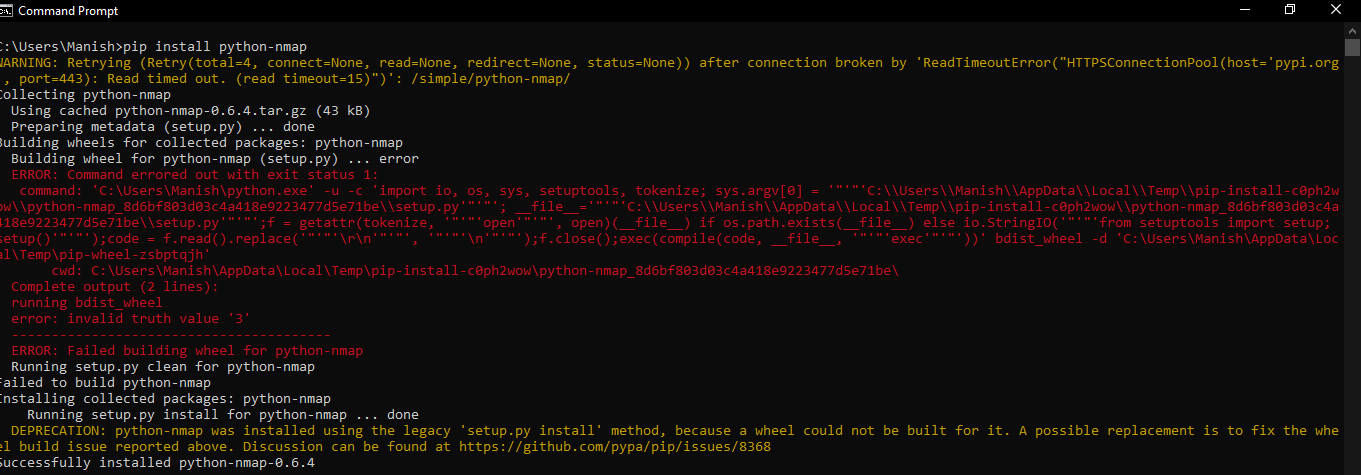
We can see that now installation process of the Nmap Module is completed, and it is successfully installed in our system. We can now use Nmap Module and its function inside a Python program by importing this module into the program. Nmap Module: ImplementationWe will now use this Nmap Module in a Python program, and with the help of functions provided in this module, we will create a port scanner using the program. As we have already learned that doing port scanning of closed ports without permission is illegal, therefore we will use the port scanner by choosing localhost (127.0.0.1) as our target. In this example Python program, we will give the range in the port scanner, and the program will tell us which port in the given range is open and which port is closed. Example: Look at the following example Python program where we have used Nmap Module to perform port scanning of localhost (127.0.0.1): Output: The port 70 number in the range is closed. The port 71 number in the range is closed. The port 72 number in the range is closed. The port 73 number in the range is closed. The port 74 number in the range is closed. The port 75 number in the range is closed. The port 76 number in the range is closed. The port 77 number in the range is closed. The port 78 number in the range is closed. The port 79 number in the range is closed. The port 80 number in the range is closed. The port 81 number in the range is closed. The port 82 number in the range is closed. The port 83 number in the range is closed. The port 84 number in the range is closed. The port 85 number in the range is closed. The port 86 number in the range is closed. The port 87 number in the range is closed. The port 88 number in the range is closed. The port 89 number in the range is closed. The port 90 number in the range is closed. Explanation: We have first imported the Nmap Module into our program so that we can use the port scanner and other functions in the program. After that, we have defined the range which we will scan each port to check whether the port (from the range) is closed or open, and we will do this with every port present in the range. After that, we have defined the target host for performing the inspection, and we initialized the 'targetHost' variable to open the local host in it. Then, we used the portscanner() function from the Nmap Module to initialize a scanner variable which we will use to scan the target host later. After that, we used a for loop so that we could loop over each port given in the range and check if it is closed or open. Inside the for loop, first, we have initialized a 'resultant' variable where we scanned the target host using the scanner variable we initialized previously. After that, in for loop, we again called the resultant variable to store the result whether the port is closed or open, and we used the dictionary that contains multiple variables to produce the result. In last, we used the print statement to print the result for each port from the range. This for loop will continue until it reaches the ending point of the range, and then the program will be completely executed. In the output, we can even see that the result is separately printed for each port to check if the port is closed or open. That's how we can use the Nmap Module in a Python program to create a port scanner and scan multiple ports with it. Note: To successfully run the program which we are going to discuss in this article, we have to install the nmap tool in our system, and if we want to install this tool in our system, we have to refer to the official website of the nmap tool. From the official website, we can download the setup file for the nmap tool and then we can install the nmap tool in our system to run the program discussed in this article successfully.
Next TopicPython PyLab Module
|
 For Videos Join Our Youtube Channel: Join Now
Feedback
- Send your Feedback to [email protected]
Help Others, Please Share


