| |

Webcam Motion Detector in PythonWe all can see that now we can perform multiple actions sitting at our home for which we had to run around many offices back then. Some of these tasks were performed using a webcam, like for the purpose of official documents, for online exams, for online proctoring, and many other tasks. Now, every laptop comes embedded with a camera; thus, giving us the option to perform all these tasks from sitting at our home. This feature enabled us to perform all these tasks without any hustle and without worrying about running from here to there. Apart from these benefits, the webcam feature also provides us the convenience of sitting at home and saves our time. In today's time, we can perform multiple actions using the webcam feature of our system, and we can utilize it to develop multiple projects, which we were unable to do back then. Today we can do many developments and programming-related work where we have to use the webcam and develop many projects using this feature of our system. One of the most popular webcams uses a webcam as the motion detector sensor to sense the motion from a particular area. We can use the webcam of our system as a motion detector and use it to perform several actions where the use of a motion detector is required. The use of a webcam as a motion detector is very popular now, and one can use this feature sitting from their home too. Yes, it is true that we can convert our webcam into a motion detector and all that by ourselves. There are many options that we can use to convert our system's webcam into a motion detector sense and use it while performing several tasks that require a motion detector. Many programming languages also provide us the option to convert our system's webcam into a motion detector sensor. We can use the library functions of these programming languages to write a program that will use the webcam of our system as a motion detector when executed. Python is one such programming language that provides us with this option of converting or using our system's webcam as a motion detector. We have multiple libraries in Python that have plenty of useful functions, and we can use these functions to write a program that, when executed, will use the webcam of our system as a motion detector sensor and use it to perform several tasks that require the use of motion detector. We can write a Python program by using the functions of many modules or libraries (specially designed for development purposes), and when we execute the program, our system's webcam will be used as a motion detector. Therefore, in this tutorial, we will learn how we can use Python libraries and their functions to write a program that, when executed, will use our system's webcam as a motion detector. We will also learn the program's working, which we will design in this tutorial. Introduction to using Python to Create Webcam Motion DetectorAs we all know, Python is one of the most powerful programming languages, and that's why it is extensively used in almost every field in today's time. Python is one of those programming languages that have very rich libraries, and the functions of these libraries are very useful for us to perform many tasks. Python always has a library or set of libraries for us for any programming or development-related work we want to do. Therefore, Python is considered one of the strongest programming languages having functions and libraries for every development-related work we want to do. As we already talked about, the webcam feature has enabled us to perform many tasks sitting at our home for which we had to run from here to there back then; Python has several libraries that have functions that work with our system's webcam. Using our system's webcam like a motion detector is also possible by using functions of such libraries of Python. Therefore, we will use some such Python libraries and their functions to work with our system's webcam and use it as a motion detector. We will write a Python program here using these libraries and their functions, and when we run this program, it will use our system's webcam as a motion detector until we exit from the program. In the later parts of this tutorial, we will design such a program that we have discussed above, understand the working of it, and learn how we can use our system's webcam as a motion detector. But first, we will learn the requirements of this project and what are dependencies are required to design such a program. Using Python to Create Webcam Motion Detector: Installing DependenciesWe have already talked about libraries of Python, which are useful for us to work with our system's webcam. Here, in this part, we will discuss only those Python libraries or modules whose functions are required to design a Python program for using our system's webcam as a motion detector. In this project, we will use the functions of the following libraries to design the required program:
Both OpenCV and Pandas are purely Python-based libraries, and these libraries are also open-source like Python. We should make sure that both of these libraries are present in our system before we proceed with this tutorial. We should also ensure that the latest version of Python or Python having version 3 is installed in our system. If any of us is using the old versions (2. x versions) of Python, we should directly switch to the latest version by installing it from the official Python website. Once we have the latest versions of Python, we can begin with the installation of the required libraries for this tutorial. (1) Installing OpenCV Library:The OpenCV is a Python library or module which comes with multiple functions that we can use to work with pictures and videos. This OpenCV module was designed to work with the pictures and videos in Python by using functions of this library in Python programs. Therefore, the functions of this library become very important for us to write the required program of this tutorial. The OpenCV is not an in-built Python module, which means this module doesn't get installed along with the installation of Python. Therefore, we should first make sure that this module is already installed in our system or not, and if this module is not present in our system, we have first to install this module to work on this project. We can install the OpenCV module in our system through various methods but installing this module through the pip installer method is the simplest and easiest installation method for this module. Therefore, we will use the pip installer method to install this module, and to install this module using pip; we have to use the command prompt shell of our system. First, we have to open the command prompt shell of our system, and after that, we have to write the following pip installation command to install the OpenCV module through pip installer: After writing this command, we have to press the enter key, and then the Installation process for this module will start. The OpenCV module will install in our system in a while as it requires many dependencies which get installed along with this module. After successfully installing this module in our system, we can move to the installation process of the Pandas library. (2) Installation of Pandas Module:Pandas is an open-source module of Python designed to work on scientific and mathematical-related tasks. Pandas is one of the most popular and strongest libraries of Python, having lots of in-built functions that can be used for many research & developments related works. The pandas' library can work on our system to perform multiple tasks related to system software, computing operations, development projects, and many others. Therefore, we use the functions of this module along with the OpenCV module's functions to create the required program in this tutorial. The Pandas library functions will help in computing & analyzing the frame capturing through the system's webcam, thus, making it work as a motion detector. We will learn more about this while understanding the working of the required program in the latter part of this tutorial. Therefore, using Pandas library and its functions in this tutorial is very important and required for the proper functioning of the project. The Pandas library is also not an in-built module of Python, which means this module doesn't get installed along with the installation of Python. Therefore, we should first make sure that this module is already installed in our system or not, and if this module is not present in our system, we have first to install this module to work on this project. We can install the Pandas module in our system through various methods but installing this module through the pip installer method is the simplest and easiest installation method for this module too. Therefore, we will use the pip installer method to install this module, and to install this module using pip; we have to use the command prompt shell of our system. First, we have to open the command prompt shell of our system, and after that, we have to write the following pip installation command to install the Pandas module through pip installer: After writing this command, we have to press the enter key, and then the Installation process for this module will start. The Pandas module will install in our system in a while as it requires many dependencies which get installed along with this module. After successfully installing this module in our system, we can move to the next sections of this tutorial. Note: As both of these libraries are already present in our system, it will show 'requirement is already satisfied' as shown in the installation window. If the module is not present already, it will install the module in our system, and after installing the module successfully, show the message 'Module installed successfully' on the command prompt shell's installation window.Other Requirements:Apart from the pandas & OpenCV library, we need to use many in-built modules of Python in the required program so that we can use the webcam of our system as a motion detector sensor. These in-built modules provide support to the motion that will be detected in the frames through the webcam. We will learn more about this while learning about the program's work. Following are the in-built modules of Python whose functions we will use in the required program of this tutorial: (1) Python Datetime Module: This in-built module deals with the functions related to datetime tasks and, more specifically, related to date-related tasks. (2) Python Time Module: This is another in-built module of Python that deals with the functions required to perform time-related tasks and time functions. Now, we have studied all the required modules whose functions we will use in the required program of this tutorial. We can now proceed with the main logic of the program so that we can understand the working and use of multiple modules' functions in it. Using Python to Create Webcam Motion Detector: Understanding Main LogicWhen we talk about a video, it means that we are talking about frames or a stack of pictures, and together these moving frames create a video. This program is basically designed by us to capture different frames (stack of pictures) and compare them with the initial static frame of the video where no movement is detected. That's how we can detect the difference in positioning and movements of objects between the initial static frame where no movement is detected and random capturing of frames through using different filters in the webcam of our system. This method is not only helpful for us to detect the change in the position of objects present in the initial frames but also helps us to track the movement through the proctoring process. As we have already discussed, where we need to use these processes with the use of webcam, we will not discuss them here and directly proceed with how we can use motion detector here. The two images or frames we compare after capturing them from the webcam of our system are actually compared based on the pixel intensity of the images, and this pixel intensity difference helps us find out the difference between the two images. For this, we will design a Python program, as we have discussed already in this tutorial, in which we will use functions of pandas, cv2, and many in-built modules so that we can compare the pixel intensity of images captured through the webcam of our system. After comparing the pixel intensity and finding out the intensity differences in images captured, we can detect the movement of objects in the frame. This is the main logic of the program we will write where we use the functions so that we can capture the differences and compare the pixel intensity differences using the program itself. Now, we all must have a basic idea of how the program will work and what is the basic idea of creating a motion detector using the webcam of our system through a Python program. We will understand more about this when we write and execute the program and understand the functions used in the program in the implementation part. But, first of all, we will proceed with the required program of this tutorial and execute it to understand the working of our webcam as a motion detector. Using Python to Create Webcam Motion Detector: Required ProgramIn this part of the tutorial, we will write the required program and understand the working of this program in the explanation part to understand how the functions we have used in the program are working and executing in the program. We will use functions of all those different modules (including the in-built modules), which we have discussed in the earlier parts of this tutorial. This program will open multiple frames on our system's screen with different filters used to capture motion through different methods. These different filtered webcam screens will be opened once we execute the program, and we can understand the working of these different webcam screens after the program's execution. That's how this Python program will help us in using our system's webcam as a motion detector to detect the change in positions and movements of the objects present in the video frame. Look at the following Python program where we have used functions from multiple modules so that we can use our system's webcam as a motion detector when we execute this program: Output: When we run the program, four different types of video frames will be opened on the output screen, which will capture the movements of an object present in the initial frame and added to the video frame later on. And apart from the frames, a CSV file will all the motion timing details will be saved in the same directory where the code is present, but we will discuss this only after understanding all the four output video frames. These frames have their own specialty, and we will describe all of them by explaining the functioning of each of these frames. Each of these frames will be used to capture the movements and work like a motion detector using our system's webcam. These 4 video frame windows will capture different types of results, and each of them has different output, and therefore, we will study each of them separately as the output of the program. Following is the description of the different color frames which will be displayed to us in the output window when we execute the program: (1) Gray Frame: The first video frame that will open in the output screen is the gray frame. The image displayed inside the gray frame is displayed in the grayscale or gray shade (That's why this frame is named the gray frame), and it is also a bit blur. As we know, RGB (Red, Green & Blue) image frames have three intensity values. But, there is only one intensity value in the gray picture frame, as displayed here. This makes it even easier to capture the intensity value differences for the object present in the gray frame. A resultant output window for the gray picture frame is displayed as the output of the program: 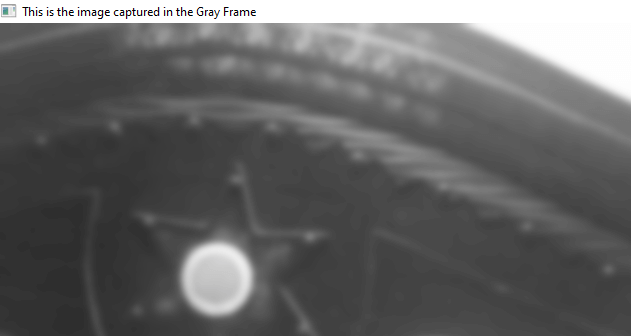
(2) Difference Frame: Instead of naming this frame as a black & white frame, we have named this frame as a difference frame because we will capture the difference of intensity values in the initial static frame & current frame through this video frame. Through this frame, we can detect the motion in the frame as well as movements of objects in the frame using the difference of intensity values in the initial static frame and current frame. Following is the resultant difference frame displayed to us in the output screen: 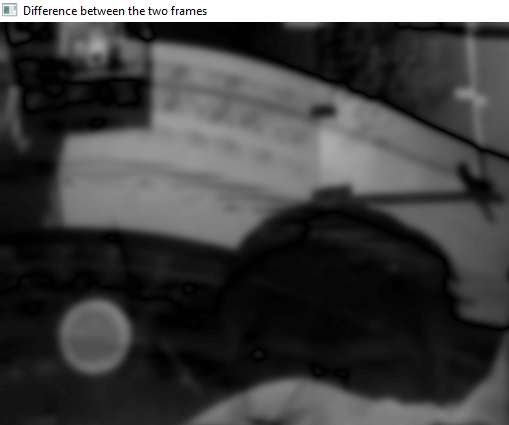
(3) Color frame: This is the color frame where images are displayed in the color shade format (as we usually see in a camera or system's webcam). We capture the color images in the color frame, and the movements of the objects present in the color frame are highlighted with the green rectangle around the area where movement is happening in the frame. A resultant output window for the color picture frame is displayed as the output of the program: 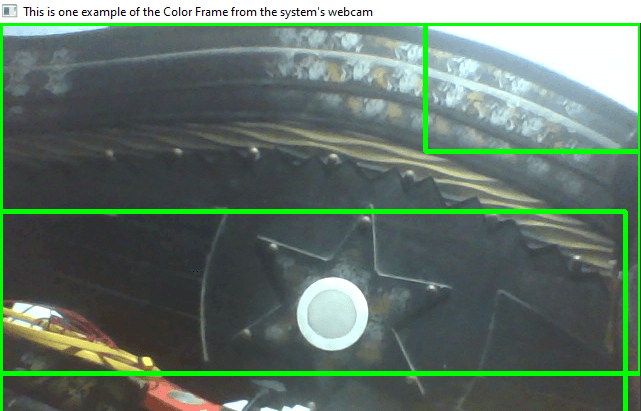
(4) Threshold Frame: This is the GaussianBlur picture filter frame, the filter which we applied in the program after the gray picture filter. As we defined in the program, when the intensity of the pixel changes with a difference of more than 30, then the pixel will be highlighted with the white color. In the opposite case, when the pixel's intensity changes with a difference of less than 30, then the pixel difference will be highlighted with the black color. Following is the resultant Threshold frame displayed to us in the output screen: 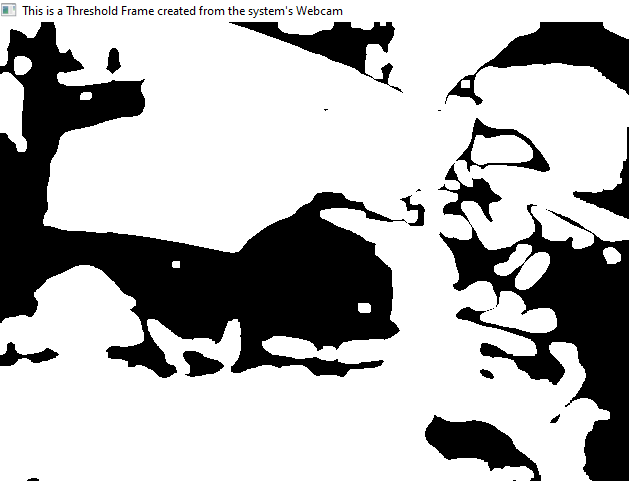
Record of Movements and Motion Timings:Now, we have understood all the four frames that will be displayed in the output window once the program is executed successfully. Apart from these frames, as we discussed, a CSV file having all records of all of the motion timings will be saved in our system's directory (the same location where the required program is present). The file will be present in the CSV extension, and we can open this file using Microsoft Excel, Google Sheets, or any other recommended software. When we open this file, we will see that all the timings of Initial and final movements will be present here with the time stamp under the 'Initial' and 'Final' columns (as we defined name in the program). These timings represent when the movement in the frame started and when it ended, as we can see below in the file saved in our system: 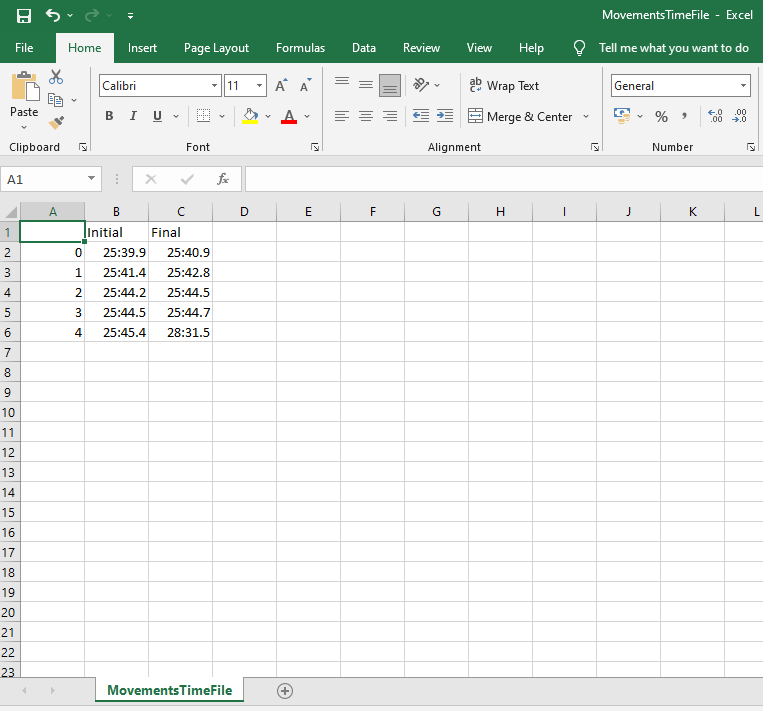
Explanation: First of all, we have imported all the required modules (cv2, pandas, time & datetime) into the program to use their functions to build the required program. After that, we have defined the static positions for the frame with multiple variables (staticBack and motionList) and defined their initial values as 'None' to set them as a static video frame. We also defined a time list to capture the time when the movement occurred in the frame. We also created a dataframe to store the start and end time when the movement occurred. After that, we used the videocapture () function from the OpenCV library to capture the video from the system's webcam and started reading each video frame with the read() function. Now, we have created a gray image using the cv2 module functions, and after that, we used this gray image variable to create a gray frame from our system's webcam. We also created GaussianBlur using the gray image we captured and created a GaussianBlur frame. Then, we used the static frame variable to create a different frame and used it as a black & white frame for capturing the movements. We also created a threshFrame where we capture the object's movements by highlighting the changes, and we created this using the differFrame we defined. Then, we created contours in the thresh frame to detect the motion and movements in the frame. And after that, we defined x, y, and width & height variables to create a rectangle around the area in the frame where movement is detected. This helps us to recognize the movements of objects in the frame and point them out with a green rectangle in the frame. After that, we have added motion status in the frame using the motionList variable we have defined. We have used the if method to add the start time and end time of the motion in the motion list variable so that we can study it for further uses. After that, we have displayed different types of frames we have defined till now and captioned them differently like color frame, Black & white frame, etc. When we execute the program, all these frames will open together at once. After that, we have defined the wait key and used the if statement to close all the frames at once. When we press the defined key ('m' in this program), it will close all the opened frames at once. After that, we appended all the motion time in the data frame we defined, from the motionList where we have stored this data till now. We imported this data into a CSV file with the 'MovementsTimeFile' name, and this file will be saved in the same directory where our code is present. Lastly, we closed or destroyed all the windows we had opened and exited from the running program. ConclusionWe have used multiple modules in this tutorial to write the required program to be executed successfully. We have created different types of frames using this program which will be used to capture the movements in the frame and act as a motion detector. That's how we used our system's webcam like a motion detector using a Python program to capture the movements of objects in the video frame. |
 For Videos Join Our Youtube Channel: Join Now
Feedback
- Send your Feedback to [email protected]
Help Others, Please Share


