Google Excel SpreadsheetWhen it comes to organizing financial data, Google Sheets is one of the popular tools used worldwide. It is a powerful spreadsheet software tool developed by Google. This tool is almost similar to Microsoft Excel, but it does not offer all the advanced features present in Excel. Despite this, Google Sheets is gaining popularity and is preferred by most people to manage everyday tasks. Some people mistakenly call it "Google Excel" or "Google spreadsheets." It is necessary to learn the basic concepts of this powerful tool and be confident to work on it. 
In this article, we discuss the concepts of Google Sheets (mistakenly called 'Google Excel spreadsheet'), which will help us get familiar with it and start working on it as a beginner. What is Google Sheets?Google Sheets is a free, cloud-based spreadsheet application. That means we can open it in our web browser like a regular webpage and have all the functionality of a spreadsheet application for robust data analysis. It allows us to store and organize different types of information, much like Microsoft Excel. Most people think that spreadsheets are only meant for certain people to process complex numbers and data. However, we can use spreadsheets software for a variety of everyday tasks. For example, we can use Google Sheets to manage a budget, plan a garden, or create an invoice, or just about anything else we can think of; spreadsheets are a great way to organize information. The following image shows an interface to a blank Google Sheet, which is usually the first screen when we create a new spreadsheet: 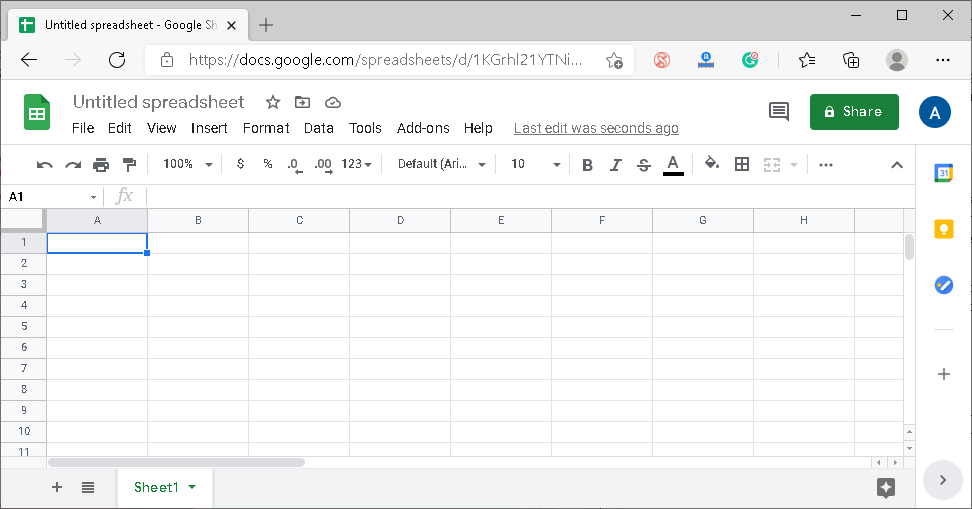
Why should we use Google Sheets over Excel?Although Google Sheets is comparatively newcomer and lacks many of Excel's advanced features, it has some excellent features that give people the reasons to use it over an established spreadsheet software like Excel. The following are some essential features of Google Sheets: Free to Use: Unlike excel, we are not required to purchase any software license for Google sheets. It is entirely free for personal use. Furthermore, we do not need to hire an IT specialist to configure, deploy and maintain this tool. Easy Collaboration: It is straightforward to share files using Google Sheets. Additionally, it allows multiple users to work on the same shared file at the same time. The users can also chat with each other from the tool itself. People with admin access can even check the edits made by users with their names separately. Cloud Support: Since Google sheets is a cloud-based tool, we can edit, view, or share files with others from any device and from anywhere. Also, it provides a 'single version' for everyone to eliminate any version control problems between the collaborating users. No Storage Issue: Unlike excel, we do not need to install Google sheets on our system. It can be used directly using the web browser. Thus, there are no requirements to have enough free storage on the system, like installing other regular software or programs. Easy Data Import: Importing the data in Google sheets is much easier than any other software or tool. We can easily pull information from other Google services, the web, or even from the system's storage. Scripting Support: Using scripts in Google sheets is simple. We can utilize Java-based Google Application Scripts and connect to APIs (Application programming interfaces) without any difficulties. Excel Support: Since Excel is still widely used, Google sheets allow us to open excel files through it and convert them to Google sheets or vice-versa. Basics of Google Sheets: Understanding the Google Sheets User InterfaceBefore we discuss some basic working steps for Google sheets, we must know some key terms and become familiar with the Google sheets interface. However, they are almost the similar terms that we find in other spreadsheets software, including Excel. Let's understand them briefly: Cell: The cell refers to a single data point in any spreadsheet, represented by the rectangle box. It is the intersection of a row and a column. Each spreadsheet contains several cells, and therefore, each cell has a unique address. The address of a cell is represented by the letter representing a column ending with the number representing a row. For example, the following image displays a cell in a Google sheet. Here, the cell is the intersection of row 1 and column A. Therefore, it is represented by Cell A1. 
Column: A column refers to a set of cells that lie vertically (from top to bottom) in a spreadsheet. Each column is represented by a unique letter, starting from the letter A. In the following image, column C is selected in Google Sheets: 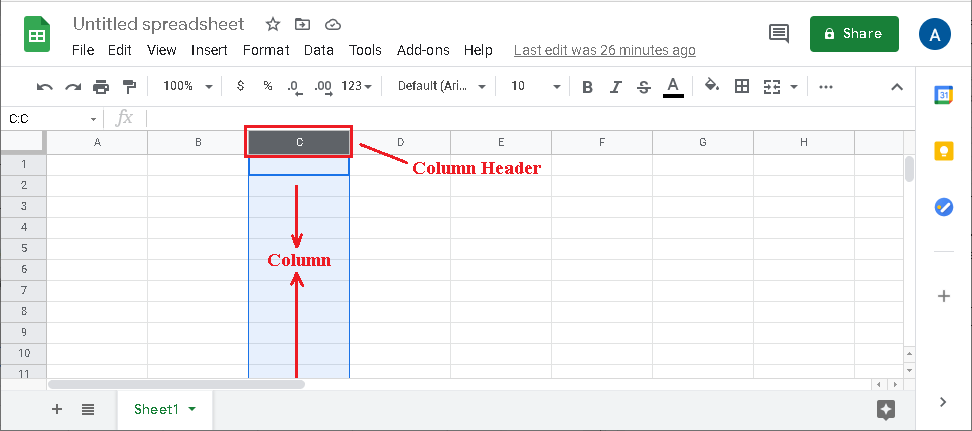
Row: A row refers to a set of cells that lie horizontally (from left to right) in a spreadsheet. Each row is represented by a unique number, starting from the number 1. In the following image, row 2 is selected in Google Sheets: 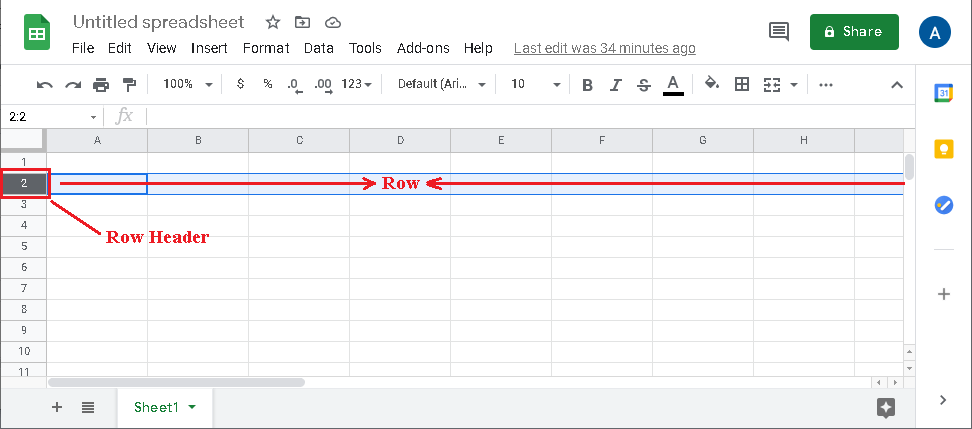
Range: The range refers to a specific selection of the cells in a spreadsheet. In the following image, rows are selected from the number 1 to number 5 in column C. Thus; the range is denoted by C1:C5, which is displayed in the name box. 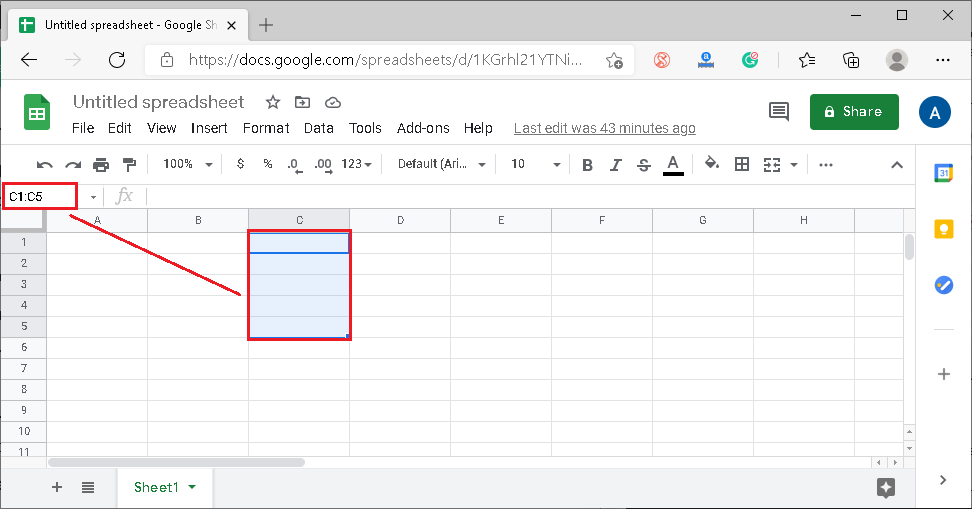
Spreadsheet Title: The title refers to a filename given to the particular spreadsheet. By default, the name 'Untitled Spreadsheet' is displayed when we create a new spreadsheet. The spreadsheet title is displayed on the top of the spreadsheet, as shown in the following image: 
Toolbar Menu: A toolbar menu contains few tabs, and each tab further contains several options. In particular, a toolbar menu provides us options to edit and modify the spreadsheet in various ways. We can click on any of the menu tabs and select the desired command from the list. A toolbar menu is located at the top of Google Sheets, under the spreadsheet title: 
Google Sheets automatically saves each change to an existing file. Additionally, it displays a notification next to the toolbar menu, which notifies us when the last time changes were saved in a spreadsheet. Apart from this, the icon given before the toolbar menu can be used to navigate back to the Sheets homepage. 
Shortcut Toolbar: A shortcut toolbar contains some quick options for formatting the data in a spreadsheet, such as a font style, font size, text alignments, text color, and more. A shortcut toolbar is located below the toolbar menu, as shown in the following image: 
Formula Bar: The formula bar is the field that allows us to enter/ edit the data, functions, and formulas of a particular cell in a spreadsheet. When we select any cell containing the formula, the formula bar also displays the formula applicable to a corresponding cell. A formula bar is located next to the name box and denoted by the sign 'fx', as shown in the following image: 
Sheets Toolbar: A sheet toolbar helps us to manage sheets within the workbook. We can insert, rename, delete sheets using this toolbar. It is located on the bottom of the window, as shown in the following image: 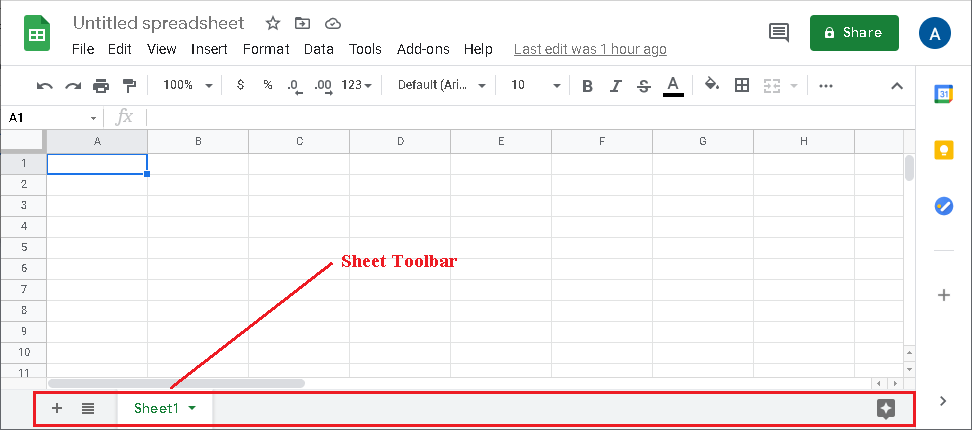
Function: A function refers to the inbuilt spreadsheet function that calculates values, manipulates data, etc. In Google sheets, we can access the functions by navigating to Insert > Function. 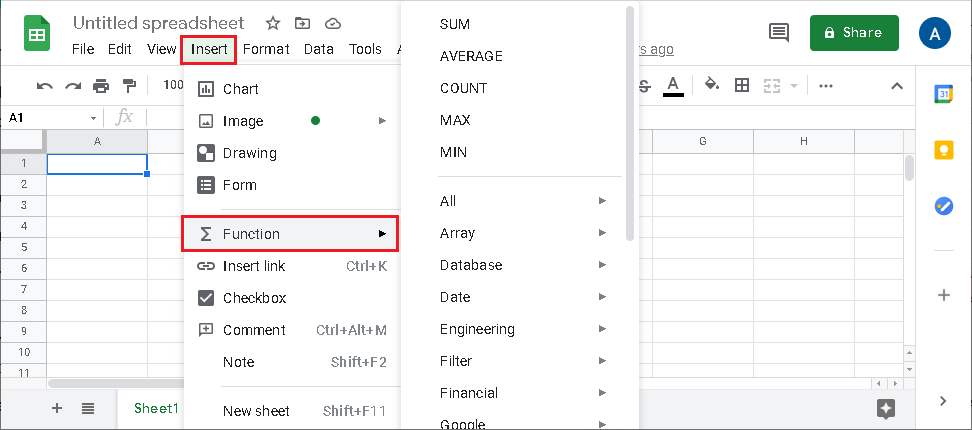
Formula: A formula refers to a combination of functions, cells, ranges, and operators used to get the desired result by calculating specific values. Sheet/ Worksheet: A sheet refers to a single page of several rows and columns. It is the main working area for a spreadsheet. 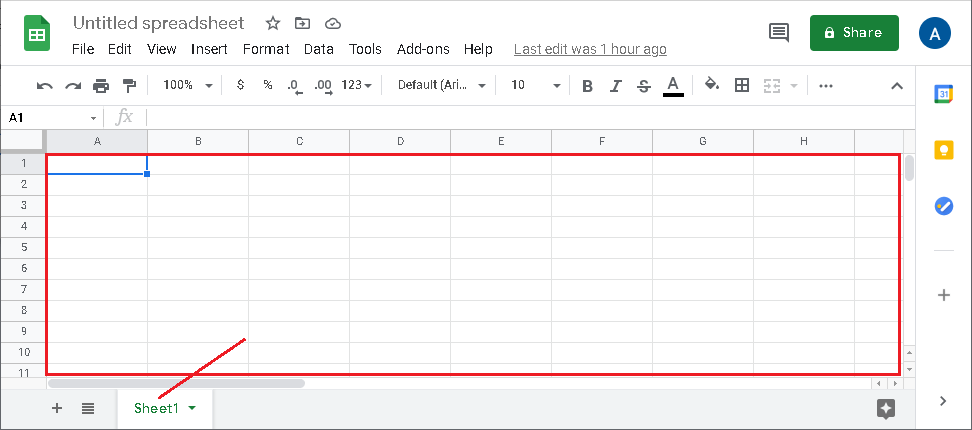
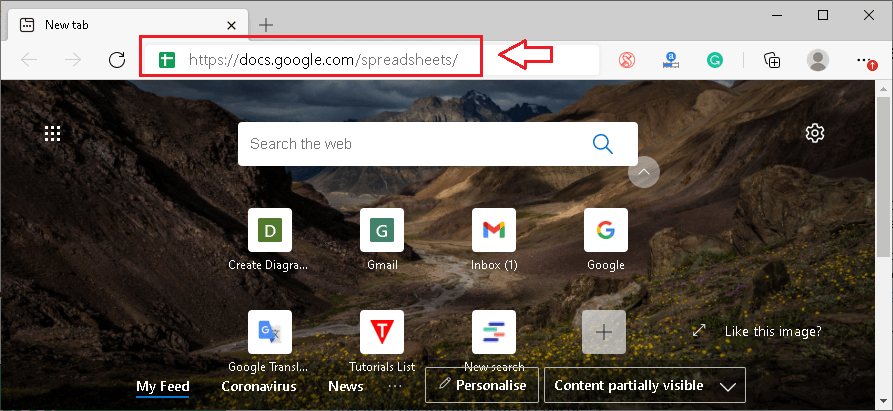
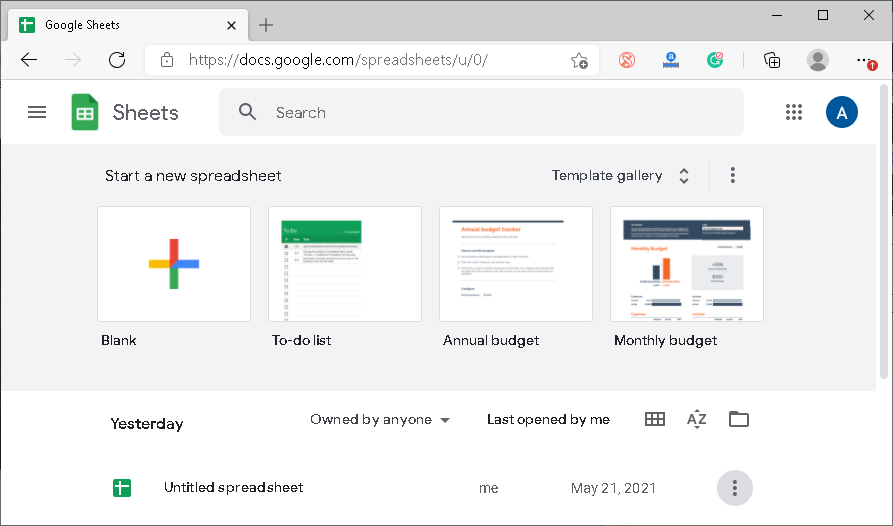
Spreadsheet/ Workbook: A spreadsheet/ workbook refers to a document/ file that contains one or more worksheets of data. Google spreadsheets are generally saved on Google Drive. However, we can download the specific file to our device for offline use. Working with Google SheetsOnce we get familiar with the basic terms of the Google sheets, we must learn how to use google sheets. Let us start with the basic things: Starting with Google SheetsThere are several ways to start with the Google sheets. However, the simplest method is to use their official website. The following are the steps to launch Google Sheets with ease:
The page also displays some default templates. Creating a New SheetWe can create a new spreadsheet from the Google sheets homepage. We can click on the plus sign (+) or a tile with the text 'Blank' to create an empty sheet. Most people use it to start from scratch and start working with their data and formatting. 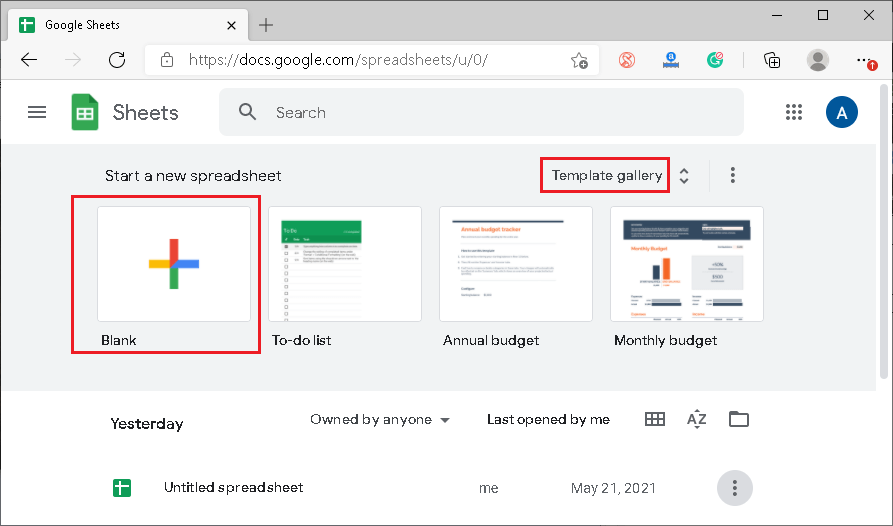
Additionally, we can also select any default template that contains some great formatting and sample data. Google sheets offers a wide range of templates that we can select from the template gallery accordingly. Naming/ Renaming a SheetAfter creating a new sheet, assigning a new name to it is the most basic step. To do this, we need to click on the box from the top of the window that says 'Untitled Spreadsheet' and change it to any desired name. 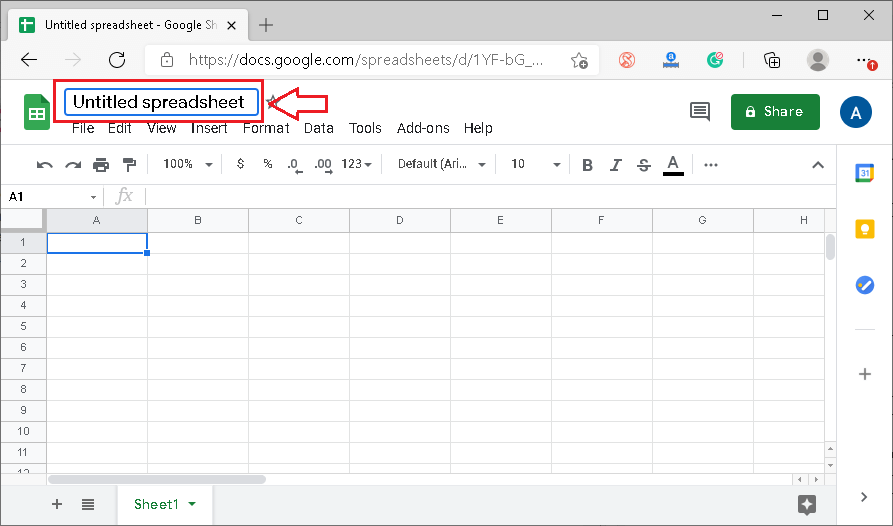
Additionally, we can rename the sheet by navigating to the File > Rename. 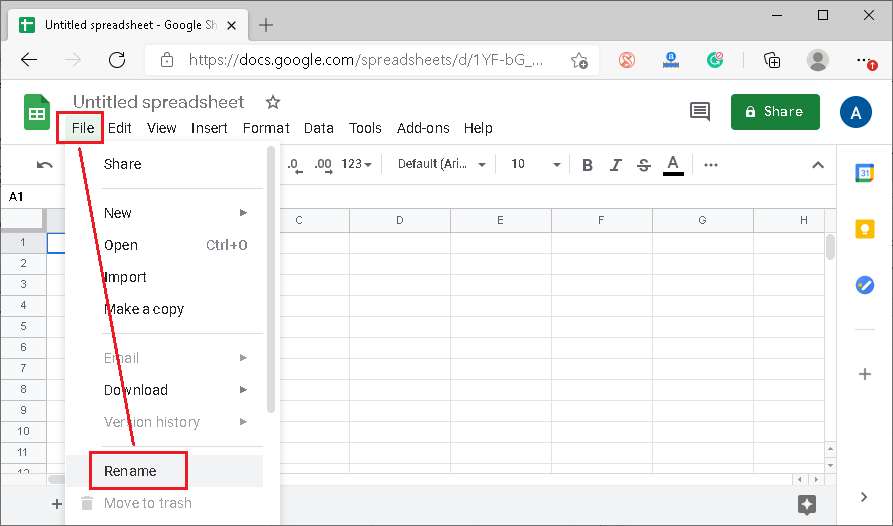
Once we enter the desired name of the sheet, it will be saved automatically. Opening an Existing SheetIf we have an excel file on our device and want to work with this existing file, we need to first import/ open it on Google sheets. We are required to navigate to File > Open or File > Import. 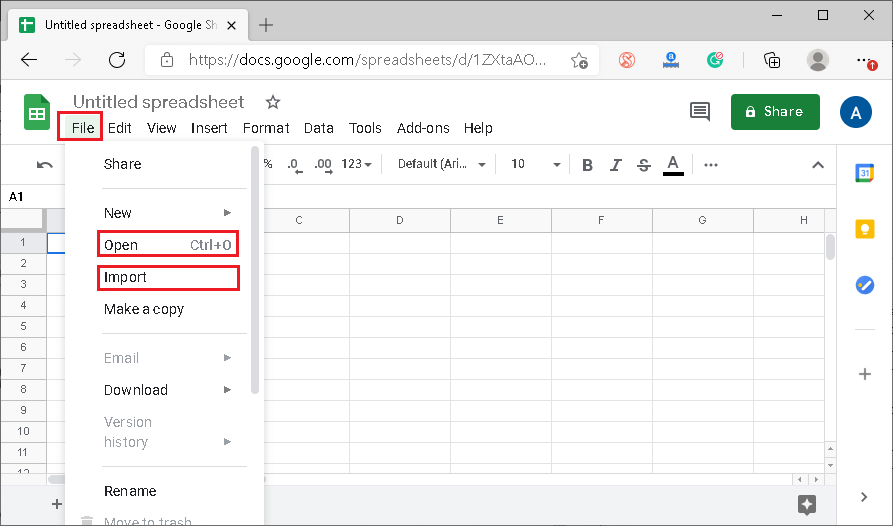
After that, we must click on the 'Upload' button and locate the file on the device using the file explorer. Once we click on a specific file, it will be opened on Google sheets. 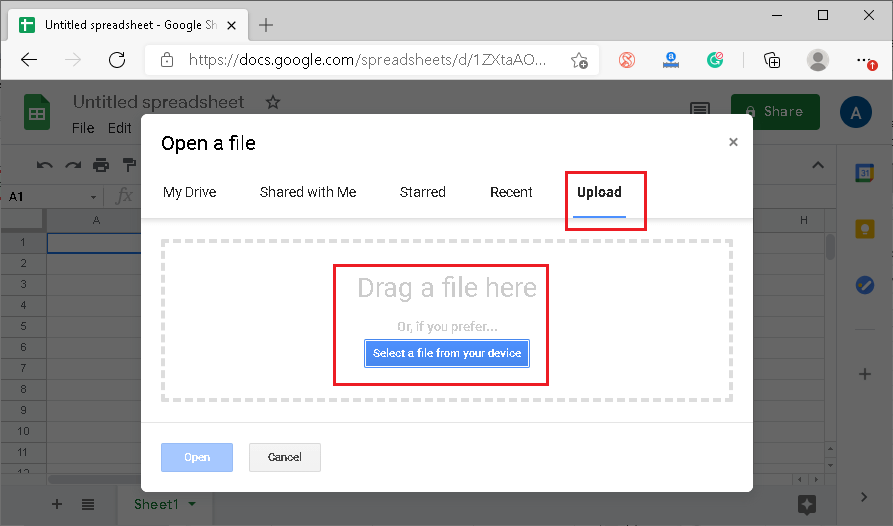
Adding Data to SheetsAfter opening a blank sheet, the editing window is displayed where we can insert the desired data. We must select the desired cell and type the content that we want to insert into it. After typing the content into the selected cell, we must press Enter. This way, we can insert data into all the desired cells. 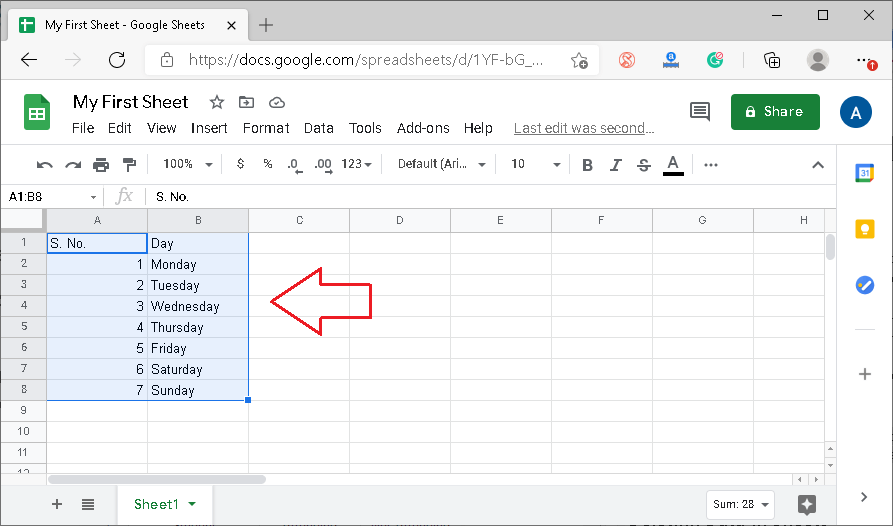
The cell contents are displayed in the cell and the formula bar. Note: We can also copy, cut, paste, or drag-drop the data into Google sheets from other programs. Also, we can import the data from other supported spreadsheet programs.Deleting Data in SheetsWe can delete the data/ contents of any cell in Google sheets. First, we need to select the particular cell and then press the 'Delete' or 'Backspace' button on the keyboard. This will delete the cell's contents. 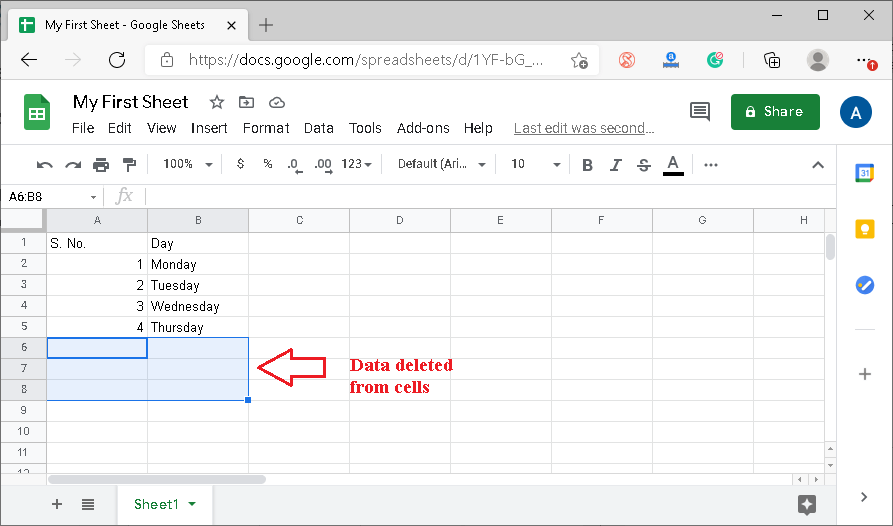
Apart from this, if we want to delete the recently added data, we can undo the changes using the Ctrl + Z shortcut. It must be noted that it only undo the last step we performed. Formatting the Data in SheetsOnce we have the contents in our sheet, we might need to adjust some formatting. Most of the formatting can be controlled directly from the shortcut toolbar. 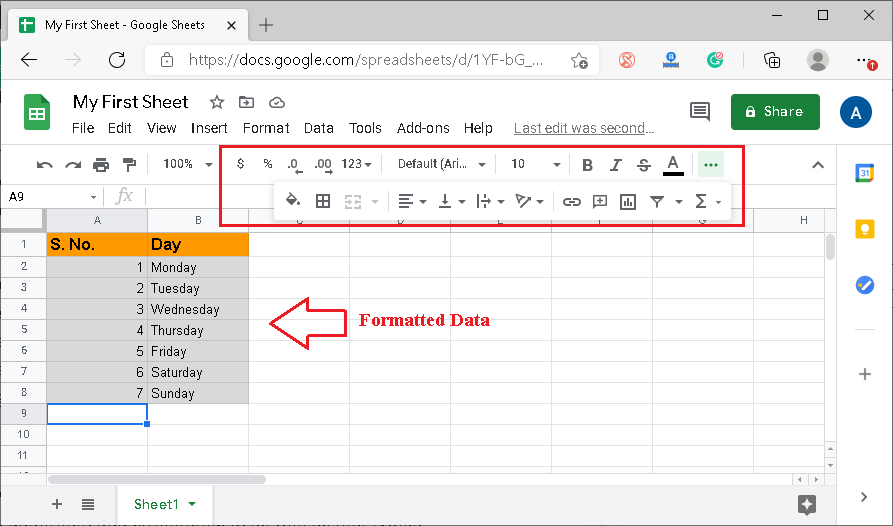
If we want to format our data extensively, we can access the advanced formatting options from the Format tab. Using Functions in SheetsLike other spreadsheet programs, Google sheets also allow us to use equal sign (=) in an empty cell and get the function we want to use. Suppose we enter 4 in cell A1 and 5 in cell B1. Next, we enter =SUM(A1,B2) in cell C1. By doing this, cell C1 displays the sum of values given in cells A1 and B1. 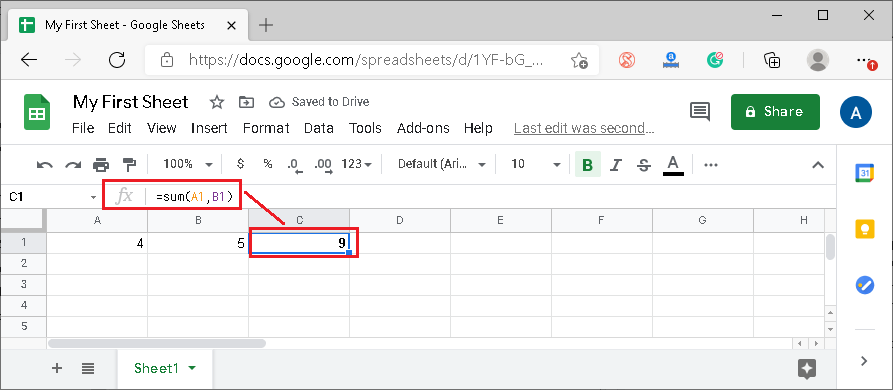
This way, we can insert any desired function in Google sheets. If we don't remember any specific function, we can access the list of supported functions by navigating to the Insert > Function. Printing a SheetIf we want to take prints of our sheets in Google sheets, we can directly give the command to print from within the web browser. We don't need to download the sheet into the local storage. To take the print, we must navigate to the File > print. 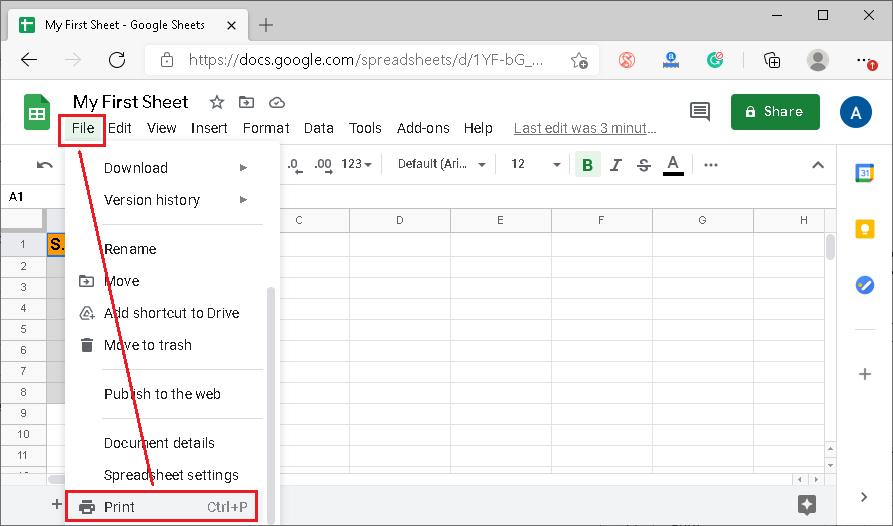
We must select the printing preferences on the next screen, such as the page setup, page orientation, paper size, layout, default printer, and more. Once we are done making the setup, we need to click on the 'Print' button. 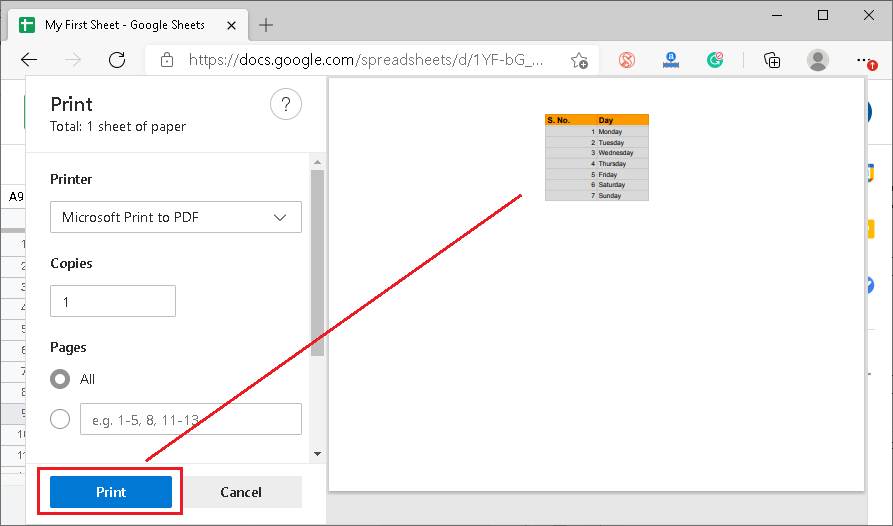
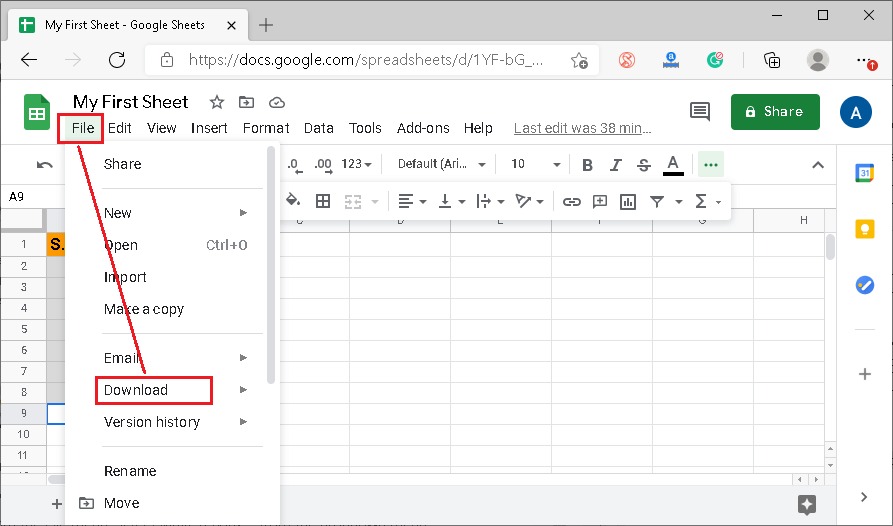
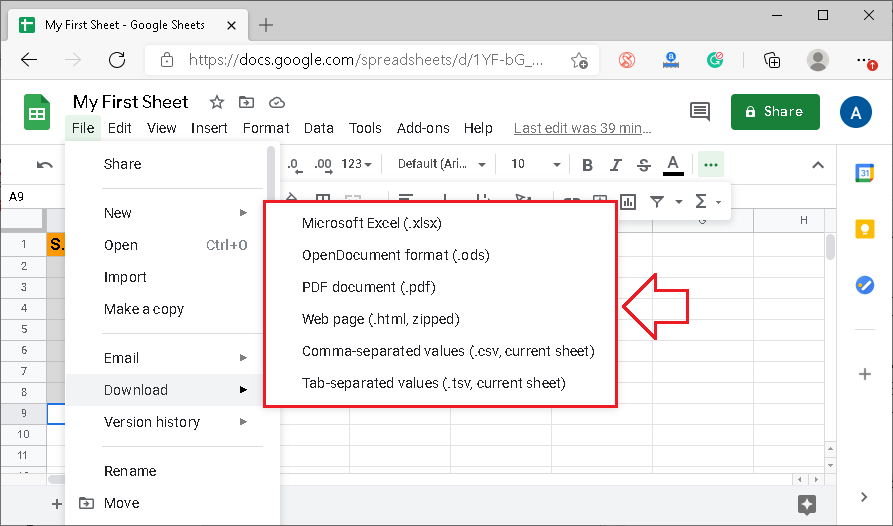
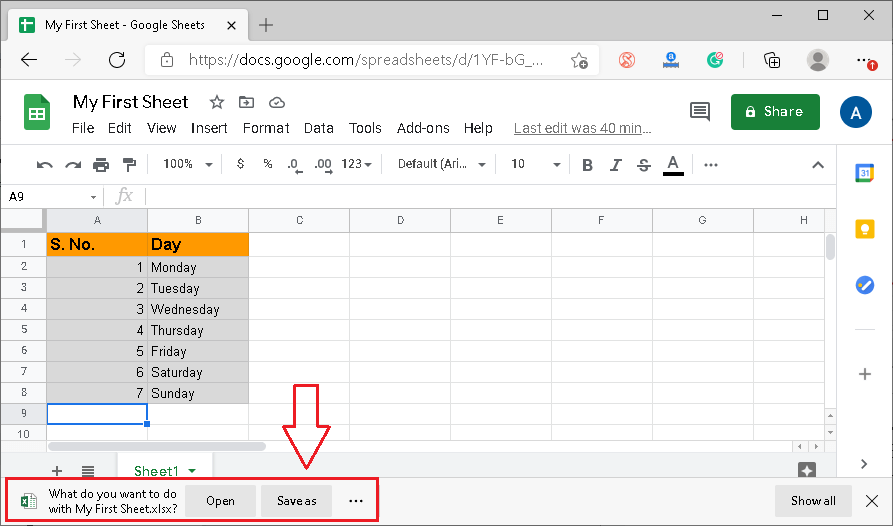
This will generate prints of the sheets accordingly. Saving a SheetAs we said above, all the changes we make in Google sheets are automatically saved to the existing file, and the sheet file/ spreadsheet is saved on Google Drive. However, when we want to save any specific file to our device, we must follow the steps given below:
Note: By default, any sheets we create or work with are saved on Google Drive. Thus, we can also launch a specific sheet from there.Google Sheets Shortcut KeysLike Excel, Google Sheets also supports shortcuts that allow users to perform specific tasks quickly. By using shortcuts, users typically eliminate the two or three steps of the corresponding work process. The following table displays the most commonly used shortcut keys of Google Sheets, including the respective action:
In the above table, it is seen that most keyboard shortcuts are also common for Excel. All the above shortcuts are compatible with Chrome on PC while using google sheets. However, they also work on other web browsers on PC without problems. Note: To use function keys (F1, F2 … F12), we must first activate them by pressing the 'Fn' button on the keyboard. This may not be required for some keyboards.Google Sheets ExtensionsSince Google Sheets is currently one of the top competitors of MS Excel, it has provided support for almost all the popular file formats present in Excel. But some features of Excel might not always work in Google sheets. The following are the most common file extensions supported in Google sheets:
Any of the above file types can be easily imported to Google Sheets. However, Google sheets allow us to download the files only in XLSX, ODS, PDF, HTML, CSV, and TSV formats.
Next TopicOnline Excel Viewer
|
 For Videos Join Our Youtube Channel: Join Now
Feedback
- Send your Feedback to [email protected]
Help Others, Please Share


