How many sheets are there in excel workbook by default?Initially, when an Excel user opens MS Excel software, there is one worksheet by default in Excel 2016. This worksheet is named Sheet1. However, a user can add more worksheets in the Excel workbook named Sheet2, Sheet3, and so on. In Excel 2013 and earlier versions of Excel, the default sheet was 3. Excel Sheets names are not informative initially. Excel allows the users to rename the worksheet names and provide them according to the data they contain. With the help of meaningful names, you can easily reach out to your data. In this chapter, we will try to provide all the useful information for Excel sheets. We will also elaborate the worksheet-related operations. Operations on Excel worksheetWe are using Excel 2016 version. Excel allows its users to provide options to change the worksheet's default settings. Several operations can be performed on Excel worksheets, such as add, delete, rename, group, and ungroup the worksheets.
We will try to explain the simplest ways to perform these operations. Besides these methods, you may find other methods and ways to perform the following operations. You can prefer whatever you find easy. Rename the Excel worksheetWhen you create a new worksheet, it comes with default worksheets named Sheet1, Sheet2, Sheet3, and so on. These default names are not informative and difficult to directly reach out to the data. To resolve this issue, Excel allows its users to rename the worksheet name according to the data they contain. Hence, it becomes easy to reach your data in a small span of time without looking for each worksheet data. Following are the simple steps to rename the worksheet name - Step 1: In your current workbook, go to the worksheet panel at bottom where you will find all worksheets for this workbook. 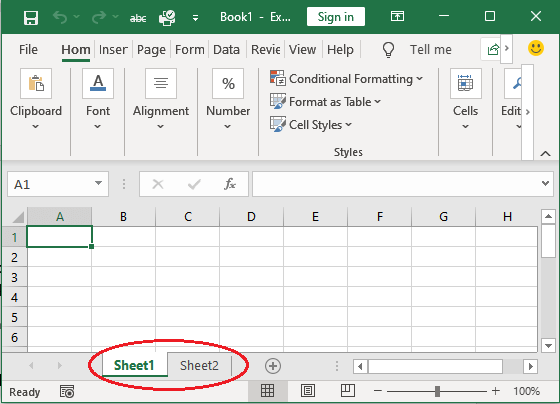
Step 2: Double-tap on one of the Sheet names to edit it and then press the Backspace key to provide a new name to it. For example, Sheet1. 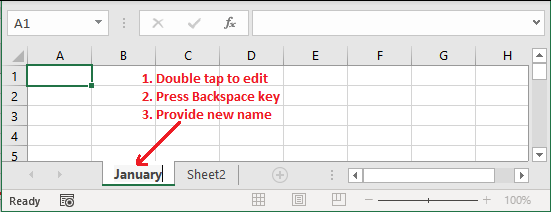
Step 3: Click anywhere on the sheet to keep the new name. You will see that the name has been changed from Sheet1 to January. 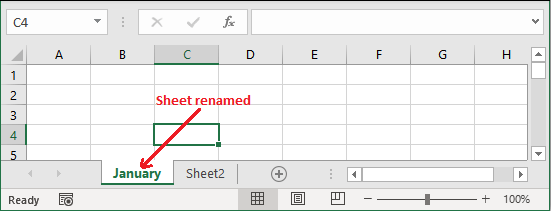
By following the same method, you can change the name of other worksheets and give them according to the data they contain. Rename the worksheet is a very easy task to do and it is very helpful to find the targeted sheet data. Add more worksheetsAn Excel workbook comes with some default worksheets that Excel provides. These default worksheets can be one and more. Excel is not restricted to this only. It enables the users to add more worksheets if they need. Excel allows inserting around 255 worksheets within a single workbook. We suggest you not use more than 12 worksheets as the file becomes heavy and the processing will also degrade. Here are the steps, how you can insert a new sheet to a workbook - Step 1: Open the targeted workbook within which you would like to insert a new one. You will see a + sign in a circle on the worksheet status bar. 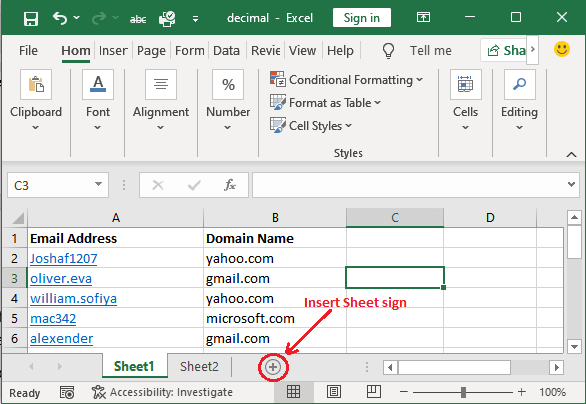
Step 2: Click on this plus sign to insert a new worksheet. 
Step 3: Once you click the insert button (+), a new sheet will add to the workbook, as shown below. 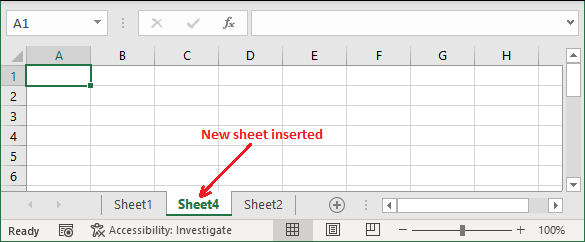
You have noticed one thing here that a new sheet (Sheet4) is inserted between Sheet1 and Sheet2 because while inserting the new sheet, you were active on Sheet1. If you want, you can change the position of the sheet and move them. Change the worksheet position To change the worksheet position, you can move the worksheet. Step 4: Just keep the mouse control on the targeted sheet (Sheet4) and move it into the direction (left or right) where you want to place it. 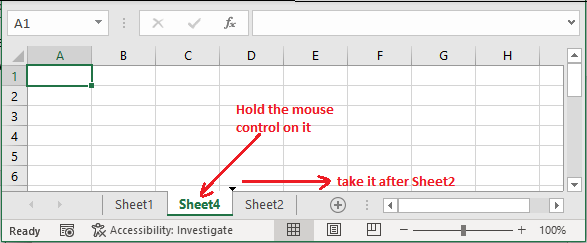
Step 5: Leave the mouse at the position where you want to keep the targeted sheet. We have placed Sheet4 after Sheet2. 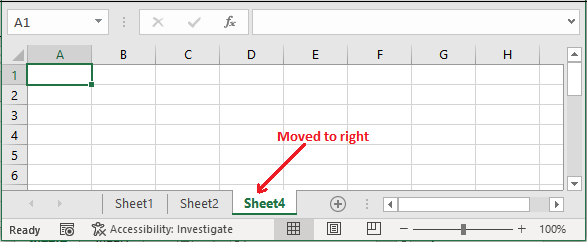
Delete an Excel sheetSometimes, you do not require a sheet anymore in an Excel file. Thus, Excel allows to delete it from the workbook. You do not need to keep it without any use. You can permanently delete a sheet from your workbook and make the storage free and reduce file size too. Be careful, do not confuse between worksheet and workbook because they both are different. A workbook is an Excel file that contains one or more worksheets inside it. Following are the steps to delete an existing sheet from a workbook - Step 1: Open the targeted Excel workbook (file) from which you want to delete a sheet. You will find a bunch of all sheets added in your workbook status bar as like below - 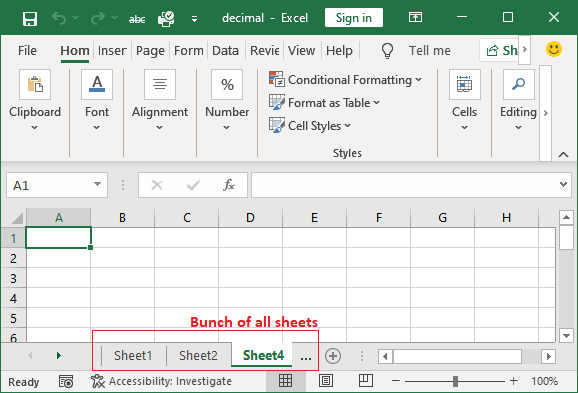
Step 2: Right-click on the sheet to which you want to delete. A list of different options will appear in which select the Delete option. 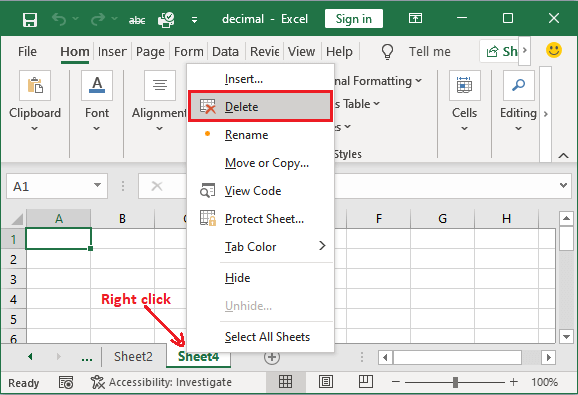
This will permanently delete the selected worksheet from this active workbook. Step 3: In the given screenshot, you can see that Sheet4 has been deleted and it is no more showing here. 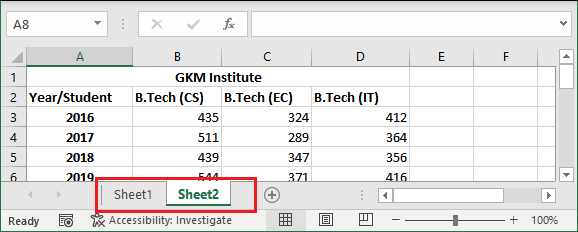
Deleting a worksheet may affect other sheets of data in the same workbook if those data depend on it directly or indirectly. So, be careful while deleting any worksheet and make sure before deleting it. Set default number of worksheetsBy default, there are three worksheets in Excel whenever you open or create a new Excel workbook. You can change it as well from the Excel advance options. It means you can set the number of how many worksheets initially be in a workbook. Inside the General options, you will find an option "Include this many sheets". You can change it to between 1 to 255. Step 1: First of all, open MS Excel and create a new workbook. You will initially find one worksheet in this workbook by default. 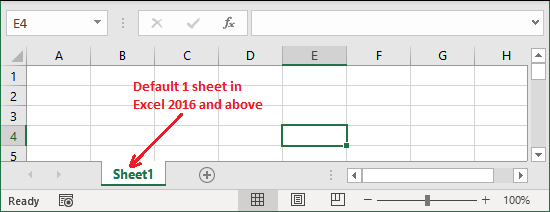
Step 2: In MS Excel, go to the File > More > Options. 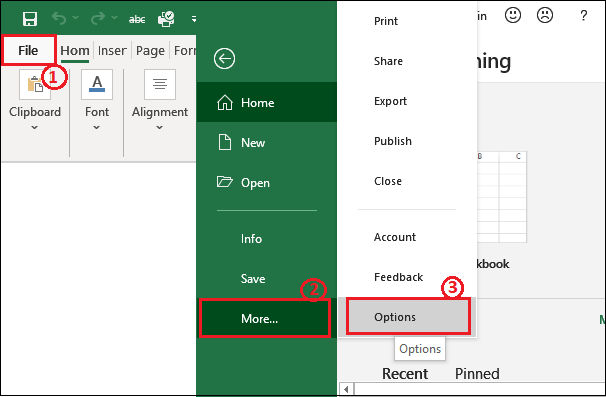
Step 3: Select the General option on the left side of the panel, where you will see the "Include this many sheets". 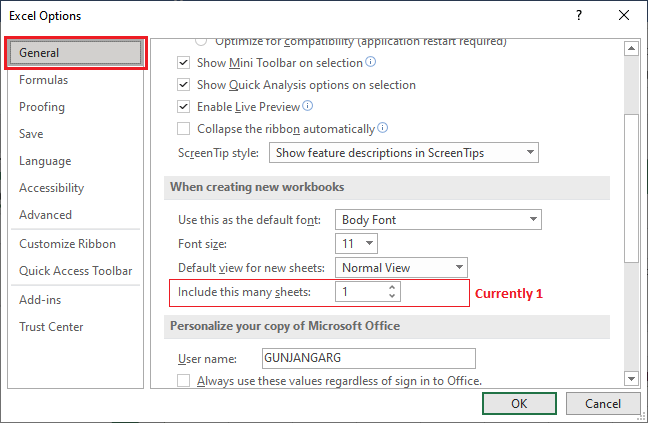
Step 4: Here, set the number of sheets you want whenever you open the MS Excel or create a new workbook. We have set 4 here to be set as default when a new workbook is created and click OK. 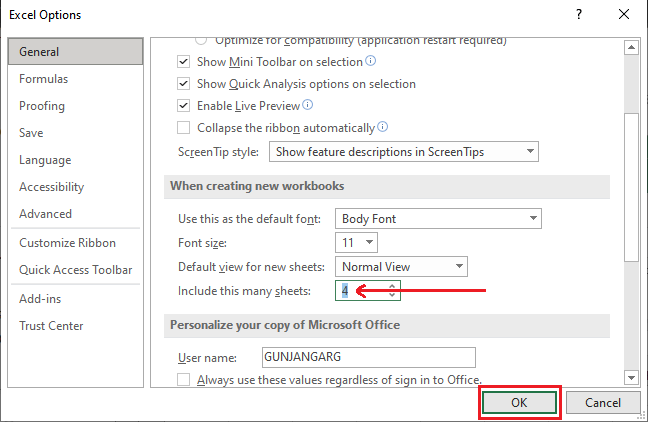
Step 5: Close the MS Excel and reopen it to create a new workbook. You will see four worksheets are there in this new workbook this time. 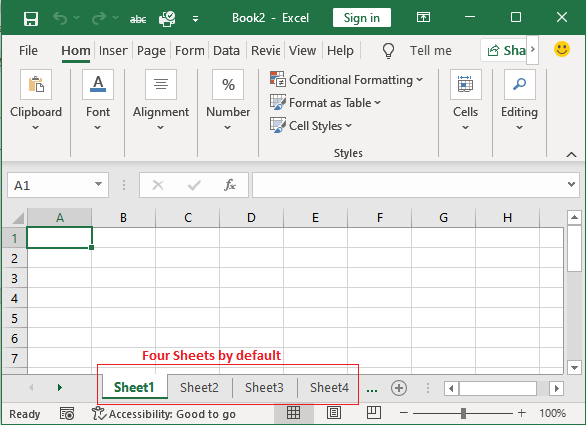
Group and ungroup worksheetGrouping is an interesting feature of Excel and helps to save time and effort if you want to perform the same operations on multiple worksheets. You can group all those worksheets together on which you want to perform the same operations. After doing the task done, you can ungroup them again. Any change in one worksheet will reflect in all other sheets of grouped sheets. Follow the given steps to group and ungroup the Excel sheets. Group the sheets We have taken an Excel workbook for this example that contains four sheets in it. 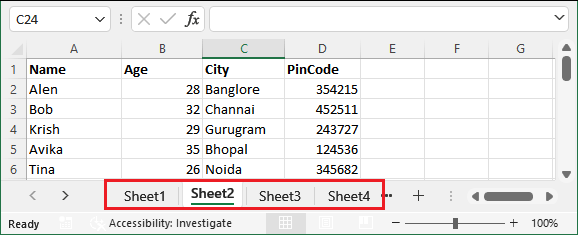
Step 1: To group the sheets together in an Excel workbook, select the sheets one-by-one whom you want to group by holding the Ctrl key. 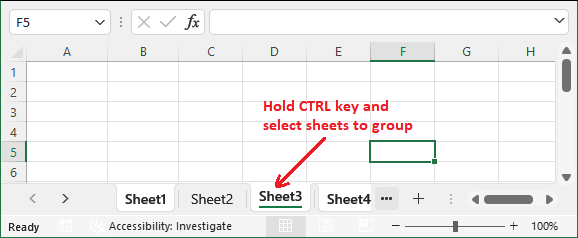
We have selected Sheet1, Sheet3, and Sheet4 using the Ctrl key. Hence, three sheets are grouped together. 
Tip: Hold the Shift key for multiple sheets to group together in one go. Step 2: Any change in any one of the grouped sheets will reflect in other. For example, we have entered a simple text "Welcome" in the F5 cell inside Sheet4. 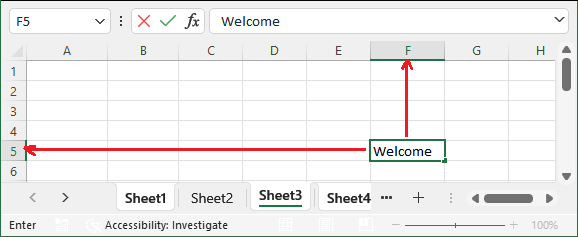
We wrote in Sheet3. Step 3: Now, move to other sheets (Sheet1); this text will also automatically reflect in the F5 cell of Sheet1 as it was grouped with Sheet4. 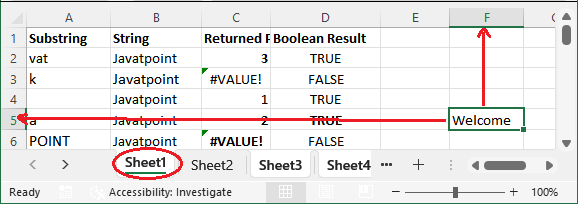
Step 4: But if you see the F5 cell of Sheet2 that is not grouped, you will not find text in it. Because Sheet2 is not grouped. 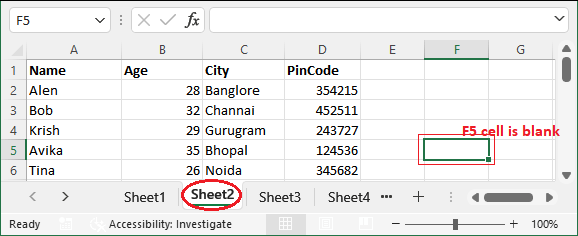
Ungroup the sheets To ungroup the Excel sheets, the users do not need to put too much effort. Either click on the sheet which you had not grouped in the status bar or follow the steps that we have described below: Step 5: Right-click one of the grouped sheets in the worksheet status bar and select Ungroup Sheets option from the list. 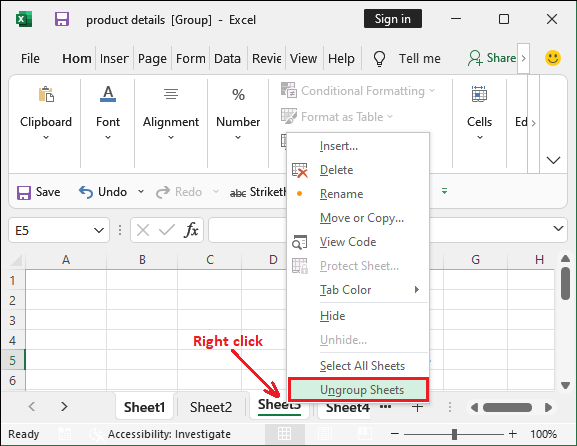
Step 6: All the grouped sheets in this workbook will be ungrouped at once. 
Hide and unhide sheetHiding and unhiding is an interesting concept of MS Excel. It is very helpful if you do not want to delete the worksheet but also not to show the sheet unnecessarily when you do not need it. You can hide the Excel sheet instead of deleting it. It temporarily hidden from the workbook. You can also unhide it back when you need it again. See the steps to hide and unhide one or more sheets of an Excel workbook. Hide the sheet We have taken this Excel workbook for this example that contains four sheets in it. Step 1: Right-click on the targeted sheet whom you want to hide and select the Hide option from the sheet. 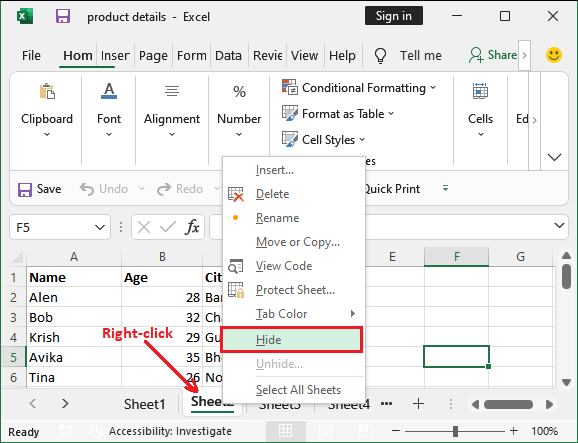
We have selected Sheet2 to hide. Step 2: The sheet will immediately hide from the workbook , and it is no more visible in this workbook but not deleted as well. 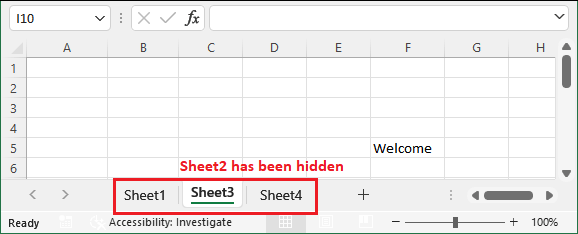
One can hide any number of sheets by following the same steps to hide worksheets. Unhide a hidden sheet To unhide an hidden worksheet, follow the steps given below: Step 1: Right-click a sheet tab in the Excel workbook status bar and select Unhide option from the list. 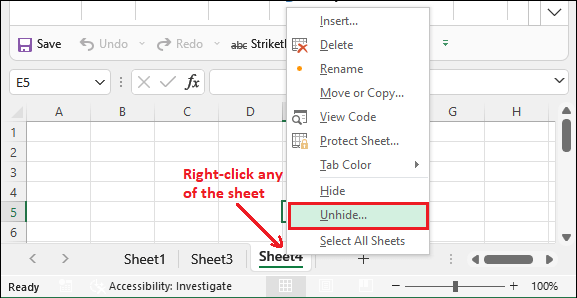
Step 2: A unhide panel will open where choose a sheet to unhide and click OK. 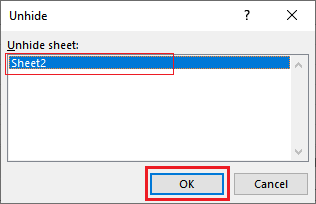
Step 3: See that the selected worksheet (Sheet2) that we hid in the previous steps is now visible. 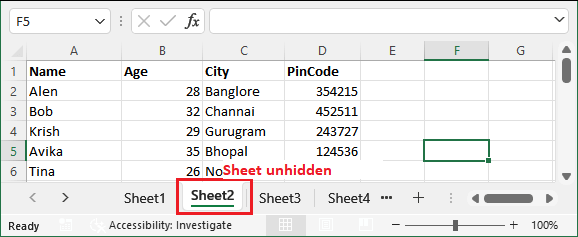
If more than one will be hidden, you can use this method. But this time, only one sheet was hidden because you have to select the sheet one by one to unprotect them. Tip: Shift/Ctrl + Click does not work here for multiple selection. This method works well when you want to unhide a specific sheet instead of all. Unhide all hidden sheets at once The above specified method to unhide all hidden sheets one by one. So, we have another method (i.e., using VBA code) to unhide all the hidden sheets at once. This method is totally different than above one. You have to code a small VBA code in the Excel visual studio and run it as a macro to unhide all the hidden sheets. Look for this method and VBA code how it works - Step 1: Take an Excel workbook that has some hidden sheets. See that multiple sheets are there, but some of them are hidden. 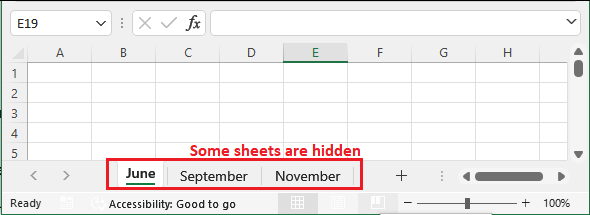
Step 2: Now, go to the Developer tab and click the Macro option here to create a new macro. 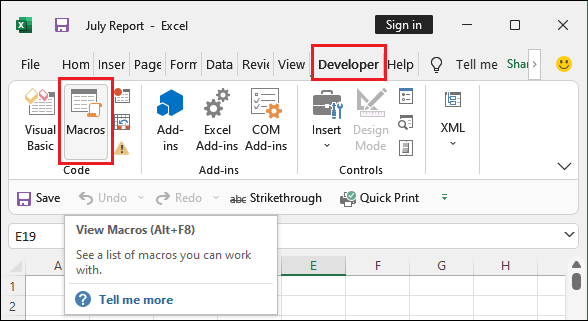
Step 3: Named the macro name, i.e., UnhideAllHiddenSheets and click the Create button here. 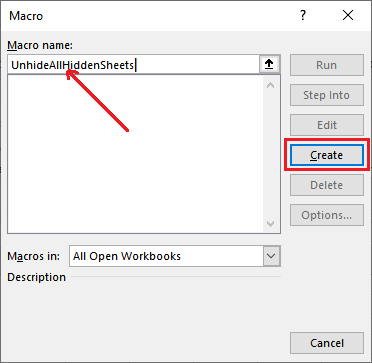
Step 4: A module is created automatically with some default syntax or VBA initial code. 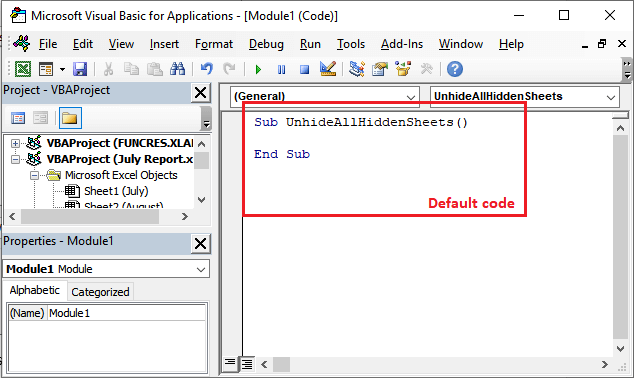
Step 5: Now, write the following two lines of code inside the default code provided by Excel visual studio and click the Run button to run the written VBA code. Dim sheet As Worksheet For Each sheet In Worksheets: sheet.Visible = True: Next sheet 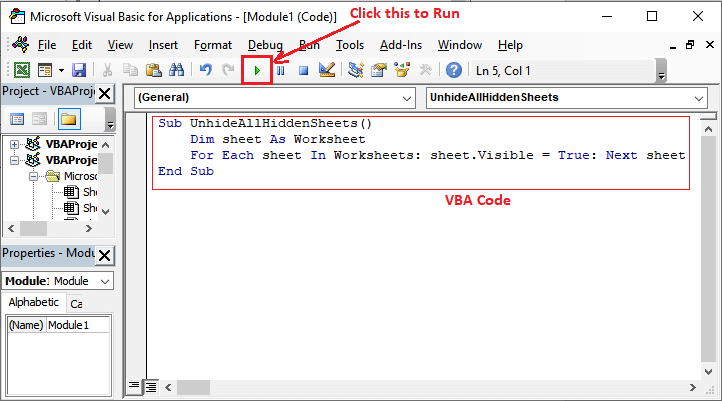
Step 6: A macro window will open where selected the macro that you had created to unhide sheets and click the Run. 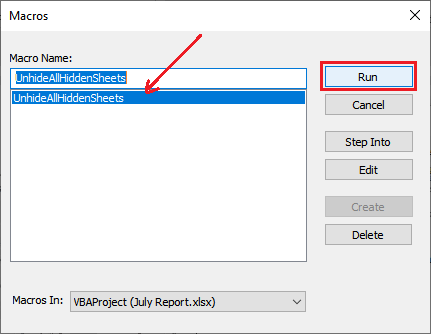
Step 7: Once you have done all the steps carefully, all your hidden sheets will be unhidden. See in the Excel sheet status bar that all the worksheets are visible now. 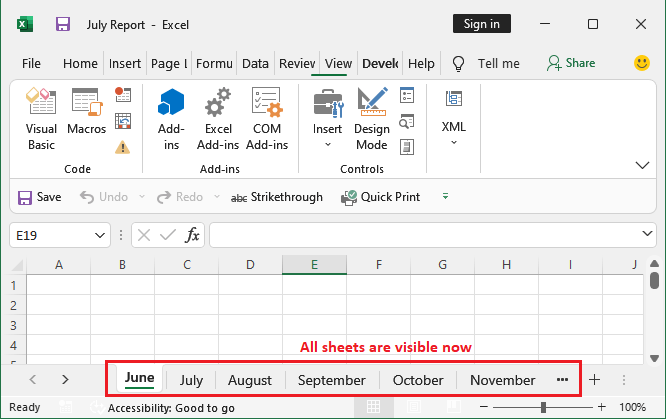
Close the Excel visual studio window and work with the sheet you want. By following these steps, you can unhide all the hidden sheets in an Excel workbook at once.
Next TopicWhat is Mod Function in Excel
|
 For Videos Join Our Youtube Channel: Join Now
Feedback
- Send your Feedback to [email protected]
Help Others, Please Share


